A month with no new post? That’s unacceptable. Since my last trip to Shenzhen, I actually have quite a few new ideas and projects to post about. The thing is there are so many of them that I don’t know which one to start with! Anyways, I’ve decided to put a stop to this. In this blog post, I will describe some work I did a little while back about implementing HID-class serial communication for AVR microcontrollers using the V-USB library.
Introduction
First, let me explain what I am trying to do. As you probably know, V-USB is a very useful software-only implementation of low-speed USB device for AVR microcontrollers. It adds USB functionality for almost any AVR, particularly for those without hardware USB functionality. With this, it’s possible to make a very low-cost standalone Arduino with USB port and without having to use an FTDI chip. I know there is the Arduino Leonardo, which is based on ATmega32u4, and which has hardware-based USB functionality. But mega32u4 only exists in SMT package, and it’s more expensive than mega328 after all. Besides, I am fully embracing the ‘I do it because I can’ spirit, and this is actually a great motivation for me to learn about V-USB.
What do I need the USB for? Mostly for two reasons. One is to flash a program to the microcontroller, so it needs a USB-based bootloader. For this, there is a very nice open-source project called USnoobie, which can bootload mega328 as a USBasp programmer. This way you can flash a program through the USB port directly, without using a serial cable or an external AVRISP programmer. So this is all good.
The second reason to have USB is for serial communication — the ability to transfer data (e.g. strings) in and out between the device and a host computer through the USB port. This is useful especially for debugging (i.e. printing values to a serial monitor), unfortunately this feature is missing in most V-USB projects. There are some related projects. For example, I came across the AVR-CDC project, which turns a mega328 into a CDC-class USB-serial converter. But there seem to be some limitations of using V-USB to implement CDC (i.e. violates USB standard), and also CDC-class devices require installing a driver on Windows. I would like to make a HID-class USB device which does not require driver installation. So overall I didn’t find any available resource that I can use directly.
Circuit Design and V-USB
Now I’ve explained the motivation, let’s see how to go about implementing it. The first step is to learn to use V-USB. I started with the EasyLogger project downloaded from the V-USB website. It is based on the tiny45 mcu. The program reads a sensor (e.g. temperature or light) and presents itself as a USB keyboard to print out the sensor values to a host computer. This is an excellent starting point for me because USB keyboard is a standard HID-class device, and the project is simple enough that I can easily learn and make modifications.
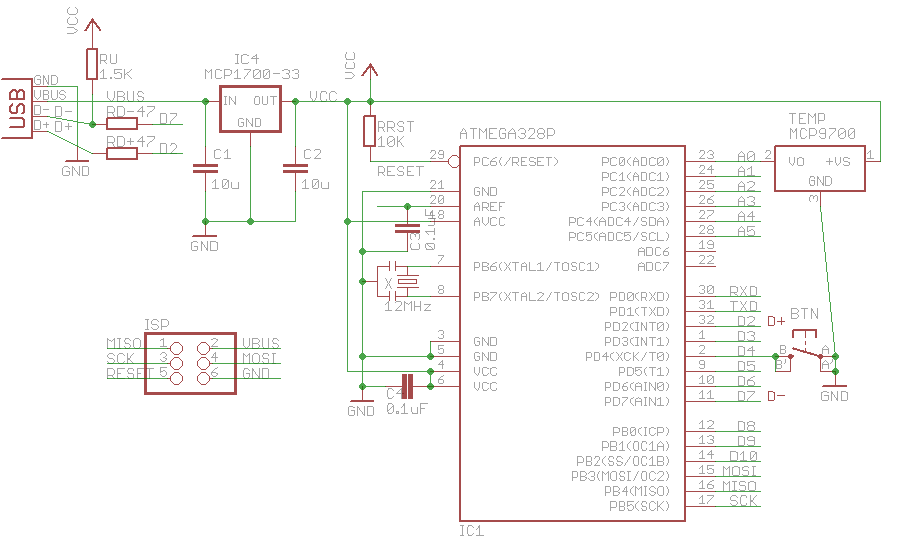
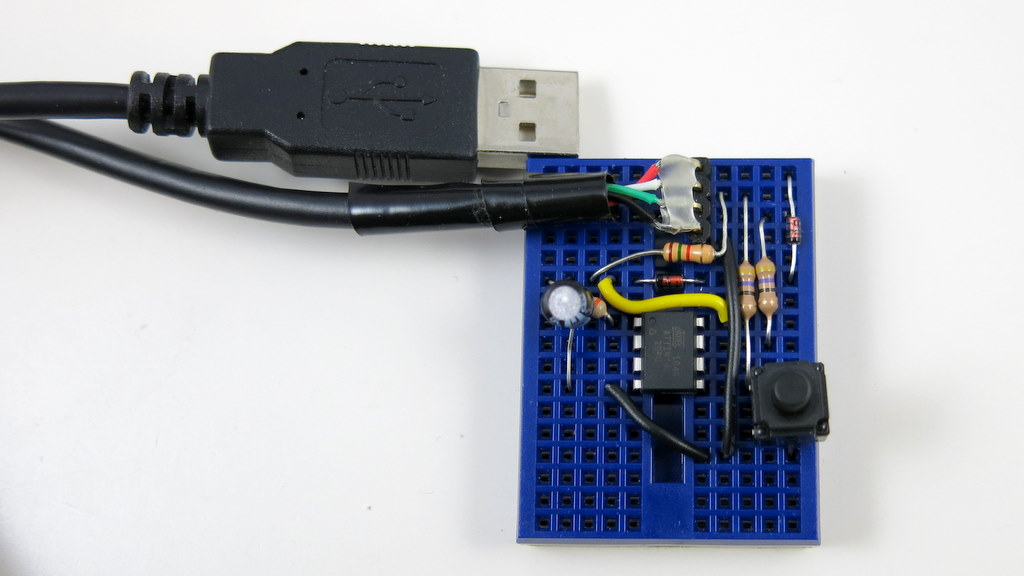
To adapt it to mega328, I first made a circuit based on USnoobie. Here is the schematic and my build of the circuit on a breadboard:
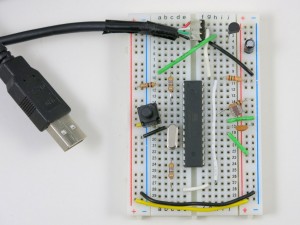
It’s a pretty standard V-USB setup. I assigned digital pin PD2 (INT0) to USB D+, pin PD7 to USB D-, and PD4 to a pushbutton. The pushbutton is used to enter bootloading mode. Specifically, if the button is pressed when the circuit is powered up, the bootloader is activated and the mcu will appear as a USBasp programmer. Different from USnoobie, I’ve decoupled this button from the D- line, so that I can use the button for general-purpose input (otherwise pressing the button will trigger the D- line). This requires changing the USnoobie code slightly to use pin PD4 for bootloading condition. Finally, I’ve also added a MCP9700 temperature sensor (you can replace it by any analog sensor such as photosensor) to analog pin ADC0 for testing later.
The next step is to modify the source code. First, change usbconfig.h to match the D+ and D- pin settings, specifically the following three macro defines:
#define USB_CFG_IOPORTNAME      D
/* */
#define USB_CFG_DMINUS_BIT      7
/* */
#define USB_CFG_DPLUS_BIT       2
/* */
Next, modify main.c. This step is pretty technical and tedious. It mainly involves changing register names to match mega328 (since the code was originally written for tiny45). Also, the calibrateOscillator(); function can be removed as the mega328 will be running on an external 12MHz clock.
I also modified the Makefile in order to compile and flash the code for mega328. After a few tweaks here and there, the EasyLogger started working on my mega328! It can successfully output numerical values to a text editor through the USB port. This is very encouraging. If these steps don’t make much sense, you can take a look at the code below, and give it a try yourself.
Learning HID
HID stands for Human Interface Device. It’s a USB class designed primarily for keyboard, mice, joystick, and similar human interface devices. The nice thing about HID is that it’s supported on all operating systems. For example, on Windows, the system uses built-in HID driver to handle USB requests, so no driver installation is required. This is why when you plug in a keyboard or mice, you never have to install a driver (imagine how annoying it would be if you had to!).
To implement HID, you first will need to construct a HID descriptor, which describes the number of reports, and the size, meaning, and (optionally) value range of each report. For example, these reports can be the ASCII code of the pressed key, the x and y offsets, and button presses of the mouse. There are also more general-purpose reports like a buffer of bytes. This is what I will be using to transfer bytes in and out between the device and host. To be honest, the whole USB descriptor thing was very obscure to me in the beginning. I didn’t know if there is one correct way to define it, or it can be flexible. As it turns out, Linux is pretty forgiving about it, but Windows is not. After many trials and errors, I finally settled with this HID descriptor:
PROGMEM const char usbHidReportDescriptor[USB_CFG_HID_REPORT_DESCRIPTOR_LENGTH] = {    /* USB report descriptor */
    0x06, 0x00, 0xff,              // USAGE_PAGE (Generic Desktop)
    0x09, 0x01,                    // USAGE (Vendor Usage 1)
    0xa1, 0x01,                    // COLLECTION (Application)
    0x15, 0x00,                    //   LOGICAL_MINIMUM (0)
    0x26, 0xff, 0x00,              //   LOGICAL_MAXIMUM (255)
    0x75, 0x08,                    //   REPORT_SIZE (8)
    0x95, 0x08,                    //   REPORT_COUNT (8)
    0x09, 0x00,                    //   USAGE (Undefined)
    0x82, 0x02, 0x01,              //   INPUT (Data,Var,Abs,Buf)
    0x95, HIDSERIAL_INBUFFER_SIZE, //   REPORT_COUNT (32)
    0x09, 0x00,                    //   USAGE (Undefined)
    0xb2, 0x02, 0x01,              //   FEATURE (Data,Var,Abs,Buf)
    0xc0                           // END_COLLECTION
};
It contains an outgoing buffer of 8 bytes (to transfer data to the host) and an incoming buffer of 32 bytes (to receive data from the host). As I said above, Linux is pretty flexible about the descriptor — you can change it in many ways and it still works. Windows, however, is very strict — if you are not careful, it will simply refuse to recognize the device.
The next step is to write functions to handle the USB requests. For transferring data out, I used the usbSetInterrupt function, which allows sending data spontaneously to the host (i.e. whenever the device has something to report). (I should mention here that I wrote the code as an Arduino library called HIDSerial. So everything gets compiled in the Arduino software. You can certainly use avr-gcc to compile the code as well). I made HIDSerial an inherited class from Arduino’s Print class, so I can make use of the many available print functions (e.g. print a string, an integer, a floating point) in the class for serial printing need, without writing extra code. For transferring data in, I implemented the usbFunctionWrite function, as described in the V-USB Document Wiki.
Now, before I can test and debug the code, I need to have some minimal host software to communicate with the device. That’s what I will be describing next.
Write Host Software using Processing
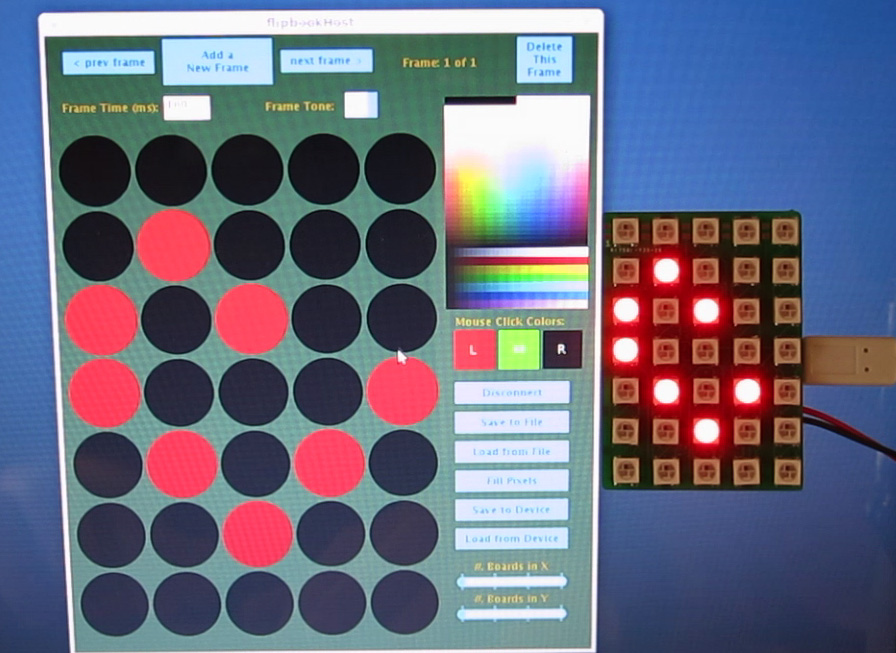
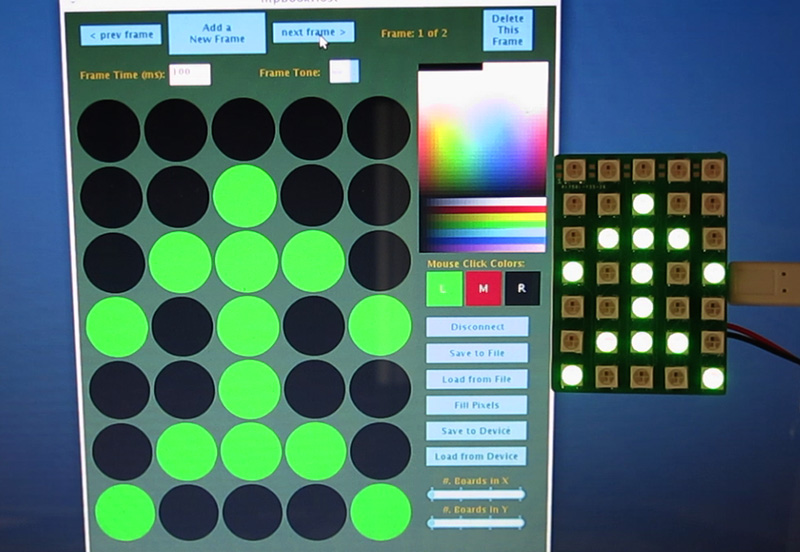
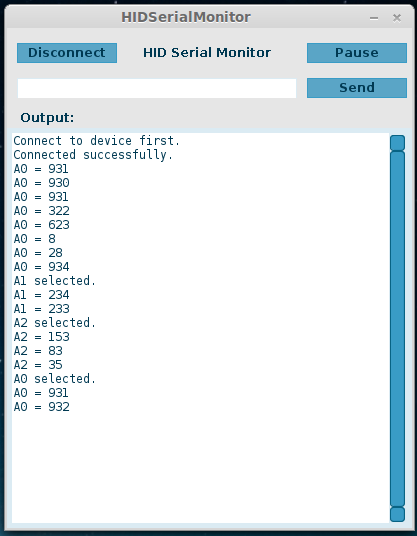
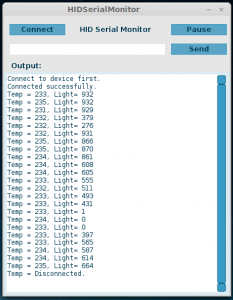
Going the HID route means the device will not appear as a standard serial COM port, so you can’t use the standard serial monitor to send and receive values. Instead, I will have to write host software myself. I can certainly do this in C or Java. But since I want to make the host software cross-platform, I have chosen to implement it in Processing, which allows me to easily export the program as standalone applications on all platforms. Long story short, to do this, I used HIDAPI library. It has all the goodies to handle communications with HID devices, such as finding a device, opening the device, reading from the device, and sending feature report to the device. Also, using the G4P library, you can easily build a GUI with buttons and text fields, and make the interface just like a standard serial monitor. Once the software is finalized, I can simply click on ‘Export Application’, and select all three platforms, and voilà, the host software is all set! Below are two screenshots of the HID serial monitor:

Source Code
The source code of this project is available for download on my GitHub repository:
You can either do a git clone, or directly download the project as a zip file (see the Download .zip button on the right-hand side of the page). The folder contains circuit schematic, part list, Arduino library (HIDSerial), host software (HID serial monitor), and bootloader (optional, but recommended as it allows you to re-flash the microcontroller through USB, without any external programmer). The Arduino library consists of several starting examples, which are also demonstrated in the video above. I am sure there are bugs and issues with the code, but please feel free to leave comments and feedback below, in order for me to improve the code.
Limitations and Issues
The biggest limitation of this implementation is the data transfer speed — it’s much slower compared to a standard USB-serial converter. This will be an issue if you need to pump out data as fast as possible. But I figured that for the purpose of debugging, the transfer speed is usually not that critical. The software works pretty reliably in Linux, but I’ve found that on Windows, the host software starts to lose data after running for a while, so not all data get transferred correctly. Resetting the microcontroller and restarting the host software seem to get it back to work. I am still investigating the cause of this issue. It may still have to do with Windows being very strict with USB communication protocols. Perhaps the USB experts can take a look at the code and point me in the right direction.
Adapting the Code to Other AVRs
It’s relatively easy to adapt the code to other AVRs. For example, ATtiny45/85 is a popular V-USB platform, since it’s small, cheap, and has internal oscillator that can run at 16.5MHz, which meets the USB standard (so it saves a crystal and frees up two pins). By changing a couple of pin assignments in the source code, I was able to get the HID serial functions to work on tiny45. I really should do it on tiny85, since tiny45 has only 4KB flash space (even a simple demo would take more than 3.5K flash space). Here is a picture of the tiny45 breadboard build. You can even program tiny45 in the Arduino software by following the descriptions here.

Thanks for reading the post. Feedback, comments, and questions are welcome.