An EagleCAD Script for Creating Laser-Cut Project Enclosures

When designing electronic circuits, often it’s necessary to have a proper enclosure for the project, to protect the circuit board and components, and for aesthetic reasons. There are several options to choose from. For example, if this is a one-off project, you can pick an off-the-shelf enclosure, make custom cutouts to fit the PCB and its buttons, connectors etc. But you will be limited by the enclosures available on the market, and you have to design the PCB size and screw hole locations according to the enclosure, so it’s not very flexible. You can also use 3D printing to make a custom case that fits the PCB nicely, but 3D printing is generally slow, and cheap 3D printers have poor precision. If you are making a commercial product and need volume production, you can order an injection mold, and the injection-molded enclosure fits the circuit perfectly. But you have to spend costs thousands or tens of thousands of dollars to order the mold, and this upfront cost is too much for small-scale projects.

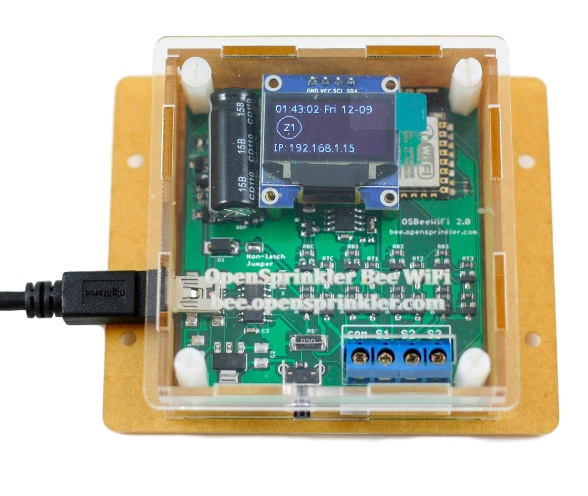
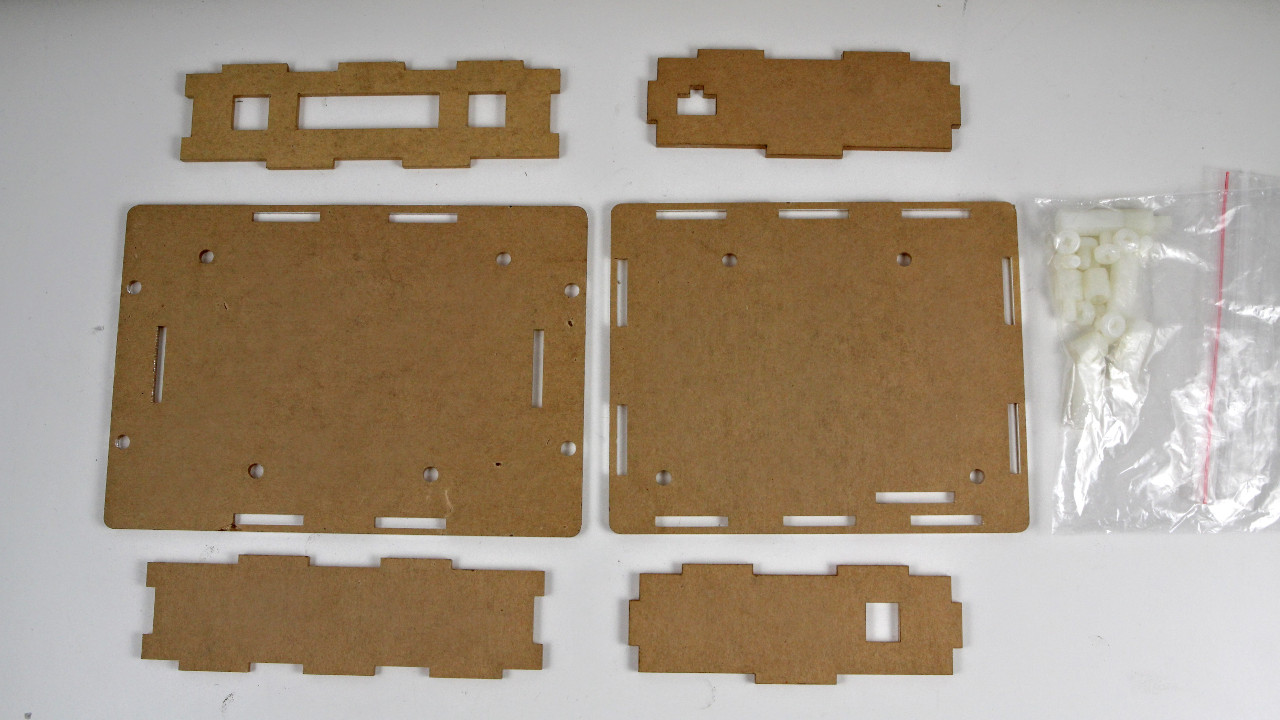
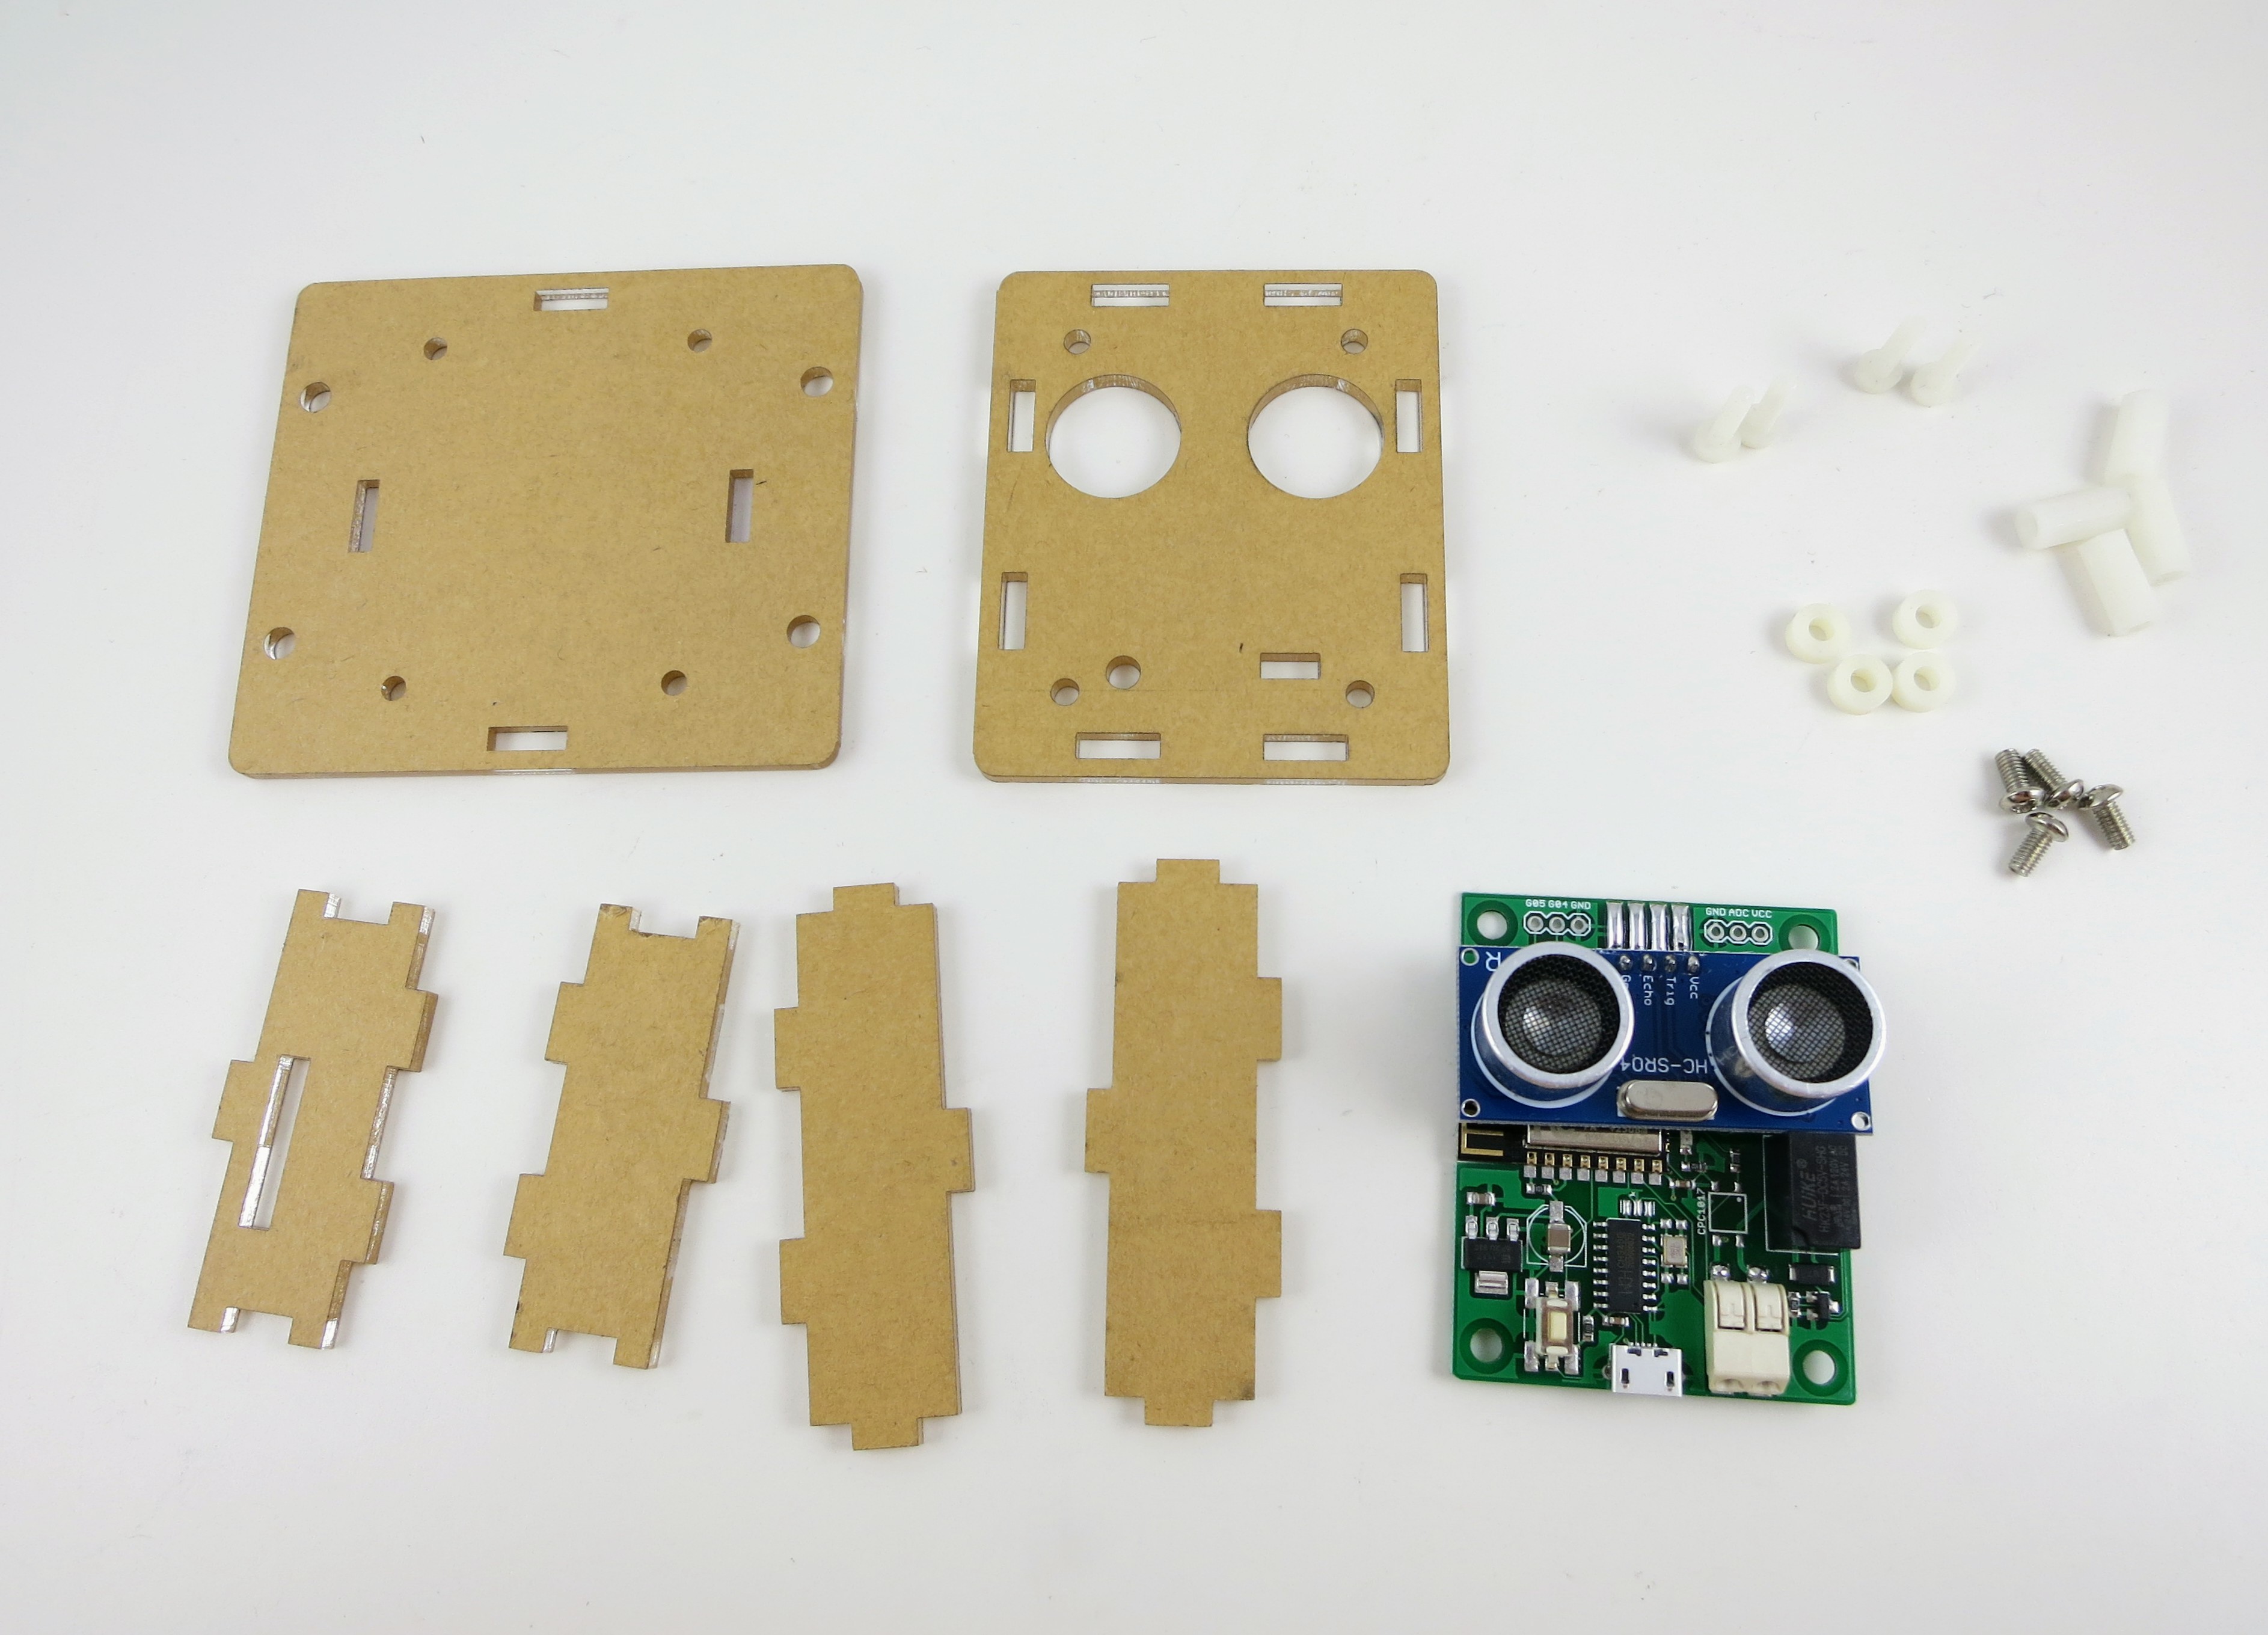
Since last year I’ve been experimenting a lot with laser-cut acrylic enclosures. Compared to the other options, laser-cut enclosures are very easy to customize for the particular PCBs I have designed; they are relatively cheap and fast to make, you can add text engravings to them, and there is no upfront cost. So I have been using laser-cut enclosures a lot for a variety of electronics projects. Generally speaking, the enclosure consists of six pieces of laser-cut acrylic panels, with teeth and holes on the side to lock them together and form a box. You can use plastic or copper screws and pillars to secure the PCB inside the box. As a side benefit of this type of enclosure — if you happen to make a mistake on one panel (which I did a few times), you can just re-order that particular panel so it’s very easy to re-design and correct the mistake.

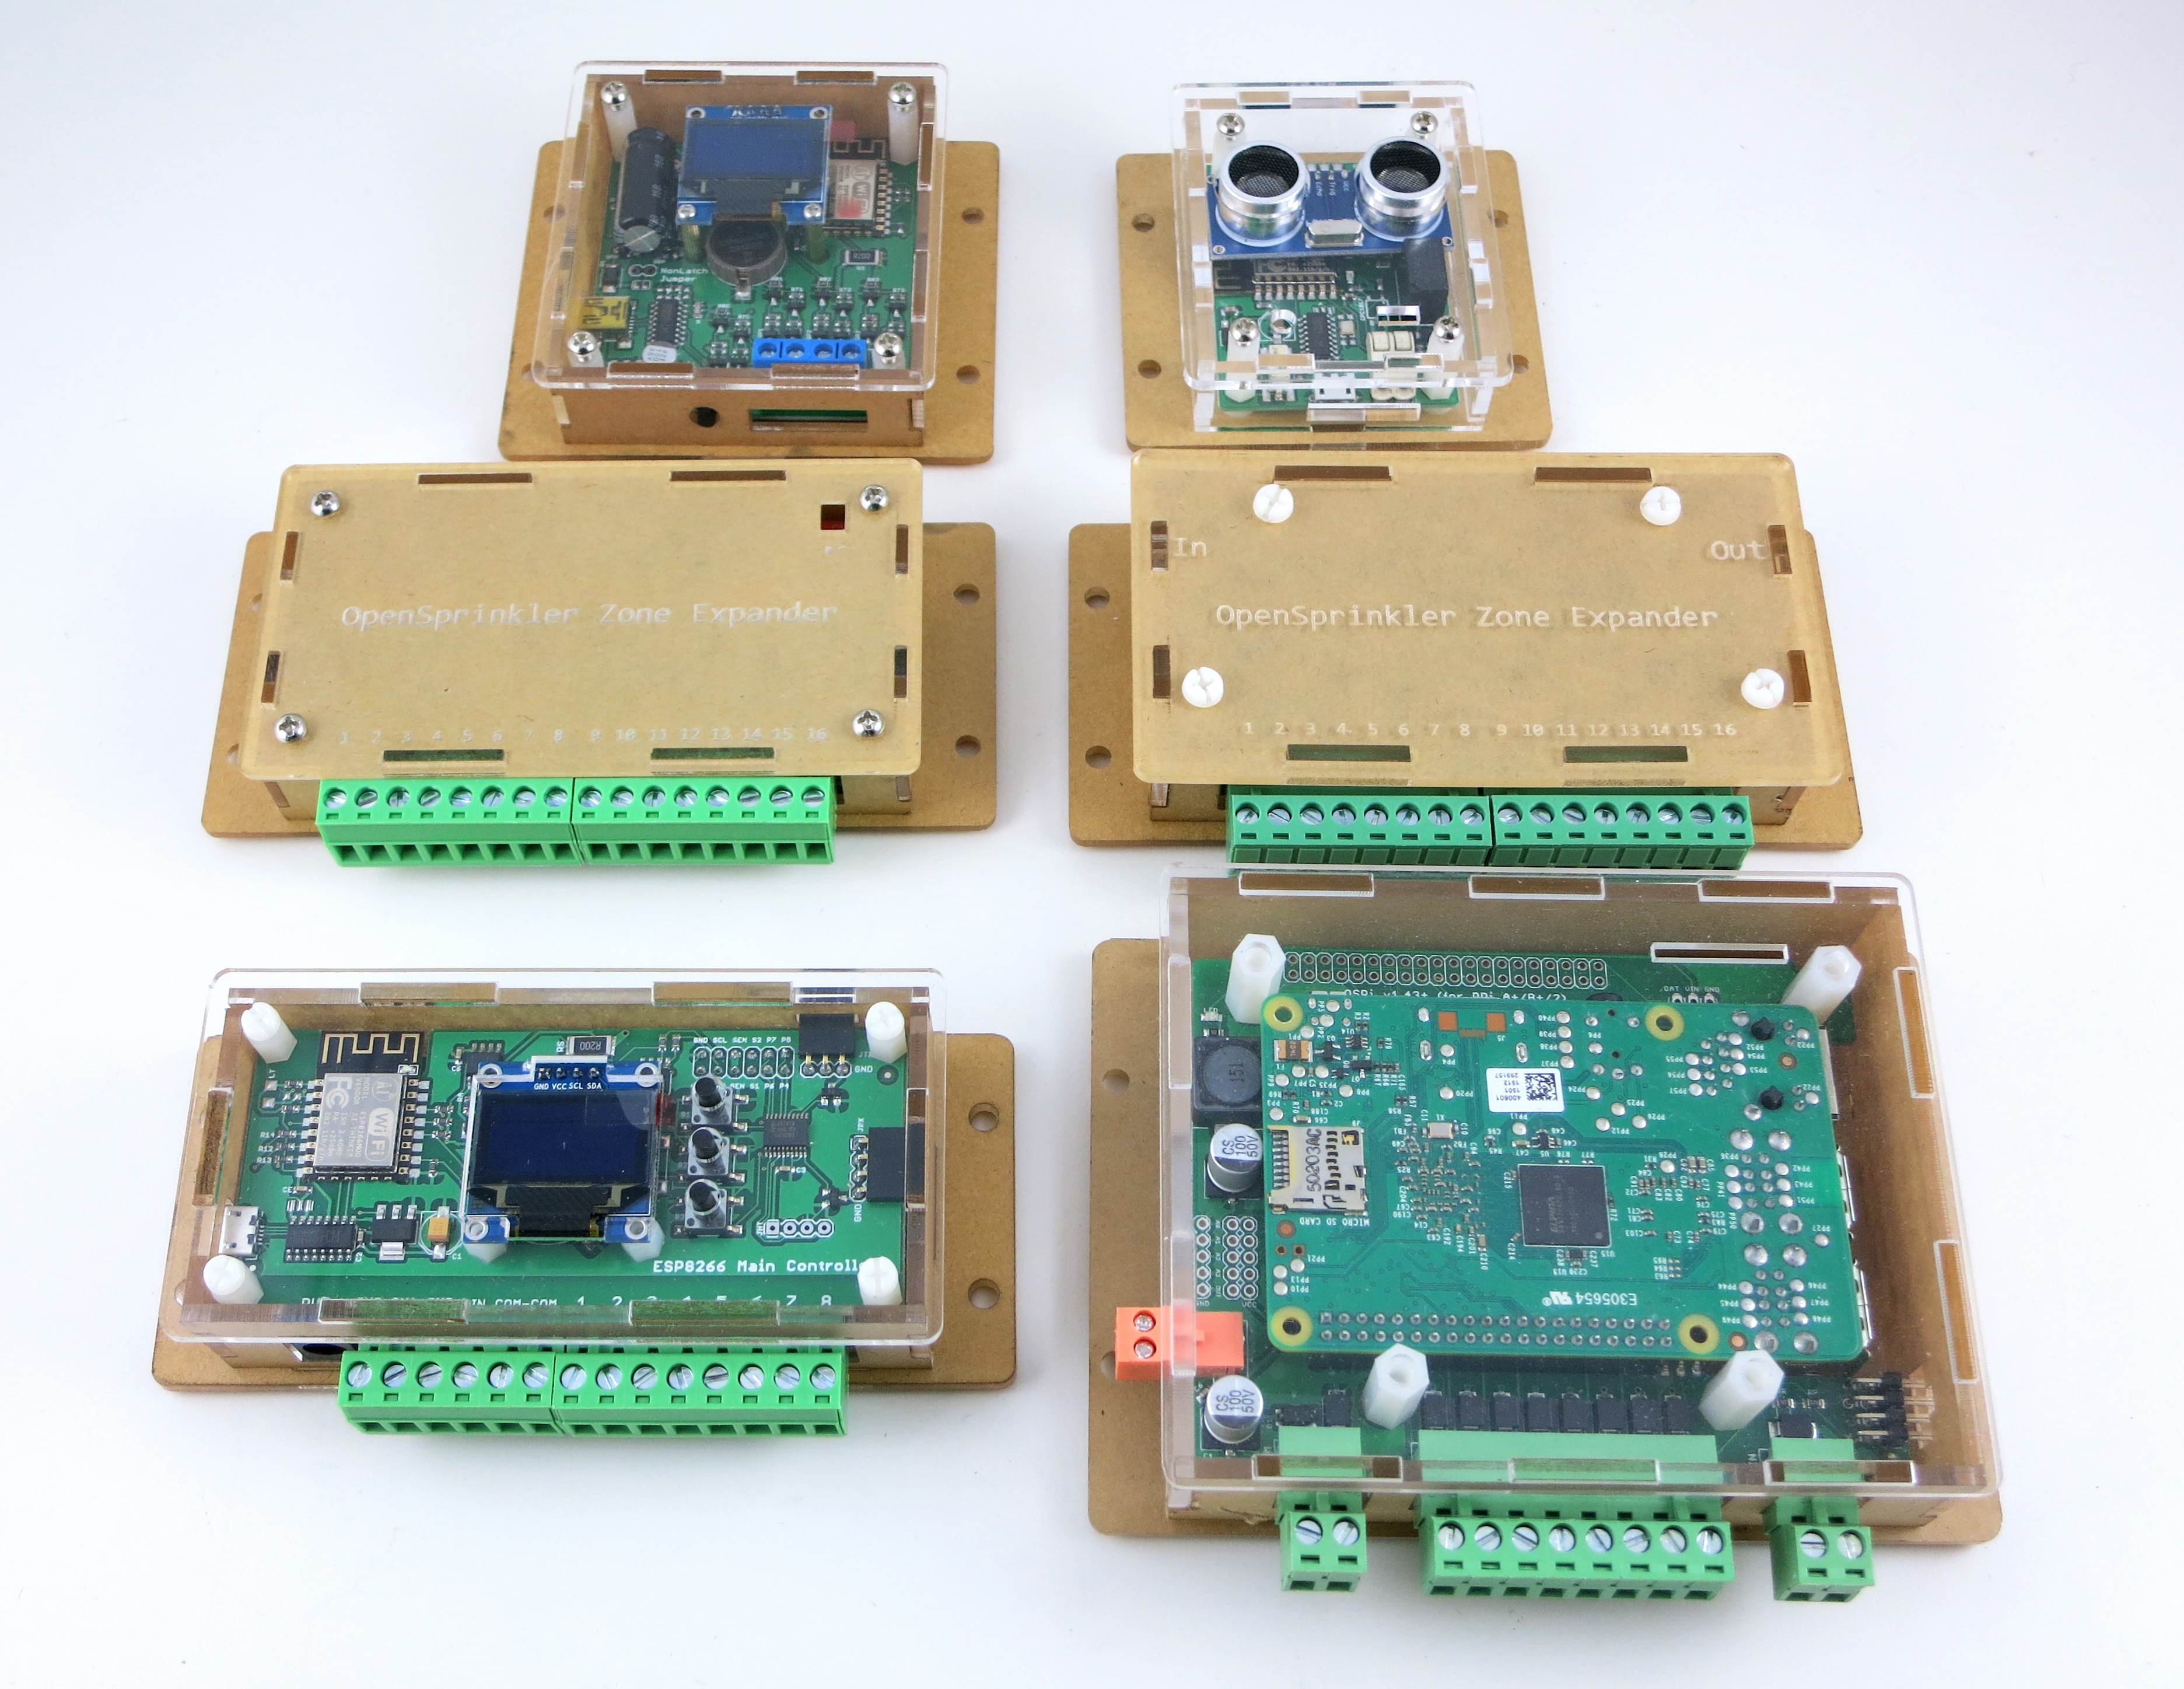
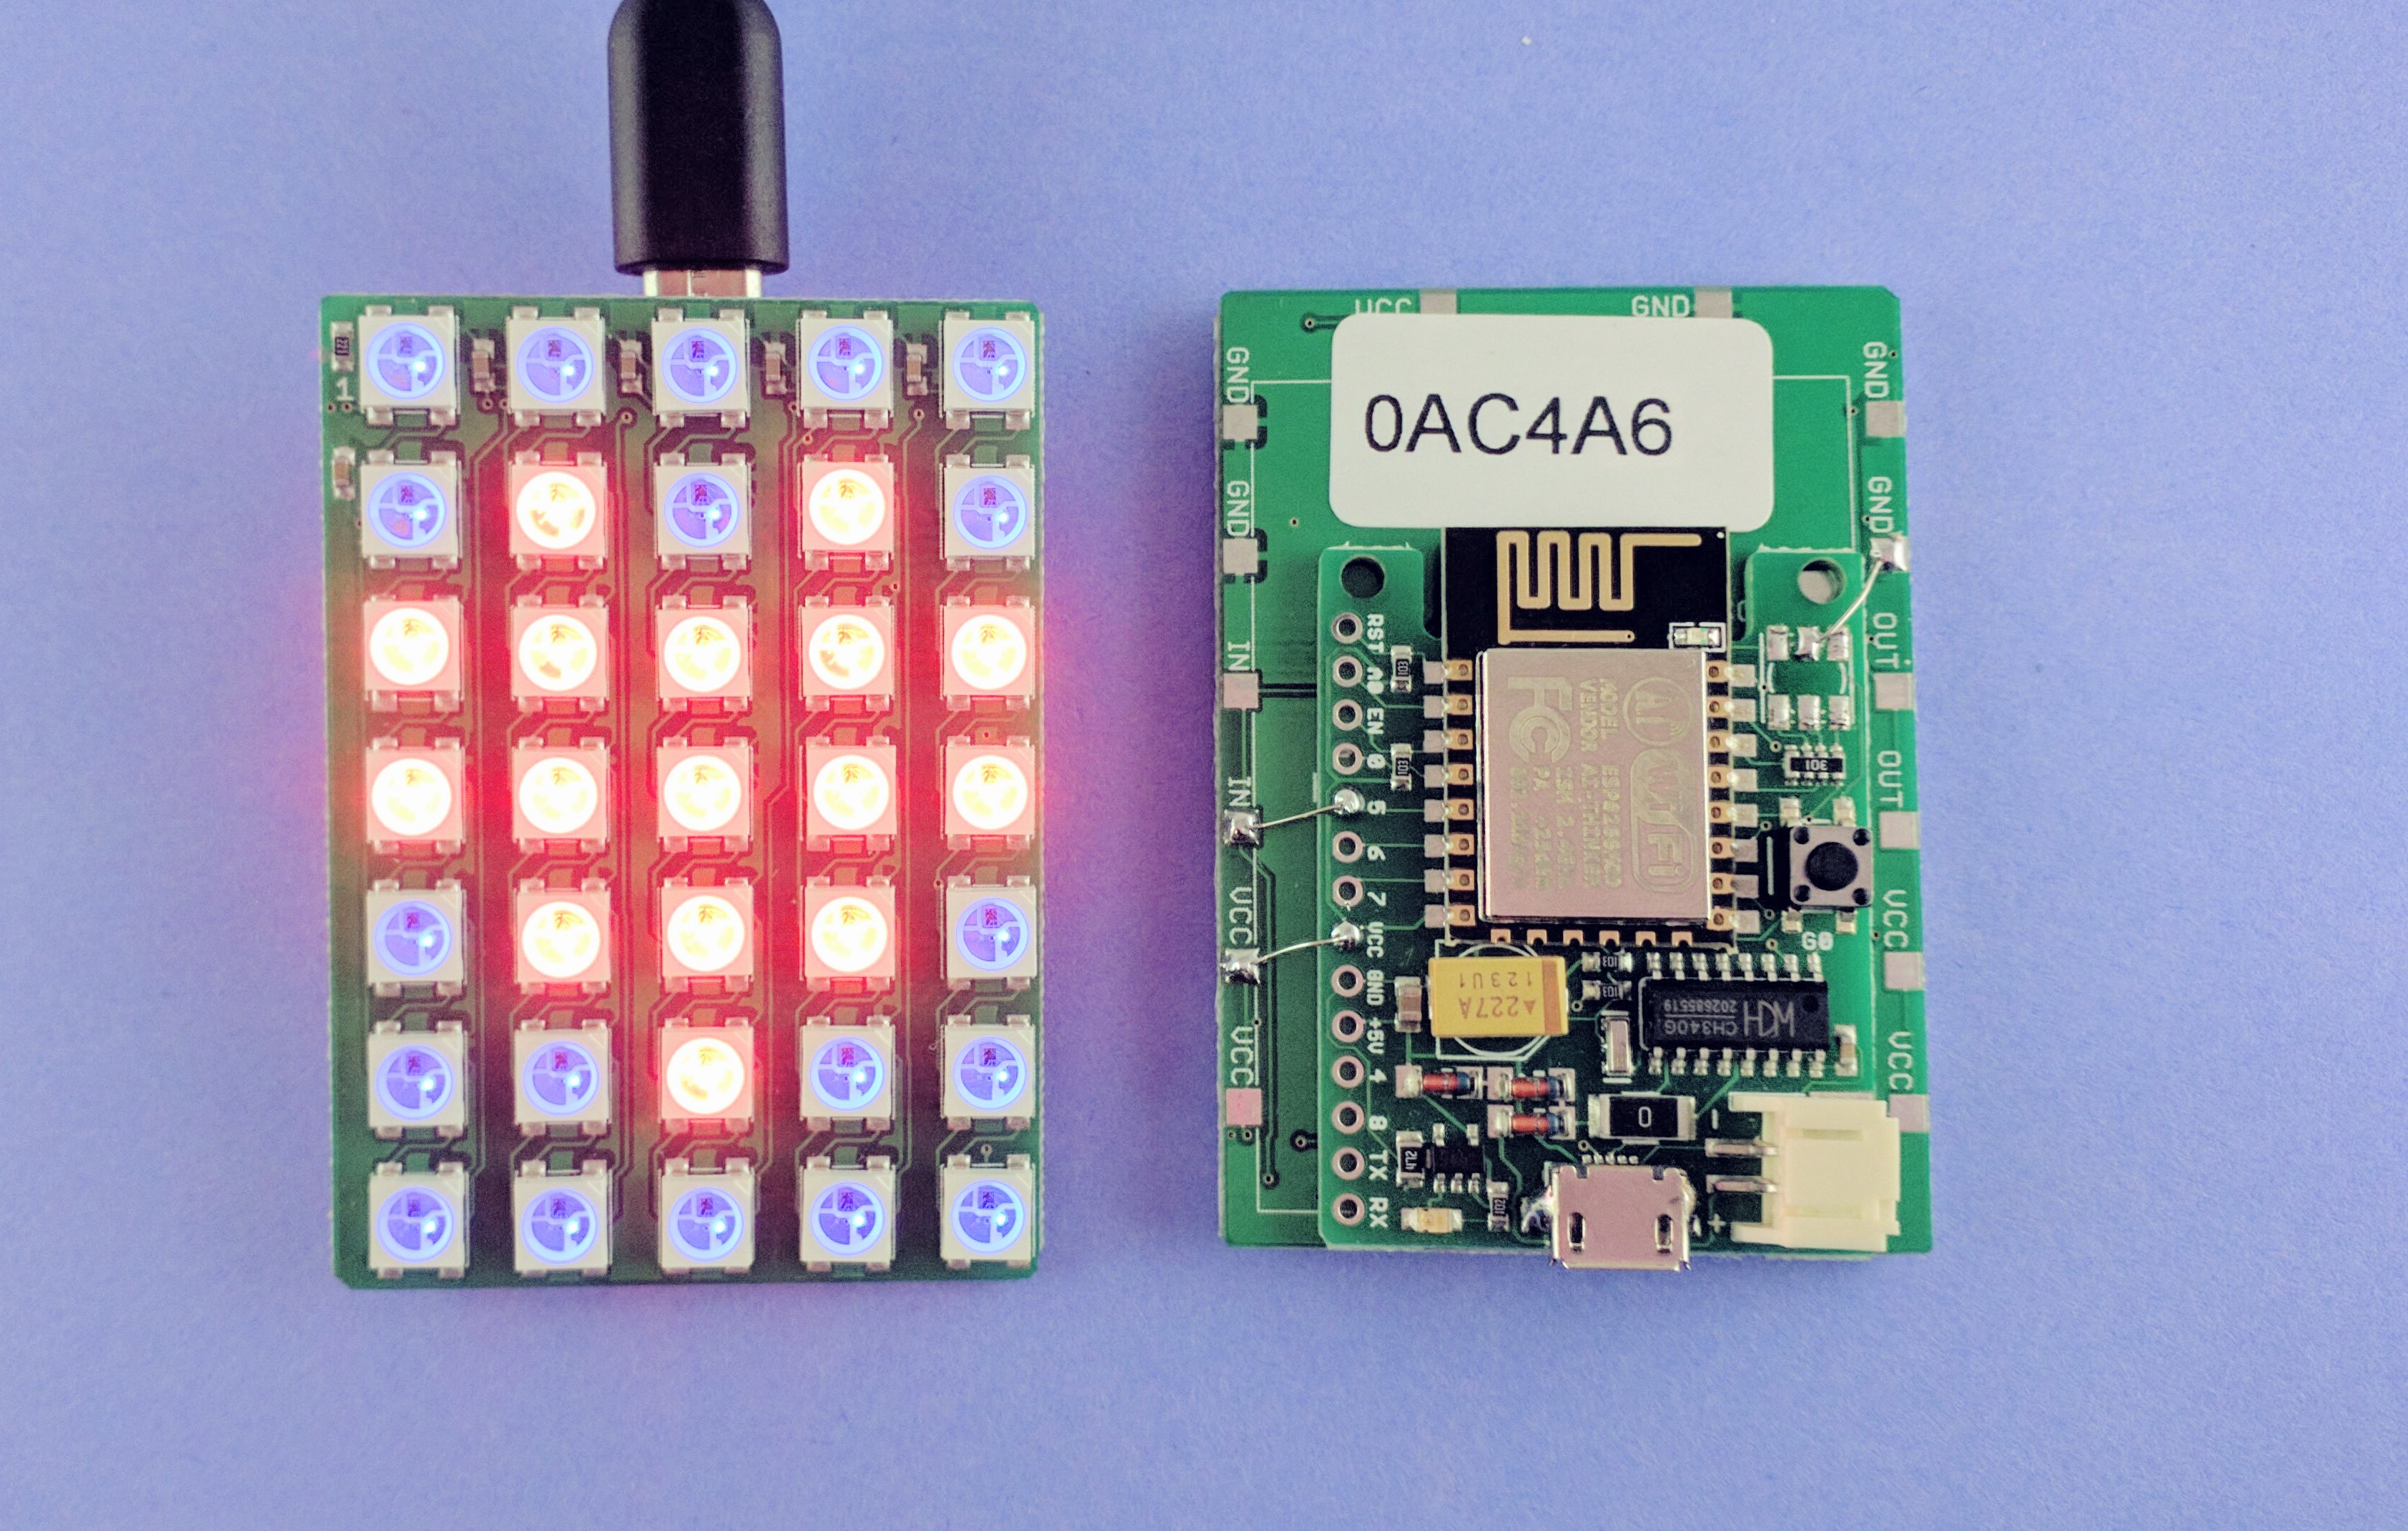
When I started, I found some tutorials and design tools online, to help create the six panels. But they are not really convenient or easy to work with. Because I routinely use EagleCAD to create my circuit boards, it would be really nice to have a enclosure design tool inside EagleCAD, so that I can compare the enclosure with the PCB precisely, making sure that all the cutouts are in the correct locations and have correct sizes. So a little while back, I wrote an EagleCAD script to help me create laser-cut enclosure panels, and used it to create a variety of project enclosures, as shown in the picture below.

Below I will briefly walk through the details of the script, what the various parameters mean, and I made a video to demonstrate how to use this script. To begin with:


Video Tutorial


Explanation of Parameters

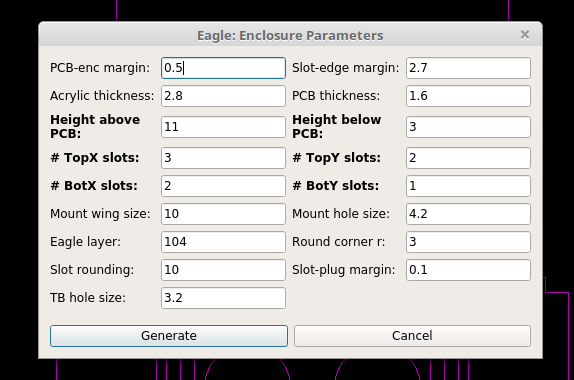
The way this script works is that it follows the dimensions of your PCB outline to create the six panels. It assumes the PCB is rectangular shaped, but if needed you can modify it to support non-rectangular shaped PCBs. There are a number of parameters you need to set, which I will briefly walk through below. Most of them are best explained by the annotated images below. All parameters of lengths are of unit millimeter (mm).

  • PCB-enc margin: the margin from PCB border to enclosure interior border.
  • Slot-edge margin: the margin from the slot boundary to enclosure edge.
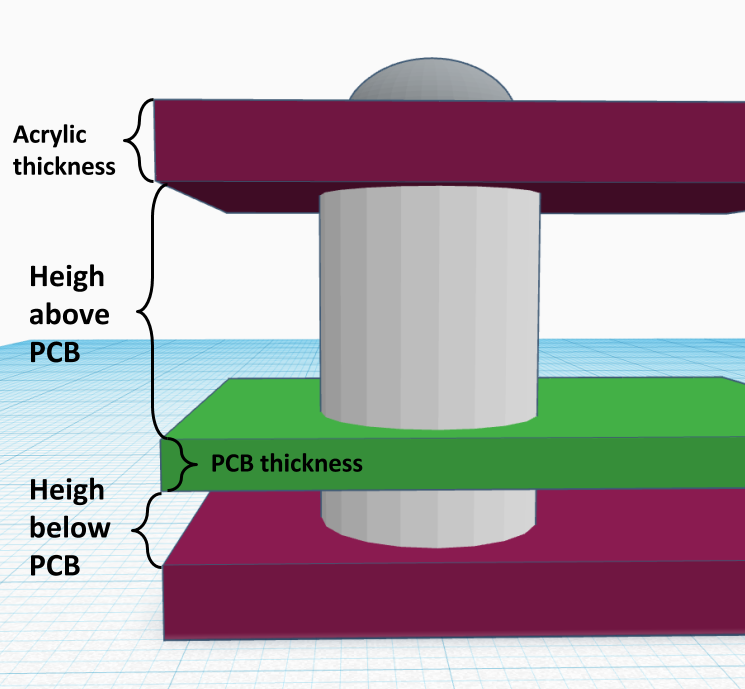
  • Acrylic thickness: the common acrylic material I’ve used are either 2mm thick or 3mm thick. You may have to adjust this slightly according to your supplier’s acrylic material thickness. You may want to make this slightly larger (like 2.1mm and 3.1mm respectively) to account for error and variations in the actual material.
  • PCB thickness: standard PCB thickness is 1.6mm, but there are other choices too, like 1mm, 1.2mm, 2.0mm etc.
  • Height above/below PCB: this defines how much space there is above and below the PCB (NOT including acrylic). The ‘above’ height depends on the tallest component on your PCB. The ones I commonly use are 11mm and 13mm. The ‘below’ height is typically 3mm, to provide spacing underneath the PCB for through-hole components.
  • Top/Bot X/Y slots: define the number of slots on the top/bottom panel and in the x/y directions. The number of slots depend on the length in x or y: longer edges probably need more slots. Also I generally make the number of slots on the top and bottom panels different, to make it easy to identify the orientation of the side panels.
  • Slot rounding: this will round the slot size to the nearest (ceiling) multiple of the slot rounding number. The slot size is automatically computed based on the number of slots. If you want the slot size to be rounded to the nearest multiple of 10, for example, you can set slot rounding to 10.
  • Mount wing/hole size: if you need the back panel to be wall-mountable (which is generally the case for my boards),
    you can define the width of the wing and mount hole size (diameter).
  • Round corner r: radius of the rounded corners.
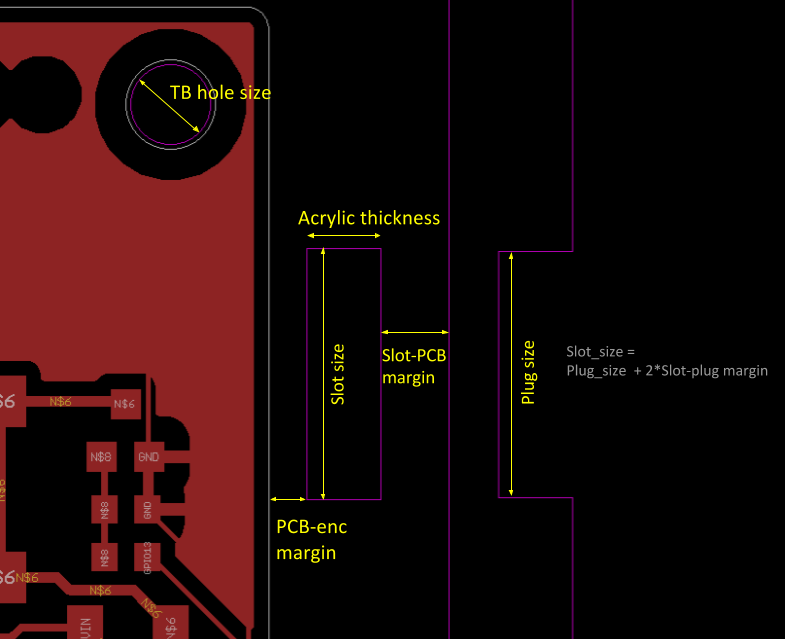
  • Slot-plug margin: this will shrink the plug size slightly to make it easy to insert into the slot. The default is 0.1mm but I suspect leaving it 0 is fine (because laser cut holes generally have negative error, meaning they are larger than design).
  • TB hole size: top-bottom hole size. This is set according to the size of screws/pillars you need. For example, if you plan to use M3 screws, set this to be slightly larger than 3.0; if you plan to use M4 screws, make it slightly larger than 4.0 and so on.
  • Eagle layer: defines which Eagle layer it uses to draw the enclosure. By default it uses layer 104.

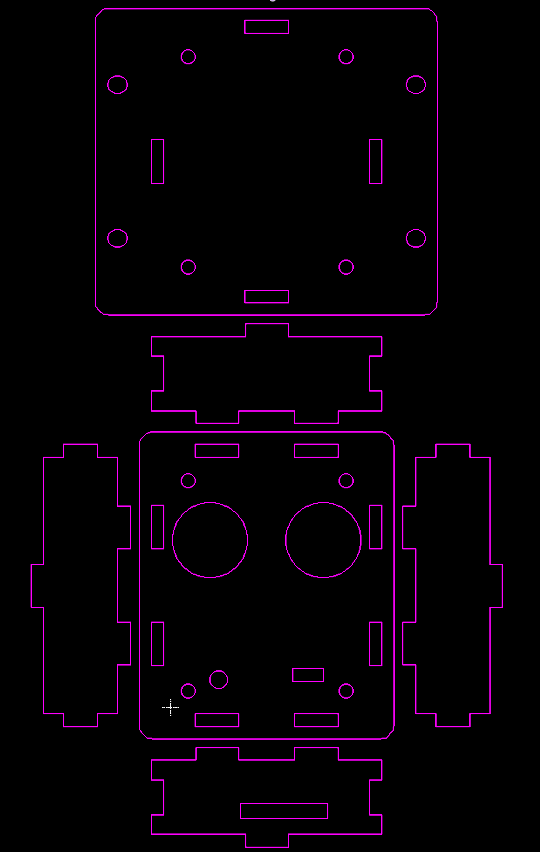
Running the Script: upon running the script, it will hide all layers except the Acrylic layer (104 by default). This allows you to see the overall enclosure design. You can go back and un-hide the other layers. If you re-run the script, it will remove the existing content on the Acrylic layer, and re-create the outlines. So be careful re-running the script — if there is anything you want to preserve (such as custom cutouts as explained below), you want to put them in a different layers so that they don’t get wiped out.

Annotated figures are more intuitive for explaining the parameters:

Creating Custom Cutouts and Text Engravings

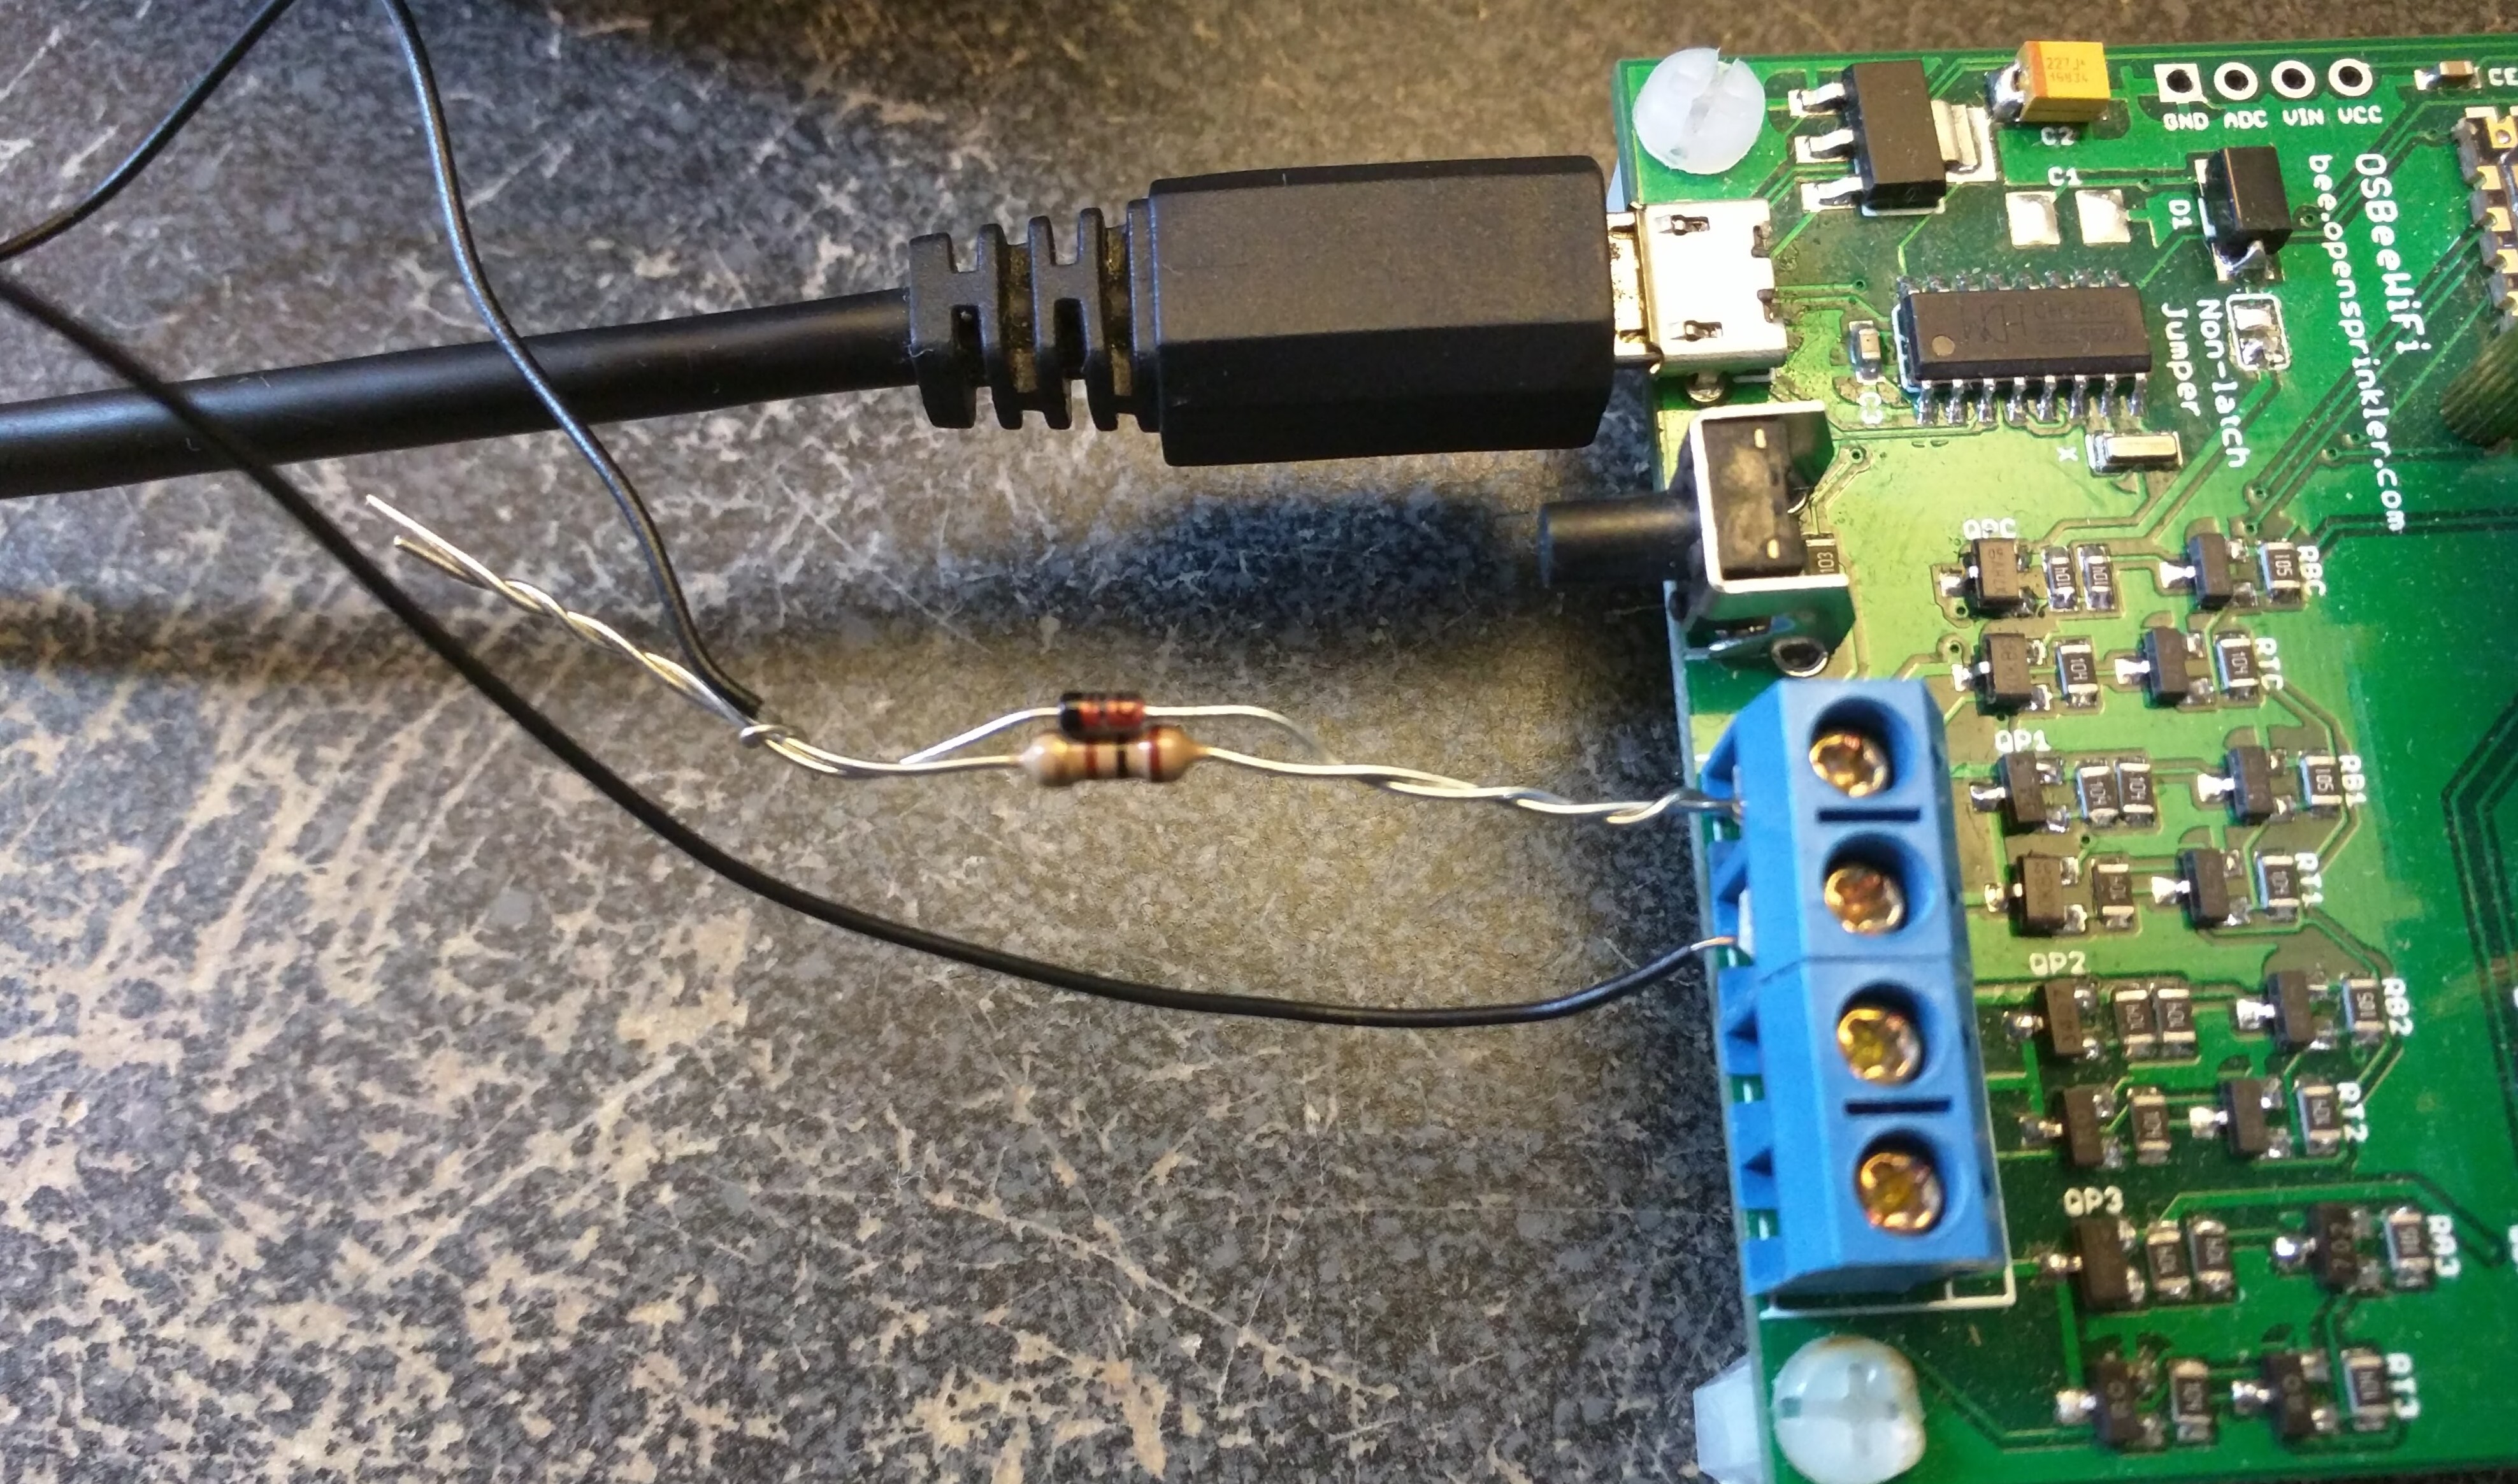
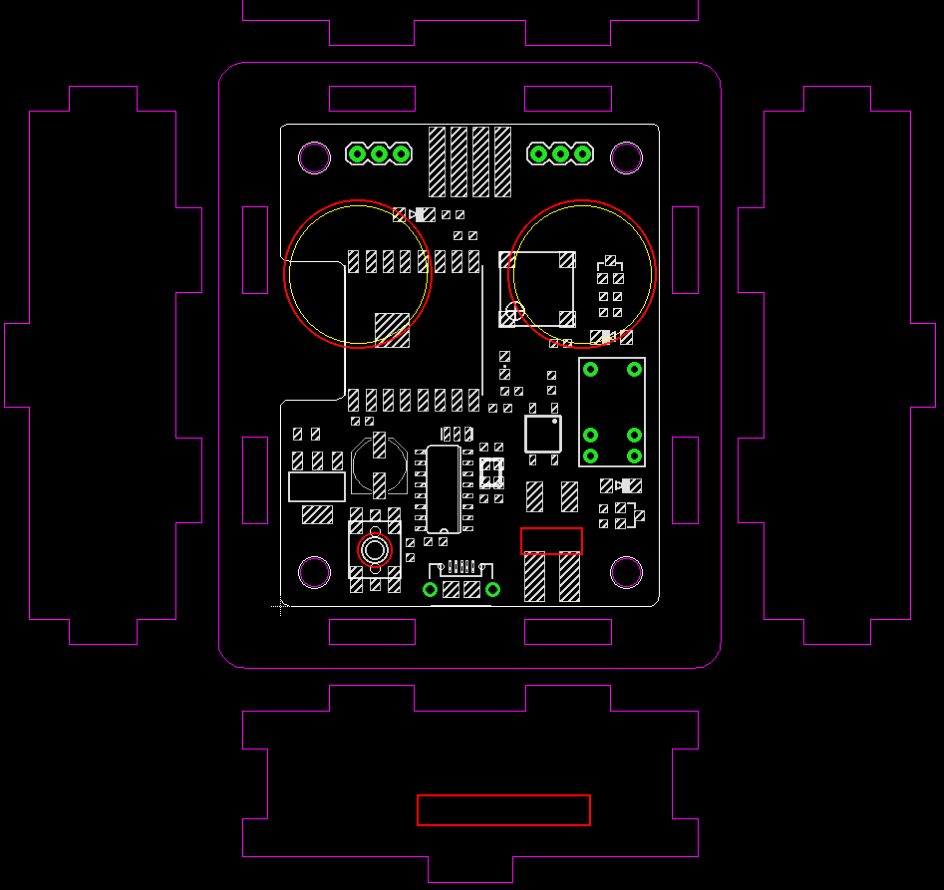
The script doesn’t automatically create cutouts for connectors, and that part you have to do it yourself. Still, having the enclosure outline embedded with the PCB design makes it easy to align the cutouts with the connectors. As shown in the last image above: the custom cutouts (colored in red) are embedded in the PCB design, so you can precisely align each cutout with its designated connector. I generally create the custom cutouts in a different layer, so that in case the Acrylic layer gets wiped out, the cutout layer is still preserved. You can also add text engravings — where I order acrylic pieces, they can add laser engravings for only a small amount of additional cost. So if I need any labels for the connectors, I can easily add them to the custom cutout layer and get them ordered as engravings.

Order Laser-cut Acrylic Pieces

Once the design is finalized, I place an order from a vendor on Taobao.com — the Chinese equivalent of eBay. To prepare the design for ordering, I export the Acrylic layer and Custom Cutout layer together into a DXF file in EagleCAD, then convert it to Adobe Illustrator (.ai) file, and send it to the vendor. I then specify the acrylic thickness, color (the most common is transparent, but there are a variety of other colors to choose from). Make sure the scale of the design is appropriate — Chinese vendors work with millimeter (Americans should too!), so make sure the design is scaled to the correct millimeter scale, which you can do easily in Illustrator.

Assemble the Enclosure

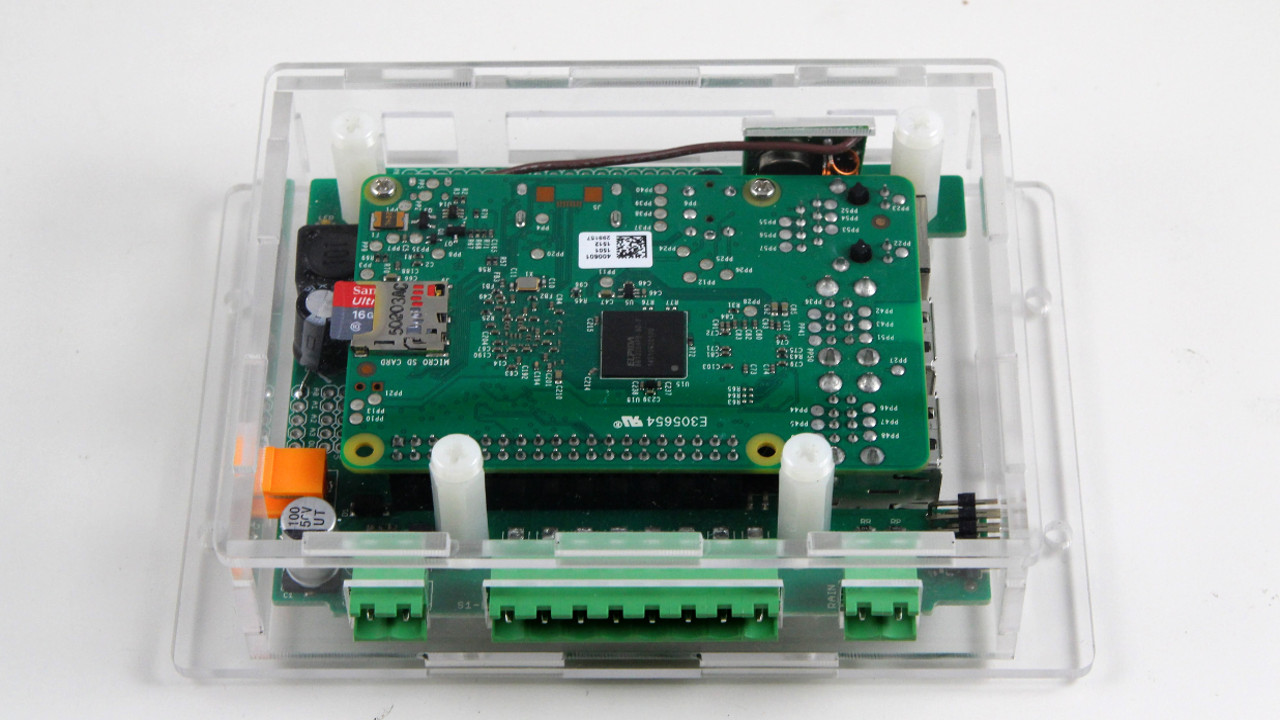
Assembling the enclosure is fairly straightforward: it involves a set of screws on the top panel and bottom panel, and separation pillars below the PCB and above the PCB. I generally like plastic screws and pillars as they are much lighter than iron or copper screws and pillars. The acrylic pieces come with a brown protective sticky paper cover. You can peel the sticky paper cover. If the acrylic material is transparent, you can see through the enclosure to the circuit board, which looks pretty cool. I generally only peel the top panel and keep the protective cover on the other panels, because peeling a lot of paper is tedious, and the brown paper cover gives a wooden appearance, which is not bad. So I keep them as much as possible. To peel the cover, it’s best to use another acrylic piece, or a stiff card of some sort to lift the cover from one corner, then carefully peel and remove the entire cover. Don’t use your nail as it can easily damage your nail. Acrylic is reasonably scratch-resistant, so using another acrylic to help peel it is totally safe.

The GIF below shows the assembly process:

Limitations and Todo for the Future

Perhaps the biggest limitation of laser-cut enclosure is the assembly time — putting all those screws and pillars together cost time and labor. But given that there is no upfront cost, it’s pretty suitable for small-scale projects, or serving as a temporary enclosure until you have a more permanent solution like an injection mold. In addition, for DIY-style projects, you can give the enclosure pieces to the customers and let them assemble the enclosure. It’s actually quite fun, kind of like the philosophy of Ikea furniture — its value is not only in the low cost but getting yourself involved in assembling the product provides a more engaging experience.

There are a couple of improvements I want to make to the script and I will try to work them out in the future. One is the ability to create a local file to store the parameters. At the moment if you want to re-design the enclosure for the same circuit, you have to manually remember what parameters you have used before — the script doesn’t remember the previous parameters because every time you run it, it will load the default parameters. It would be nice for it to store previous parameters for a particular circuit board to a local file, making it easy to modify in the future. Another improvement is providing visual aid to indicate where the PCB is located on the side panels, to make it easier to design cutouts for connectors etc. Right now to create cutouts I still have to do a lot of hand calculations, which can be automated in the future.

That’s it. Feel free to try it out and let me know what you think. If you make modifications to the script and improve its features, please be generous to share your contributions!

How to Switch Gardena 1251 Latching Valve using OpenSprinkler Bee (OSBee)

Recently when helping a customer, I came across an interesting case of how to control Gardena 1251 latching solenoid valve using OpenSprinkler Bee. This valve is mostly sold in the European market and isn’t very popular in the US market. On spec, it’s operated using a single 9V battery, and to use this valve you need to buy a Gardena 1250 controller unit. The whole assembly including the valve and controller unit are quite pricy (close to 100 bucks), so it’s not a very cost-effective solution compared to other brands. Nonetheless, it’s an interesting case that helped me understand how these latching solenoids work.


Measure the Control Voltages

The initial request to look into this valve was due to the fact that OSBee can’t seem to operate this valve correctly: it can open the valve but never manages to close the valve. This was reported by a German customer, and it caught my curiosity. To figure out the issue, the first thing I did was to check how the control unit (1250) is sending out control voltages to the valve. It’s pretty common that when operating latching solenoid valves, the control circuit sends an impulse voltage to open the valve, and another impulse voltage in the reverse polarity to close the valve. On most solenoid valves I’ve seen, the two impulse voltage (of opposite polarity) are roughly the same, and that’s also how the OSBee circuit works.

Upon connecting the control unit to an oscilloscope, I noticed something strange: no matter how I press the on/off button, it’s only sending a very short (a few milliseconds) pulse, which cannot possibly operate the valve. Then it became clear to me that the controller is in fact actively sensing the existence of the valve, and would not send control voltages if the valve is not detected. I measured the resistance of the solenoid valve, which is about 35 ohm. So I connected a 33 ohm resistor to the controller as a dummy load, and there you go, now we can observe the control voltages and pulse lengths.

It’s pretty easy to notice the asymmetry here: while opening the valve requires a pulse of 250 ms and -7.84 voltage (this is roughly the battery voltage since my 9V battery isn’t fully charged), closing the valve only requires a very short pulse of 62 ms and very low voltage — 2.5V. This is quite strange to me: how come closing the valve only requires such a short pulse and such low voltage?


How Does This Latching Valve Work?

In order to figure out what’s going on here, I un-tightened a bunch of screws and opened up the valve.

At the bottom of the valve is a pressure chamber with a spring. This is very similar to other valves I’ve seen.

The top section contains, supposedly, a coil and magnet inside, and a small cone-shaped metal piece that can be attracted to the magnet or released. It’s quite easy to observe that when opening the valve, the metal piece gets attracted (left picture above), this supposedly releases the pressure in the bottom chamber, thus allowing the water to flow through the valve. Conversely, when closing the valve, the metal piece is released and dropped to block the hole at the bottom, this supposedly allows water pressure to build up in the bottom chamber, thus stopping the water flow.

The key in making this latching is that an impulse voltage can permanently magnetize the core, thus permanently attracting the metal piece. This makes it possible for the valve to remain in the ‘open’ status without contiguously drawing current from the power source (which is unlike non-latching valves like 24VAC valves).

Observing this mechanism, it became clear to me that ‘closing’ the valve basically requires de-magnetizing the core, and that requires just a short pulse of low voltage in the opposite polarity. If you apply the same voltage and strength as before, it will start magnetizing the core the other way, thus the magnetic pole changes direction but the metal piece will still be permanently attracted!

Anyways, this is very interesting to me because previously I had no idea how latching solenoid valves work internally. Now at least I know understand this particular valve works, and this understanding will help me figure out how to get OpenSprinkler Bee to control this valve.


Use OSBee to Control the Gardena 1251 Valve

There are several issues that make OSBee incompatible with the Gardena 1251 valve, but it turns out they can all be solved without too much difficulties. The first is that OSBee by default boost the input voltage (which is 5V from USB) up to 22VDC, which is significantly higher than 9V required by the valve. This is reasonably easy to solve — by fine tuning the boosting time, I can find the sweet spot where the boosted voltage is just around 9V. This boosting time turns out to be around 80 to 100ms.

Second, OSBee by default uses 100ms pulse in both directions (i.e. both opening and closing the valve). This is very easy to change to 250ms and 62ms respectively to match the Gardena controller.

The last issue deserves more thinking, that is, opening the valve requires 9V, but closing the valve requires only 2.5V. Because the input voltage is from USB and it’s 5V, there is no obvious way to step that down to 2.5V since the boost converter can only bump up the voltage and never reduce the voltage. How do we create this asymmetric voltage in opposite polarities? Turns out that you can do so by making use of a diode connected in parallel with a 100 ohm resistor. Why? The diode is a one-way gate: when positively biased, it turns on almost fully (except the 0.7V voltage drop across it, which can be ignored here); but when reversely biased, it turns off, thus current has to flow through the resistor (connected in parallel to the diode), and that resistor will divide the voltage, ensuring that only about 2.5V falls on the valve.

I’ve attached here a diagram showing the connection. The diode can be almost any general-purpose rectifier, like 1N4148, 1N4001 and so on. I’ve also included two photos showing the actual components connected to OSBee and the valve. With this modification, OSBee can now both open and close the Gardena 1251 valve successfully. Mission accomplished!

Introducing OpenSprinkler Bee 2.0 — a WiFi-enabled Universal Sprinkler Controller

Today I am very excited to introduce OpenSprinkler Bee (OSBee) 2.0: it’s an open-source, WiFi-enabled, universal sprinkler controller. It is suitable for garden and lawn watering, plant and flower irrigation, hydroponics, and other types of watering project. This is the first OpenSprinkler product built upon the popular ESP8266 WiFi chip. It’s designed primarily for latching solenoid valves, but can also switch non-latching solenoid valves (such as standard 24VAC valves), low-voltage fish tank pumps (which can be used to feed water to flower pots and indoor plants), and other types of low-voltage DC valves and pumps. All of them can be powered from a single USB port. This is made possible by using a unique circuit design that leverages a boost regulator and a new solenoid driver circuit. Hence I call it a Universal sprinkler controller. Among the software features, it introduces the concept of Program Tasks, which provides maximal flexibility in programming the zones. In contrast to the first version of OSBee, which was in the form of an Arduino shield and relies on an additional Arduino, OSBee 2.0 is a standalone controller with built-in WiFi, OLED display, laser cut acrylic enclosure, and can switch up to 3 zones independently.

Here is not-so-short video introduction to OSBee 2.0:

Here are two photos of the OSBee 2.0 circuit board:

osbeewifi_1osbeewifi_2

Screenshots of the web interface and Blynk app:
osbee_screenshots

In summary, in terms of Hardware Design, it has the following features:

  • A single ESP8266 chip serves as the microcontroller and handles WiFi connectivity.
  • On-board 128×64 OLED display, real-time clock with backup battery, USB-serial chip. Can switch up to 3 zones independently.
  • Boost converter and a new H-bridge design that allows the same controller to switch both lathing and non-latching solenoid valves, all powered from a single 5V USB port.
  • An easy-to-assemble laser cut acrylic enclosure.

In terms of Software Features:

  • It has a built-in web interface that allows you to easily change settings, perform manual control, and create automatic sprinkler programs. It also provides logging and program preview features.
  • It introduces Program Tasks to allow maximal flexibility in programming zones. For example, you can define arbitrary ordering of zones, have multiple zones run at the same time, and insert delays between tasks. Zone water time is programmed at precision of seconds.
  • It allows remote control through the Blynk app and Blynk cloud server.
  • Firmware update can be performed either wirelessly using the web interface (OTA), or through the on-board USB port with a USB cable.

It improves upon the current OpenSprinkler 2.3 by adding built-in WiFi capability, and using a unified solenoid driver that can handle both latching and non-latching solenoid valves. On the other hand, it can only switch up to 3 zones, and the number cannot be expanded. It’s also missing a few advanced features at the moment, such as weather-based water time, virtual stations (e.g. HTTP and RF stations), and support for sensors. Some of these features are purely software, and can be easily added in the future.

OpenSprinkler Bee 2.0 is now available for purchase at our online store:

The package includes a fully assembled OSBee 2.0 circuit board, laser cut acrylic enclosure, instructions, USB cable, and optionally an USB adapter.


Resources and Technical Details

OSBee 2.0 is an open-source project. Its hardware schematic, firmware source code, user manual, and API document are all available at the OpenSprinkler Github repository (look for the prefix OSBee in the repository).

Below I will briefly go over the technical details of the boost converter and the solenoid driver, as I think it’s an interesting design that’s potentially applicable elsewhere. The boost converter is borrowed directly from the OpenSprinkler DC circuit. It’s a simple MC34063-based boost regulator that bumps the input 5V up to 24V DC, and stores the charge into a 2200uF capacitor.

osbee_circuit_1

The Booster is controlled by two MOSFET-based high-side switches. The first one controls the input power: the microcontroller uses it to feed the input 5V to the booster, which quickly raises the voltage to 24V. After a couple of seconds, high-side switch 1 is turned off and the microcontroller prepares the states of the half H-bridges (COM, Z1, Z2, Z3). Let me first explain how the states are set for Latching solenoids. The solenoids for the three zone are connected between COM-Z1, COM-Z2, and COM-Z3 respectively. Normally all four half bridges are in ‘High’ state, so the net voltage across every solenoid is 0. To activate a solenoid (say Z1), the corresponding half-bridge will be pulled down to ground (i.e. ‘Low’ state). The microcontroller then turns on high-side switch 2 momentarily to dump the charge from the 2200uF capacitor to the solenoid. This turns on the valve. To deactivate the solenoid, the microcontroller pulls all half-bridges to Low, except the zone that is to be deactivated which remains in High state. It then turns on high-side switch 2 momentarily, again dumping the capacitor charge to the solenoid, but now in reverse polarity, thus closing the valve. This is basically how it operates latching solenoids.

So how does the same circuit work for Non-Latching Solenoids, such as 24VAC valve commonly used in residential sprinkler system? It turns out that just like latching solenoids, non-latching ones also require a pretty high impulse current (called inrush current) to get activated. The difference, however, is that to keep it on, it needs to draw current continuously from the power source. When the power cuts off, the solenoid is deactivated. This is called the holding current and is considerably lower than the inrush current. So to operate non-latching solenoids, all I need is an additional diode that provides a path from the input 5V to the solenoids to provide the holding current. This diode could be software switched by the microcontroller, but because ESP8266 has very few number of GPIO pins, (and I want to avoid having to use an IO expander), I opted to enable this diode path using a solder jumper. To operate non-latching valves, this jumper needs to be soldered on.

osbee_circuit_2

On the Software side, the firmware uses an option to allow the user to choose the valve type (unfortunately the controller can’t automatically detect the valve type yet). For non-latching valves, the half-bridge states are actually easier to manage than the latching case: now COM is always in ‘High’ state, and Z1, Z2 or Z3 are kept ‘Low’ for as long as needed to keep the valves on. That’s it.

You may be wondering how does this even work for valves rated at 24VAC? How can we drive them using DC, and just 5V? The short answer is that this is due to the way such solenoids behave under AC. Specifically, when you first connect the solenoid to 24VAC, it immediately draws a high inrush current, which reliably energizes the solenoid and opens the valve. Once energized, the solenoid presents a large inductance and high reactance to AC, thus limiting the effective current flowing through it. This results in lower holding current, which is enough to keep it on and saves the coil’s lifespan. We can exploit this behavior and achieve the same effect using a DC-based circuit: the booster produces a high voltage initially to provide the inrush current needed to energize the solenoid, and then lowers the voltage to the input level to provide the holding current. Exactly how much holding current is needed is not clearly defined, but for all 24VAC solenoids I’ve tested, once energized, they can remain on at just 5V input voltage.

Now we are left with the last part of the technical details: the Half H-Bridge Design. From the circuit diagram above, it seems we can easily implement the half bridges using relays. While this is totally true, relays are bulky, expensive, slow to switch, and difficult to replace. For these reasons, modern electronics prefer to use semi-conductors as much as possible in place of relays. So I decided to use a MOSFET-based H-Bridge design, and it’s a more interesting design than just throwing relays everywhere.

Typically when you want to switch between GND and a voltage considerably higher than the microcontroller’s output, you can use a half H-bridge design as show in the left image below. It uses a low-power N-MOSFET to drive the high-power P-MOS on the bridge, making it possible to use a GPIO pin to switch a high voltage. However, this generally requires 2 GPIO pins (i.e. A and B) per half bridge. Because ESP8266 has a small number of GPIO pins, the challenge is how to use just 1 GPIO pin per half bridge.

osbee_hbridge_1osbee_hbridge_2

So I came up with a slightly modified half bridge design, as shown in the right image above. It leverages two low-power N-MOSFETs to drive the high-power P-MOS and N-MOS on the bridge. This allows using just 1 GPIO pin (A) to switch the bridge. When A is Low, both input N-MOSFETs turn off, and the gates of the P-MOS and N-MOS are both pulled high, so the P-MOS turns off and N-MOS conducts, pulling the OUTPUT to Low. When A is High, the reverse happens, and the OUTPUT is also High.

Using two input N-MOSFETs also makes it easy to prevent shoot-through problem, which is often an issue with H-bridge. Shoot-through happens when the control signal A transitions from Low to High (or conversely from High to Low), and at some point the P-MOS and N-MOS may both be in conducting state, causing a shorting. To avoid this, I chose to use two different types of input N-MOSFETs: one with lower gate threshold voltage (such as BSS138) and one with higher gate threshold voltage (such as 2N7002). This way, as the control signal A swings between Low and High, the two input N-MOSFETs will turn on and off at different times, ensuring that the P-MOS and N-MOS will not both conduct at the same time. As for the choices of the P-MOS and N-MOS, I opted to use the common AO3401 and AO3400, which provide ample room for continuous current as well as impulse current.

Sorry about going through these nitty-gritty details, but I think these are interesting design notes worth documenting and sharing. Feel free to chime in with your comments and suggestions. Thanks!

OpenSprinkler Black Friday / Cyber Monday Sales Are On

A quick note that our Black Friday / Cyber Monday sales are on now: all OpenSprinkler products are shown in discounted prices right now, and the deal only lasts till Monday Nov 28. This is the only time of the year that we offer discounted pricing, so if you are interested in buying OpenSprinkler, grasp this chance and don’t let it slip away!

If you are wondering whether you need to apply any coupon code. The answer is NO: the price you see is the discounted price. In the past when we used to have coupons, many customers forgot to apply the coupon in the end. To save you the trouble of having to enter coupon code, we directly discount the price, so you will definitely not miss it.

WiFi-enabled Color LED Matrix using ESP8266 and WS2812 LEDs

Last Thursday I had a lot of fun doing a workshop at my college (UMass Amherst) where I taught students to use a WiFi-enabled Color LED matrix combined with Javascript programs to create animations displayed onto the LED matrix. The matrix is made of 5×7 WS2812 (NeoPixel) LEDs. I’ve actually designed it two years ago and wrote a blog post about it. Back then I was using an Arduino-compatible SquareWear Mini to control the display patterns. It was fun to play with, but changing the display patterns require modifying the Arduino sketch and upload it over and over again, which took a lot of time.

This time, I improved the design by simply using a ESP8266 WiFi chip mounted at the back of the LED matrix. I wrote a firmware with a minimal set of HTTP GET API, with which you can set all pixels colors, set the brightness, or tell it to scroll a line of text. What’s cool about it is that you can now use Javascripts to send animation frames to it on the fly, which is a lot easier compared to re-writing and uploading an Arduino sketch. In addition, you can take the LED matrix on the go and use your mobile phone to control it, which is nice for wearable electronics.

img_20161029_234314

The video below goes through the details. Take a look at it first. Essentially, combining ESP8266 with the LED matrix makes a little wireless display. The next thing I should work on is to figure out how to stream video to it. It’s going to be very very low resolution for sure, but it’s gonna be fun, and I can always daisy chain multiple matrices to make a larger display.


Workshop Materials

Below you can download the materials I prepared for the workshop, including the Arduino firmware code (compilable in Arduino using ESP8266 core with NeoPixel library), the Javascript programs I wrote, and the powerpoint slides with lots of details and can be used as a 1-2 hour tutorial.

Also, the LED matrix and ESP8266 development board that I used in the demo are both designed by myself. They are attached together by double-sided tape and three soldered wires. The hardware design files are available in my Github repository below:


“Alexa, Open Sprinkler Zone 1” — How to Use IFTTT with OpenSprinkler (and OpenGarage)

I just discovered something exciting recently and want to share with you: it’s now possible to use IFTTT with OpenSprinkler and OpenGarage; and because IFTTT support Amazon Echo (Alexa), you can now speak voice command to trigger sprinkler actions. For example, say ‘Alexa, trigger open sprinkler zone 1‘, or ‘Alexa, trigger my garage door‘. I will briefly walk you through the setup process. We will be building support for IFTTT into the firmware soon, to allow for additional features like push notification. For now, the guide below will allow you to trigger actions on OpenSprinkler and OpenGarage with your existing firmware.

Before I proceed, I should give credits to Mike Szelong, who has purchased both OpenSprinkler and OpenGarage, and made both work with Alexa through IFTTT. Thanks to Mike for sending me this tip in the first place. Below let me first explain how IFTTT works.

What is IFTTT?
If you’ve never heard of IFTTT, it stands for If This Then That. With IFTTT, you can set up what’s called ‘recipes’, which hook up ‘triggers’ with ‘actions’. There are many triggers, for example, weather changes, sensor value changes, a new text message, a new twitter message, a new photo upload, or in our case, an Alexa phrase. There are also many actions, for example, send a text message, send an email, post a message on facebook, or in our case, send an web request to OpenSprinkler. With IFTTT, you can easily set up recipes like: ‘if temperature drops below xx degrees, send me a text message’, ‘if there is a new post on my facebook, send me a push notification’, or in our case ‘if Alexa receives a specific phrase, trigger a sprinkler action’. Because it’s so convenient, it has become very popular among Internet of Things.

How does IFTTT send or receive web requests?
IFTTT provides support to what’s called a ‘Maker Channel’, allowing you to use generic web requests (i.e. HTTP commands) as triggers and/or actions. This makes it possible to extend IFTTT support to your own DIY hardware gadgets. For example, to use a Maker trigger, just have your gadget send a web request to IFTTT, and hook it up with an action, such as text message, to enable push notification. This way, when OpenSprinkler starts to run any program, or receives weather changes, it can send a web request to IFTTT, which further triggers a text message or push notification to your phone. Conversely, to use a Maker action, you can set IFTTT to send a web request to your gadget. This way, when it receives an associated trigger, it can send a command to OpenSprinkler to start an action. As both OpenSprinkler and OpenGarage implement HTTP GET commands, they can naturally work with IFTTT through the Maker channel.

Wait, what’s the catch?
There are two. First, to use the device as a trigger, the firmware needs to connect to IFTTT. Neither OpenSprinkler nor OpenGarage has firmware support currently to send web requests to IFTTT, you can’t use them as a trigger yet, but work is underway to add such support to the firmware. Second, to use the devices for action, IFTTT needs to reach the device from the Internet. This requires you to set up port forwarding so that IFTTT can use the public IP address to reach the device. I know that port forwarding is gradually phasing out in favor of cloud-connected devices, but for now we will have to stick with port forwarding.


Now I have explained how IFTTT works, let’s go ahead and create some recipes.

Step 1. Sign up for an IFTTT account
Go to ifttt.com, click on ‘Sign up’ to register an account. You will walk through a simple tutorial to learn the basics of IFTTT.

Step 2. Enable Maker channel
Click on ‘Channels’ at the top, then search for ‘Maker’ and under ‘Developer Tools’ select the Maker channel, and click on ‘Connect’. You will be assigned a ‘key. At the moment you don’t need the key, so you can ignore that for now.

ifttt1

Step 3. Set up a recipe
Click on ‘My Recipes’ at the top and then ‘Create a Recipe’. Select a trigger (i.e. this) — for example, search ‘sms’ and select SMS as a trigger. Input your phone number and a verification pin. Then select a trigger method, such as ‘Send IFTTT an SMS tagged’. Then input the tag phrase, such as zone1on. This means every time IFTTT receives a text message with that particular phrase, it will trigger an action.

ifttt2ifttt33

Next, to choose an action (i.e. that), search for ‘Maker’, and click on ‘Make a Web Request’. This is where you need to input the HTTP command. You will need to type in your home network’s external IP address, external port number (that maps to OpenSprinkler through port forwarding), followed by a supported HTTP command (check API document listed below), device password, and required parameters. The example below turns on zone 1 (i.e. sid=0) for 10 minutes (i.e. 600 seconds). For ‘Method’, select ‘GET’, and you can leave Content Type and Body empty. If you are not sure whether the command works or not, simply copy and paste the URL you constructed to a browser, and if the returned message has {‘result’:1} that means it has succeeded.

ifttt5
Click on ‘Create Action’ to finish.

In case you’ve got lost, here are some useful links that you may need to refer to:

Step 4. Test the recipe
To test the above example recipe, send a text message #zone1on (don’t forget the pound sign!) to the IFTTT phone number (this is the same phone number you received a text from when you verified your phone with IFTTT). If everything is set up correctly, your sprinkler zone 1 will start watering for 10 minutes!

Step 5. Use Alexa to enable voice command
Now that I’ve walked you through a basic example, you can experiment with using Alexa to enable voice command. You obviously need to have an Alexa (Amazon Echo) for this to work. The recipe is largely the same as the above text message example, except that for trigger (i.e. this) you will select Alexa, and give it a phrase. Now when you speak that phrase to Alexa, it will trigger the action. How exciting! Don’t forget that you need to say ‘Alexa, trigger xxx’ where xxx is the phrase. The ‘trigger’ keyword is kind of like the pound sign in the text message.

If you have an OpenGarage, you can also follow the OpenGarage API to set up web requests and get Alexa to open / close the garage door for you.

Currently as the phrase is fixed / static, there is no easy way to parametrize the phrase. For example, you can’t say ‘trigger open zone 1 for blah minutes’ where ‘blah’ is a variable like 10, 20 or any positive integer you want. I am sure this would be possible in the future though.

Next Step: Notifications
As I said, another popular use of IFTTT is for email / text / push notifications. For doing so, the device needs to send HTTP commands to IFTTT. Upon receiving the request, it can trigger an action such as sending you an email or text message. Work is under way to add this support to both OpenSprinkler and OpenGarage firmware, and hopefully they will be ready soon!

Review of NeoDen 4 Pick and Place Machine with Vision System

A few years ago I purchased a NeoDen TM-240A desktop pick and place machine, and wrote two blog posts about it. It was one of the most popular desktop pick and place machines on the market back then, and has served me well for the past three years. It does small boards pretty well, but without a computer vision system, it requires a fair amount of manual placement of fine-pitched components; and it only has a fixed set of 27 feeders, which are not entirely sufficient for me.

Recently NeoDen released a new model called NeoDen 4 — it’s their first desktop model that has built-in computer vision system. The vision-based alignment makes it possible to place fine-pitched components with minimal manual work. It has four pick and place heads, which means if can simultaneously pick up to four components at a time. It can fit a lot more feeders, and can handle a variety of component types, including matrix tray components, and any special components that you can lay out in a 3D printed tray. It has a vibration feeder for components in tube packaging. Although I rarely use tube packaging, one notable exception is the CH340G USB-serial chip, which is used in almost all my products, and so far it only comes in tubes. On top of these exciting new features, the machine I ordered comes with a PCB conveyor belt that can automatically feed PCBs into the system. This is really convenient for starting a pick and place job.

img_20160916_162204img_094454

Well, a picture is worth a thousand words, and a video is worth a thousand pictures! Without further ado, here is my video review of this machine:

So far I am pretty happy with the machine. Pricing-wise, it’s surely more expensive than TM-240A, but not significantly. I paid around 9K in total, including DHL shipping and all the feeders (for TM-240A I paid 5.5K). It’s not all perfect so you’ve got to learn the quirks. For example, I learned that the component height is often quite important — without providing the proper component height, the placing may give you a lot of troubles. Also, for components that need better placement accuracy, reducing the placing speed (say, to 50%) helps a lot to improve the accuracy and reliability.

Overall the machine operation is fairly intuitive, and it works in a predictable manner, much better than some of the comparable products I’ve seen on the market. No matter how powerful the machine is, you can’t afford to spend forever learning how to use it. It took me just two days of looking through the user manual, video tutorials, and doing my own trial and error to learn to successfully produce the first board using this machine. I would say it’s pretty good.

Disclaimer
I am not associated with NeoDen in any way. I am just a standard user. Please do NOT contact me for purchasing or sales questions. Go to their company website (www.neodentech.com) for details.


EagleCAD ULP Script

One difficulty I had initially was how to export a PCB design to a format acceptable by the machine. Without this I would have to manually locate the x-y coordinates of each component using the down-facing camera, which would be a huge pain. The user manual and video tutorial had no descriptions about the format of the spreadsheet. After banging my head on the wall for a while, I found one example spreadsheet somewhere in the flash drive that came with the machine, and that seems to work. Then I went ahead and modified an existing EagleCAD script (designed for TM-240A) to match the example spreadsheet. The script can be downloaded from the link below. Please take a look at the README file as it explains how to use the script.


OpenSprinkler Pi Laser Cut Enclosure

For a long time, OpenSprinkler Pi (OSPi) has been using the OpenSprinkler injection molded enclosure. While this has worked fine, the enclosure is not particularly designed for OSPi, leaving some cutouts not aligned with Raspberry Pi. Recently I have started learning to design enclosures using laser cut acrylic pieces. This is a great way to design fully customized enclosures for circuits. Today the first batch of laser cut enclosures for OSPi has arrived, and we will be shipping these with OSPi kit right away.

Here is a picture of the enclosure pieces and screw bag:
img_1262

And here is a picture of the enclosure after it’s fully assembled. After removing all the protective papers from the acrylic pieces, it produces a fully transparent look of OSPi, which is pretty cool.
img_1261

It’s not necessary to remove all the protective papers. I would recommend leaving the papers on except the top panel. This way it gives a kind of wooden texture of the enclosure, and adds more protection to the enclosure.

Below is an instructional video that walks you through the assembly steps:

I will make a separate post shortly that explains how to automate the design of such laser cut enclosures.

Learning Electronics — 2. Fun with Crystal Radio and Extensions

As a kid I was fascinated by the Crystal Radio — the simplest radio that requires no battery or power source. Learning about crystal radio is what got me into electronics in the first place. There are plenty of tutorials you can find online about how to build your own. In this blog post I describe a basic version of the crystal radio, and a couple of simple extensions using modern techniques to improve its quality (although these extended versions all require battery). I won’t talk much about the principles, but instead will focus on making it easily reproducible and a fun weekend project.

(By the way, this is the second of the ‘Learning Electronics’ series. The first one was about the Astable Multivibrator circuit and was posted five years ago… Alas, time flies!)

The Basic Version
The basic version of crystal radio that I learned as a kid consists of just 7 components as shown below. In fact, the resistor R is optional, making it only 6 components. There is an inductor L, variable capacitor C, diode D, high-impedance earphone (you can use a piezo disc), and antenna and ground. The amazing thing about this circuit is that it has no battery or power source, as the radio signal directly drives the earphone.

crystalradio_basiccrystalradio_lccrystalradio_pd

Because radio signals are very weak, to make it successful, there are several key ingredients:

crystalradio_gnd

  • Earphone: you have to use a high-impedance earphone — the typical earbud has very low impedance (less than 32 ohm), which is too heavy a load to drive with direct radio signals. The easiest solution is to use a piezo disc, which has very high impedance and is very cheap. You can then use a thick paper (or better, 3D printing!) to make a cone cover so that you can easily insert it into your ear.
  • Diode D: use a diode with small forward drop voltage. The classic choice is a Germanium diode, such as 1N34A or 1N60. However, Germanium diodes are difficult to source these days. So if you can’t find a Germanium diode, a small Schottky diode like the common 1N5817 would also work. Again, the point is to use a diode with the smallest forward drop voltage possible.
  • Antenna and Ground: a good antenna is critical for crystal radio. The antenna should be set up outdoors if possible. I implemented mine using a long single stranded wire and ran it around the perimeter of my porch. It worked quite well. As for ground, I just inserted a wire into the ground hole of a 3-prong wall socket. Be careful: make sure it stays reliably in the ground hole. If the wire touches the hot socket, it will be extremely dangerous!
  • Tuning Circuit: inductor L and variable capacitor C form the tuning circuit. These are pretty easy to find in an old radio or a DIY radio kit (as shown in the picture above). A lot of the inductor coils you can find have both a primary coil and secondary coil. You can use just the primary coil, or connect the primary and secondary in series. Similarly, a lot of the variable capacitors have two sections. You can use either section, but to help increase the frequency range of reception, you can connect the two sections in parallel.

The best time to try the crystal radio is probably at night, when there is less electro-magnetic interference in the air and the ambient noise is low. Slowly turn the dial on the variable capacitor and listen carefully. If there is a strong local AM station, you should be able to hear it. If you can’t hear anything, don’t worry, read on and you can find how to use a simple audio amplifier module to help you hear weak channels.


LM386 Audio Amplifier Module
The first time I heard something from the crystal radio, it was really exciting. But the volume is just too small to keep enjoying it. After a bit of Googling, I found a simple audio amplifier chip LM386, which can easily amplify the radio signal to be played on a speaker. It’s pretty easy to build the circuit myself, but there are ready-made LM386 modules that you can find on eBay and Amazon, for only a couple of bucks. So I bought one. Soldered a few wires, connected a standard 8 ohm speaker, and plugged in a 9V battery: wow, now you can hear the radios loud and clear, much better! Below is the updated schematic and a picture showing the wiring:

crystalradio_lm386crystalradio_lm386pic

crystalradio_lm386closeup


TA7642 Radio IC
With LM386, the sound is loud and clear. But there is still one problem: the antenna and ground wires are very cumbersome, and make the circuit non-portable. I did some more Googling, and found a simple radio IC called TA7642 that can amplify and detect AM signal, eliminating the antenna and ground wires. TA7642 is a 3-terminal IC shaped like a transistor. It’s quite simple to use and can work at a voltage as low as 1.2V, which is ideal for battery power. You can buy it from eBay or Amazon. I got mine from the Chinese website Taobao, for a jaw-dropping price of 20 Chinese cents (about 3 US cents). Below is a typical circuit of TA7642 that works with high-impedance earphone. It is powered by a single AA battery:

ta7642_simple

This time the antenna and ground wires are gone, so the circuit becomes portable. To hear the sound through a speaker, you can again use the LM386 audio amplifier. Because LM386 requires at least 5V, it won’t work with a single AA battery. But it’s common to use a 9V battery to power the whole circuit, and two diodes in series to create the 1.5V operating voltage that TA7642 needs.

I implemented the circuit using an electronic experiment kit, which has most of the components I needed. I can easily make a custom PCB to fit everything in a small enclosure. At night I can hear about 3 to 4 stations. Cool!
ta7642_pic

DIY Radio Kit: so after I built the circuit, I discovered that Elenco sells a $15 DIY Radio Kit that is essentially the same circuit as I learned above (i.e. TA7642 + LM386). So if you want a kit that includes all the components, this is a very decently priced kit to buy.

Along my search, I also found some DIY Radio Kits from Taobao, like this six-transistor radio, and seven-transistor radio. For less than $2, these kits include PCB, all components, speaker, and even an enclosure! What a crazy price!


It was a lot of fun to re-live my childhood passion by learning to build the crystal radio again, with some modern touches. The experiments above are quite easy to reproduce, and hopefully they provide inspirations for you to try them out as well.

ESP8266 Reboot Cycled Caused by Flash Memory Corruption — Fixed!

After I released the ESP8266-based OpenGarage, there has been a weird bug that kept bugging me: a small fraction of the controllers (let’s say 1 out of 10) would crash on restart, and that leads to an infinite reboot cycle. Once this happens, it seems there is no way to stop it until you reflash the controller with NodeMCU firmware, and then flash OpenGarage firmware back. It’s completely crazy because first, this issue is hard to reproducing — most controllers would work just fine, but once in a while, one would go nuts; second, upon crashing you can check the stack dump but the information is basically gibberish and does not help debugging at all; third, just reflashing the OpenGarage firmware itself is not sufficient — something seems to have been permanently altered in the flash memory such that you have to flash a completely different firmware (NodeMCU for example) to stop it; finally, even this is not a permanent fix — if you reboot the controller regularly for a few times, this issue will eventually happen again.

For the longest time I thought there is a bug in the OpenGarage firmware code that causes this to happen. But the above symptom defies any standard reasoning and explanation. This has kept bugging me until yesterday, I finally sat down and did a number of reproducible tests that helped me finally figure out the cause. It turns out this has to do partly with the ESP8266 hardware quality and partly software. The short story is that every time ESP8266 restarts, the firmware (more specifically, ESP8266 Arduino library) writes the current WiFi SSID and password to flash memory (along with other flash memory operations such as reading config files); over time this may cause a corruption at some point (possibly due to flash memory quality); once this happens, it will keep crashing on restart, and the only way to stop it is to erase the corrupted region (that’s what reflashing NodeMCU firmware accomplishes).

In fact, this issue has already been reported in the ESP8266 Arduino forum. I wish I had discovered this earlier. The solution is actually quite straightforward: simply add WiFi.persistent(false); right at the beginning of the code, that will stop the library from writing SSID and password to flash memory every time. This is unnecessary anyways since OpenGarage firmware already stores SSID and password in the config file.

This simple trick seems to have magically fixed the annoying bug. To be fair, I believe this bug only happens when you manage WiFi SSID and password separately in a config file stored in flash memory space — if the SSID and password are hardcoded into the firmware the issue wouldn’t happen. In any case, I wrote this blog post to document the issue and fix, and hope this may be useful for others who encounter similar issues with ESP8266.