Check my new blog post on the ESP8266 Serial-to-WiFi module
As the Internet-of-Things (IoT) are becoming more and more popular, there is an increasing demand for low-cost and easy-to-use WiFi modules. For Raspberry Pi and BeagleBone, you can plug in a cheap USB WiFi dongle (like the popular Edimax 7811). These dongles are generally less than $10. But for microcontroller-based devices, the options are much fewer and generally more costly. For example, an Arduino WiFi shield can easily cost $40 to $50; even the more recent CC3000 module costs about $35. If you are puzzled by the big price difference: those cheap WiFi dongles require a USB host system, which is beyond the capability of Arduino. Still, it’s unsettling to realize that a WiFi module or shield would cost more than an off-the-shelf WiFi router, even though the router is significantly more powerful.
Recently I saw a post on Hack A Day alerting us about a new Serial-to-WiFi chip. I immediately ordered two of those. I honestly don’t know what I should expect from these $3 parts, but perhaps it’s a good push towards a new wave competitions on low-cost WiFi solutions. Anyways, while waiting for the shipment to arrive, it reminded me that a while back I actually bought something similar: a Hi-Link HLK-RM04 Serial-to-WiFi module. It’s about $10, so still pretty low-cost. I am glad I didn’t lose it, so I took it out of a pile of electronics and started experimenting with it.

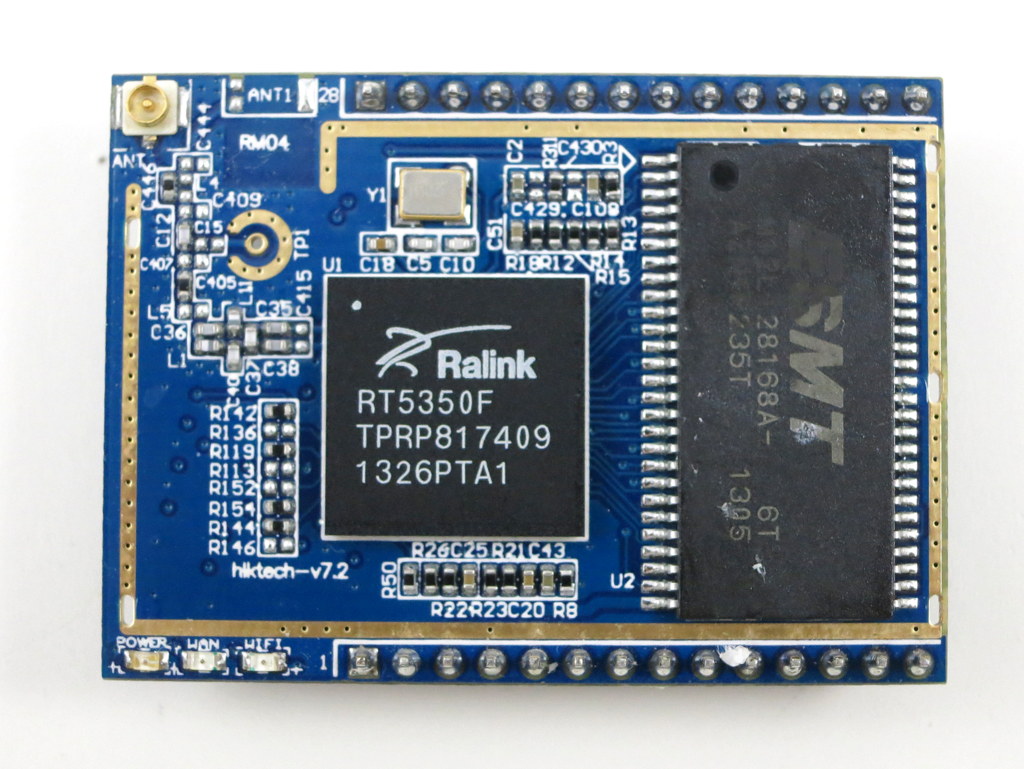
As you can see, the module is pretty small (about 40mm x 30mm). The picture on the right above shows the components underneath the metal shield. The chip (RT5350F) is a 360MHz MIPS core with built-in WiFi support. The module is quite powerful — at factory default settings it functions as a normal WiFi router. Now, in order to get it to talk to a microcontroller like Arduino, I need to use its Serial-to-WiFi capability. What is that? Well it means using the serial (TX/RX) interface to send and receive Ethernet buffers, and similarly using serial to send commands to the module and query or change its current status. This is quite convenient because first, it only takes two wires (TX/RX) of the microcontroller to talk to the module, second, it moves WiFI-related tasks to the module allowing the Arduino code to be very much light-weighted.
Check my new blog post on the ESP8266 Serial-to-WiFi module
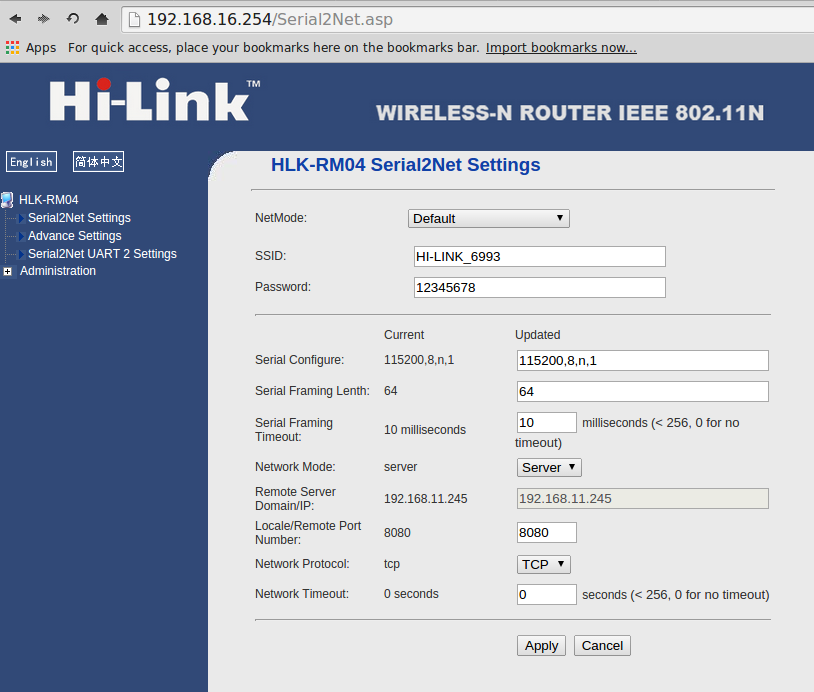
Power-Up. To start the module you just need to provide +5V power. At the first use, the module boots up into a WiFi AP (access point) named Hi-Link-xxxx so you can actually log on to the WiFi network and change settings there. Here is what the homepage looks like (default IP: 192.168.16.254, default log-in: admin/admin):
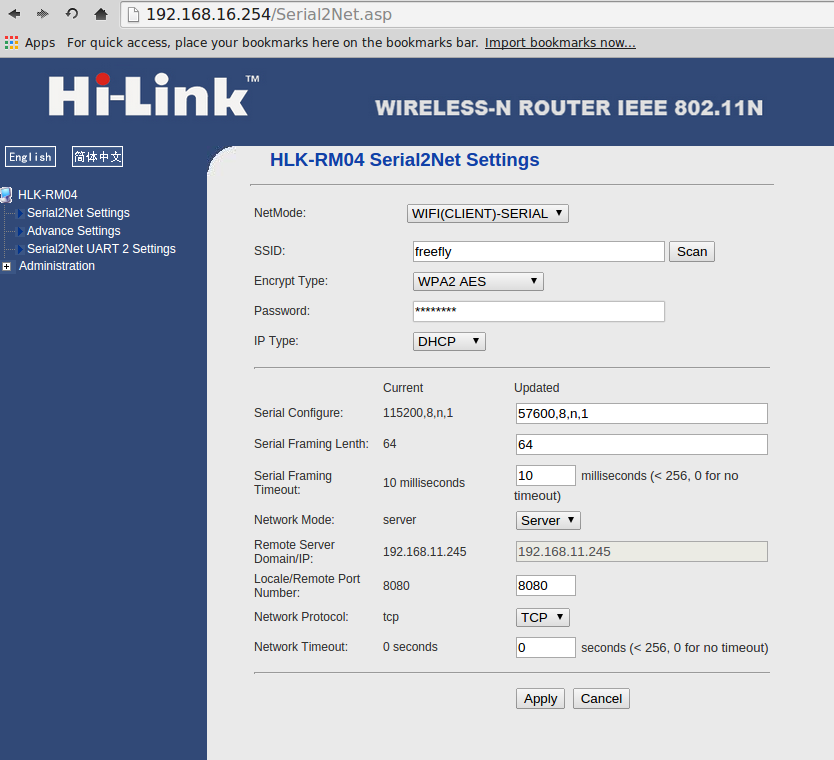
Change Settings. For my purpose I need to set the module as a WiFi client so that it can log on to my home network, and allow the Arduino to communicate wirelessly through the module. So I changed the NetMode to WiFi Client – Serial, and put in my home network’s SSID and password. I also changed the Serial baud rate to 57600 (the default is 115200): the lower baud rate can help Arduino to communicate with it more reliably especially if I am going to use software serial. Make sure that the Local/Remote port number is set to 8080 or anything other than 80 (because 80 is reserved for the module’s homepage).
Receiving Data. Now after the module boots up, it appears as a device on my home network (for example, 192.168.1.147). If I type in 192.168.1.147 in a browser, I will still see the same homepage as above. However, now I can communicate with the module’s serial interface through port 8080. To see what’s going on, I used a PL2303 USB-serial converter: connect the serial converter’s +5V, GND, TXD, RXD to the WiFi module’s +5V, GND, RX, TX (note TXD->RX and RXD->TX), then I opened a serial monitor at 57600 baud rate (putty in Windows or gtkterms in Linux). Now type in http://192.168.1.147:8080 in a browser, I get the following output on the serial monitor:
GET / HTTP/1.1
Host: 192.168.1.147:8080
Connection: keep-alive
Accept: text/html,application/xhtml+xml,application/xml;q=0.9,image/webp,*/*;q=0.8
User-Agent: Mozilla/5.0 (X11; Linux x86_64) AppleWebKit/537.36 (KHTML, like Gecko) Chrome/37.0.2062.94 Safari/537.36
Accept-Encoding: gzip,deflate,sdch
Accept-Language: en-US,en;q=0.8,zh-CN;q=0.6,zh;q=0.4
Cool, this means the Ethernet buffer has been received through the serial RX pin. If I can then send something back through the serial TX pin, like acknowledgement plus HTML text, the data will be transferred back to the browser. This is basically how HTTP GET command works.
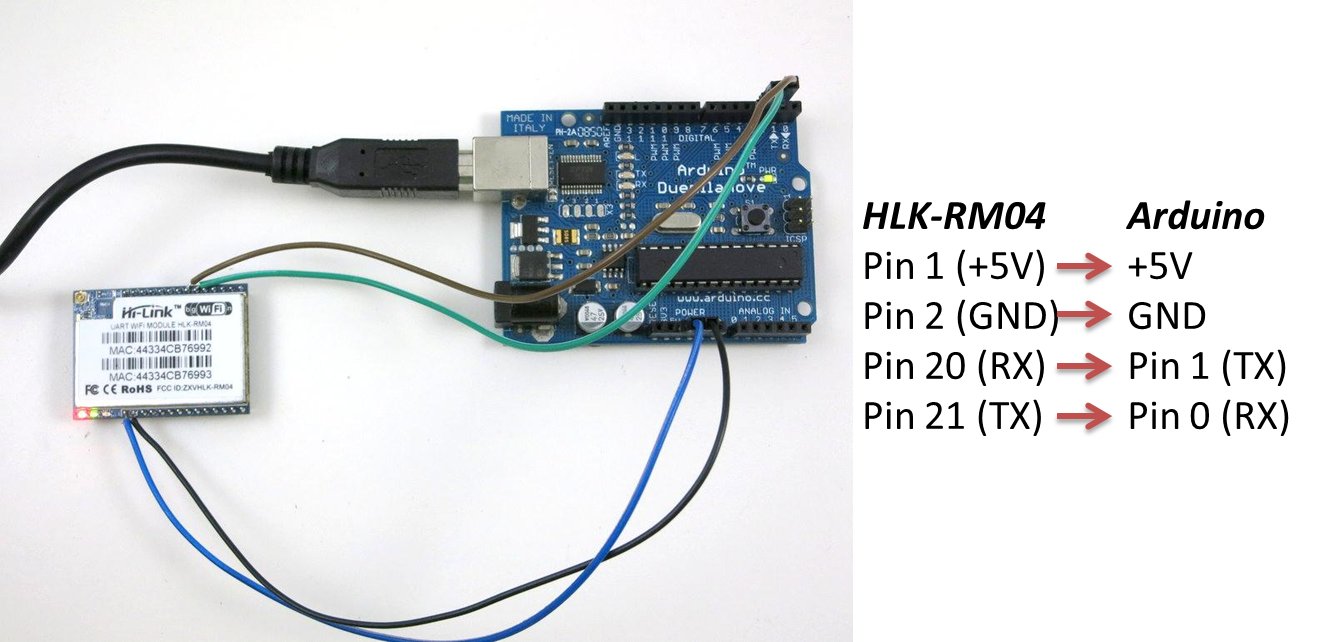
A Simple Arduino Example. To send data back through the serial TX pin, I used an Arduino to set up a simple example. To get reliable communication, I used Arduino’s hardware RX/TX (0/1) pins. The drawback of this is that when you program the Arduino you need to temporarily disconnect the WiFi module from these two pins, otherwise they will interfere with the uploading process. Here is a picture of the setup:
Next, I wrote an Arduino program to print out the analog values of A0 to A5. This is actually modified from the WebServer example in the Arduino Ethernet Shield library:
void setup() {
  Serial.begin(57600);
}

void loop() {
  boolean has_request = false;
  if (Serial.available()) {
    while(Serial.available()) {char c = Serial.read();}
    has_request = true;
  }
  if (has_request) {
    Serial.println("HTTP/1.1 200 OK");
    Serial.println("Content-Type: text/html");
    Serial.println("Connection: close");  // the connection will be closed after completion of the response
    Serial.println("Refresh: 5");  // refresh the page automatically every 5 sec

    String sr = "\n";
    sr += "
Basically receiving/sending Ethernet buffers is done through reading/writing into serial. Now open a browser and type in http://192.168.1.147:8080, I see the following:


analog input 0 is 521

analog input 1 is 503

analog input 2 is 498

analog input 3 is 510

analog input 4 is 525

analog input 5 is 548


Pretty cool, isn’t it! 🙂 If I have a SD card connected to Arduino, I can also serve files, such as Javascripts or logging data, from the SD card.
Blinking LEDs. By analyzing the received buffer, I can also implement various HTTP GET commands. For example, the program below sets the LED blinking speed by using http://192.168.1.147:8080/blink?f=5 where f sets the frequency.

void setup() {
  Serial.begin(57600);
  pinMode(13, OUTPUT);
}

int f = 0, pos;
void loop() {
  boolean has_request = false;
  String in = "";
  if (Serial.available()) {
    in = "";
    while (true) {  // should add time out here
      while (Serial.available() == false) {}
      in += (char)(Serial.read());
      if (in.endsWith("\r\n\r\n")) {
        has_request = true;  break;
      }
    }
  }
  if (has_request) {
    int i1 = in.indexOf("GET /blink?f="), i2;
    if (i1 != -1) {
      i2 = in.indexOf(" ", i1+13);
      f = in.substring(i1+13, i2).toInt();
    }
    Serial.println("HTTP/1.1 200 OK\nContent-Type: text/html\nConnection: close");
    String sr = "\n";
    sr += "\n";
    sr += "LED frequency: ";
    sr += f;
    sr += "Hz.";
    Serial.print("Content-Length: ");
    Serial.print(sr.length());
    Serial.print("\r\n\r\n");
    Serial.print(sr);
    has_request = false;
  }
  if (f>0) {
    static unsigned long t = millis();
    if (millis() > t + 1000/f) {
      digitalWrite(13, 1-digitalRead(13));
      t = millis();
    }
  }
}

More on Changing Settings. Instead of using the WiFi module’s homepage to configure settings, you can also change settings by sending serial commands to the module directly. This can be done by pulling the RST pin on the module low for a couple of seconds, which switches the chip in AT command mode. Then you can send (through serial) any of the listed AT commands to change parameters such as SSID and password. This is a nice way to add some automation to the configuration process. Details can be found in the module’s datasheet.
Drawbacks. The main drawback of a Serial-to-WiFi module is that the data transfer speed is quite low. I tested transferring a file stored on SD card and am only getting 5 to 7 KB/s. This means to transfer a 1MB file it will take 3 minutes. Clearly not a good solution for bulk data. Another drawback is that if you need to restart the WiFi module it generally takes 35 to 50 seconds to boot up, that can be an issue for the impatient. Fortunately you likely don’t need to reboot the WiFi module frequently.
Overall the HLK-RM04 Serial-to-WiFi module is a reasonable and low-cost solution for adding WiFi to Arduino and similar microcontroller boards. At the price of $10, there is no much more you can ask for 🙂