A little while back I released the very first version of ESPToy — a ESP8266 Development Board with a few useful on-board components like color LED, button, and temperature sensor. It has a built-in ATmega644 microcontroller, and pin headers for plugging in a ESP-01 through-hole WiFI module. Shortly after that, I discovered the Lua firmware (named nodemcu) for ESP8266. At first I didn’t pay much attention — Lua is a new language that I’ve never used before, and I wasn’t sure if it’s worth my time learning about it. At the same time I was getting tired of the AT firmware (the original firmware that comes with ESP), partly because it’s not very stable, and partly because it’s complicated to use and involves an extra microcontroller to communicate with it.
Over time I saw increasing development and community support on the Lua firmware. So I became more curious. The final push came recently: there was a supply chain problem of the ATmega644 microcontroller. I was about to purchase a new batch of ESPToy 1.1, but the microcontroller is difficult to source from my suppliers in China. I decided that I should give the Lua firmware a try — if it works, I don’t have to use an extra microcontroller any more!
That’s where I wish I had known it earlier — the Lua firmware is, in my opinion, all around better than the AT firmware. It’s easy to use, especially for writing simple web servers; it’s more stable, and best of all, it runs Lua scripts directly on the ESP module, removing the need to use an extra microcontroller. So here comes ESPToy 1.2, with a surface mount ESP8266 module, pre-flashed with the Lua firmware and a start-up demo (WiFi color LED demo):
Built-in Components. Similar to the previous versions, ESPToy 1.2 has a built-in color LED, pushbutton, mini-USB port and the CH340G USB-serial chip. The pushbutton is internally wired to GPIO0 and can be used to re-flash the firmware if needed. The way Lua firmware works is that you send scripts to it through the serial port. The module will execute the script on the fly, and return results (if any) back to the serial port. This is different from a standard microcontroller program in that the scripts are interpreted (not compiled ahead of time), much like how Javascript, Python, and other scripting languages work. This provides a lot of flexibility, including receiving and running a dynamic script on the fly!

Pin Definitions. ESPToy 1.2 internally assigns the following pins for the built-in components:
- Lua pin 2 (hardware GPIO4): Red LED
- Lua pin 1 (hardware GPIO5): Green LED
- Lua pin 4 (hardware GPIO2): Blue LED
- Lua pin 3 (hardware GPIO0): Button (active low)
Note that these pin names refer to the pin indices defined by the Lua firmware. These are different from the hardware GPIO pin numbers.
One big advantage of the Lua firmware is that it runs directly on the ESP microcontroller, removing the need for an extra microcontroller. This simplifies the hardware design and reduces cost. The module comes with 1 analog pin and several digital pins. It can do most things that an Arduino can, such as writing and reading a GPIO pin, reading an analog sensor, PWM, I2C, SPI, UART. But what it really excels is the capability of creating web services and handling WiFi connections. It also has a file system, storing scripts and data directly to the built-in flash memory. This is a huge advantage over Arduino, and it’s pretty much an all-in-one solution to build Internet of Things (IoT) gadgets. Probably the only disadvantages would be the relatively small number of available pins, particularly analog pins, and that the PWM speed is quite low. Other than these, most Arduino applications can be easily adapted to Lua scripts, but now with WiFi capability!
Lua 101. So what’s the catch? Well, learning a new language is a barrier. Lua is similar to C++ and Java, but it’s after all different, and the syntax is quite flexible, so some code may look obscure at first. To begin, the Hello-World example is pretty trivial:
print("Hello ESPToy!")
notice that unlike C++ and Java, there is no semi-colon at the end. Next, we can blink the LED on ESPToy by:
led=2
gpio.mode(led, gpio.OUTPUT)
gpio.write(led, gpio.HIGH)
tmr.delay(1000000)
gpio.write(led, gpio.LOW)
On ESPToy, the red LED is connected to GPIO2, green to GPIO1, and blue to GPIO4. The above lines are very much similar to Arduino code. Note that just like Python and Javascript, you don’t need to define variable types — the variable types are determined dynamically, so it’s quite flexible. Here is an example of a for loop:
led=2
gpio.mode(led, gpio.OUTPUT)
for i=1,10 do
  gpio.write(led, gpio.HIGH)
  tmr.delay(20000)
  gpio.write(led, gpio.LOW)
  tmr.delay(200000)
end
Next is a demo of using interrupt:
led=2
button=3
gpio.mode(led, gpio.OUTPUT)
gpio.write(led, gpio.LOW)
gpio.mode(button, gpio.INT)
function button_cb(level)
  if level==0 then
    gpio.write(led, gpio.HIGH)
  else
    gpio.write(led, gpio.LOW)
  end
end
gpio.trig(button, "both", button_cb)
This sets up an interrupt for GPIO3 (connected to button), which triggers a call back function when the button is clicked. Lua supports anonymous inline function, similar to JQuery. So you can also write the code this way:
gpio.trig(button, "both", function(level)
  if level==0 then
    gpio.write(led, gpio.HIGH)
  else
    gpio.write(led, gpio.LOW)
  end
end)
If anonymous functions are new to you, this can look a bit weird. But you will quickly get used to it, and find it convenient.
WiFi Web Server 101. While the above examples replicate what an Arduino can do, the power of ESP is in its WiFi capability and creating web services. For example, the following code creates a WiFi access point named ESPToy-xx (where xx is the last byte of the MAC address) with password opendoor:
wifi.setmode(wifi.SOFTAP)
cfg={}
cfg.ssid="ESPToy" .. (string.sub(wifi.ap.getmac(), 15,17))
cfg.pwd="opendoor"
wifi.ap.config(cfg)
Similarly you can easily set it to run in client mode and log on to an existing WiFi network.
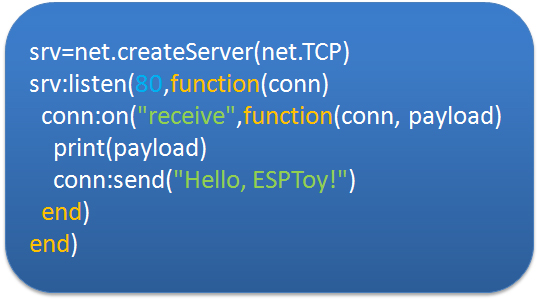
Next, to create a very simple HTTP server, use the following script:
srv=net.createServer(net.TCP)
srv:listen(80,function(conn)
  conn:on("receive",function(conn, payload)
    print(payload)
    conn:send("Hello, ESPToy!")
  end)
  conn:on("sent",function(conn)
    conn:close()
  end)
end)
It creates a TCP server, listening to port 80. Upon receiving a web request, if sends back a simple webpage and closes the connection. Now log on to the ESPToy-xx WiFi, open a browser and type in 192.168.4.1, you will see the webpage returned by the module. If this was to be done with the AT firmware, you would have to use a microcontroller to send commands to ESP, and the code size can easily triple or quadruple the above script. So it’s a total time saver!
File System. Another advantage of the Lua firmware is that it supports a file system. The ESP-12 SMD module has 512KB flash memory space, enough to store many scripts and data files. If this was to be done on the Arduino, you would have to use a SD card shield or EEPROM shield to provide compatible size of storage. So this is yet another invaluable feature.
Using ESPlorer. To work with ESPToy 1.2, I recommend using the ESPlorer software — a Java-based GUI for easily uploading scripts to the ESP module. It supports sending individual commands, saving scripts to files, running script files, removing files. If a script named init.lua exists on the module, the firmware will automatically execute the script upon booting. This is how the startup demo is set to run.
Re-Flashing Firmware. To upgrade the firmware (to newer Lua versions), or to revert back to the AT firmware, you can use the esptool — a Python-based script. Using ESPToy, press and hold the on-board pushbutton while plugging in a mini-USB cable. This will allow the ESP module to enter bootloading mode. Then run esptool to upload a new firmware.
Resources. You can find additional information and examples projects using the Lua firmware from the following websites:
- Programming ESPtoy with Arduino
- ESPToy Homepage
- ESPToy Github Repository
- Latest Lua (Nodemcu) Firmware
- ESP8266 Community Forum
Also, you may want to check a few tutorials of the Lua programming language to get familiar with it.
Purchase Link. In conclusion, this post is meant to be a crash course of the Lua firmware and the basic usage instructions of ESPToy 1.2. This new version of ESPToy is immediately available at the Rayshobby Shop — it replaces the previous version, and is priced at $16 ($8 cheaper than the previous version!). Give it a try, and have fun!