There has been an unexpected delay in the enclosure processing: the order was supposed to arrive by Monday this week but is now pushed back to Friday next week. As a result, all orders that include an OpenSprinkler enclosure will be delayed. I am really sorry about the delay. It is unfortunate and unexpected. The way we currently order enclosures is through Electronic Precepts (http://electronicprecepts.com/): they order in bulk from Serpac and machine custom cutouts for us. While on vacation last week, I sent an inquiry email and learned that there will be a delay due to machine down time. Initially I was told it would come today, but the latest status is that it’s more likely to come Friday next week. I know the folks who have ordered OpenSprinkler / OpenSprinkler Pi have been waiting eagerly for their orders to arrive. Sorry about that! I wish I had control over the enclosure processing. Meanwhile if you want to cancel the order, or want to receive the board first and enclosure later in a separate package, feel free to let me know. Thanks for understanding!
OpenSprinkler March 2013 Update
Tomorrow we will be flying south to Peru for a one-week spring vacation (yes, that’s right!) I am very excited about the trip, and am looking forward to visiting Machu Picchu 🙂 Before I go off and get lost in exploring the ancient world, some quick updates about what’s happening recently:
- OpenSprinkler Pi is back in stock as of last week, and about 50 have already been shipped out. One user on the Rayshobby forum, Ric, pointed out that the original Python demo code only worked for RPi rev. 1. It turns out, as Ric discovered, that RPi rev. 2 has changes the pin numbers of a few GPIO. So if you own a rev. 2, you should update your code from GitHub, and follow the instructions in README.txt to modify a pin number in your Python code. Thanks Ric for finding this out!.
- OpenSprinkler 1.4u will be the last DIY, all through-hole version. As soon as it sells out (there are only a couple of them left in stock), we will discontinue the DIY kits. The main reason is that the support overhead for DIY kits has gradually become too high for me. Although we don’t officially provide any assembly support for DIY kits, when users get into trouble and can’t fix problems themselves, I hate to see them go and have to jump in to help, sometimes even asking them to send the kits back to me so I can fix soldering mistakes for them. This is simply not sustainable any more. One way to solve the issue is to have a community of people to help each other, but i don’t see that happening on OpenSprinkler any time soon. So the only solution is to let go the DIY version. Sorry folks!
- We will be going to the Bay Area Maker Faire again this year. I’ve just submitted the proposal to Maker Faire and hopefully it will be accepted. If you are planning to be there too, feel free to come by, hang out with us and watch demos 🙂
- Since we are going off for vacation, we won’t be shipping packages until Monday March 25. Meanwhile I will still be checking emails, although probably no more than once a day.
All right, time to pack and prepare for the trip tomorrow. Thanks for reading this post!

Custom OpenSprinkler Enclosure — Part II
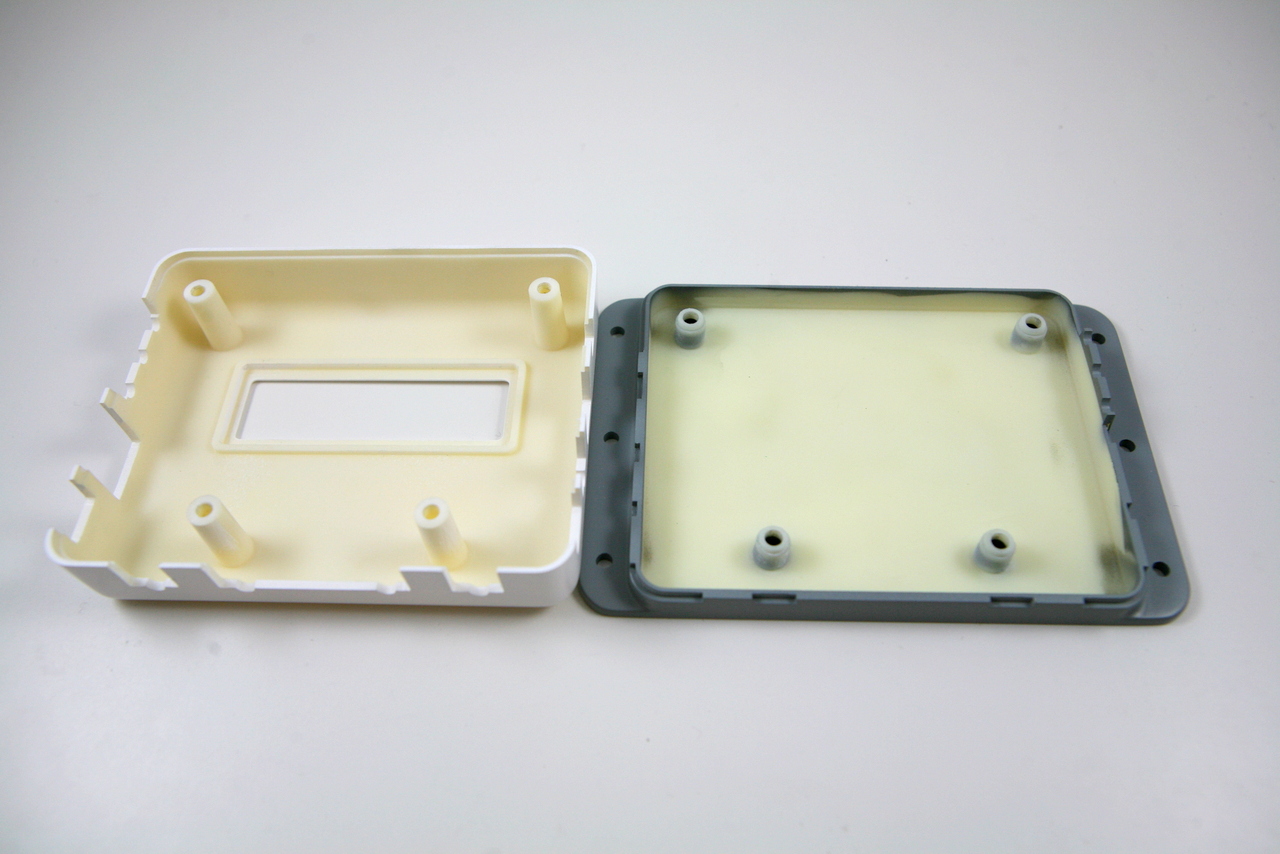
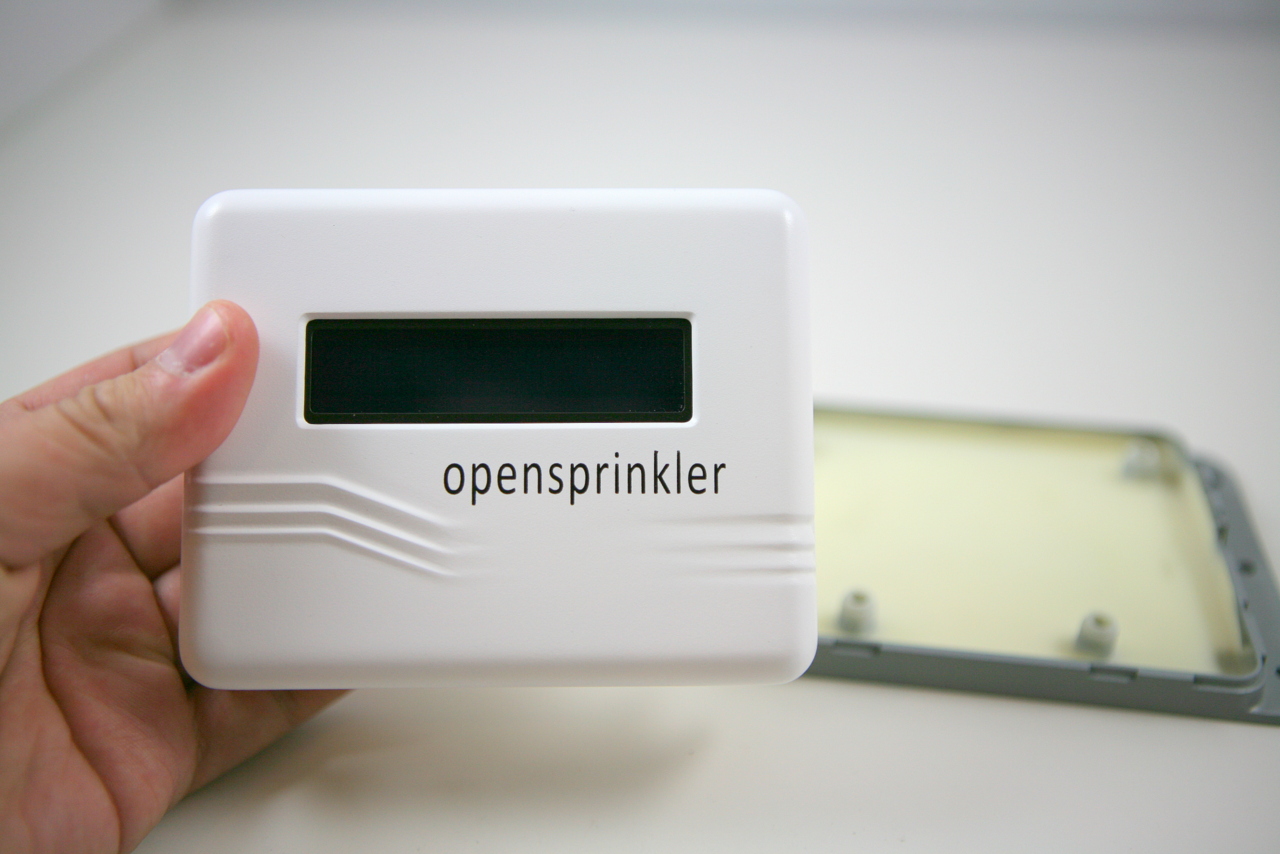
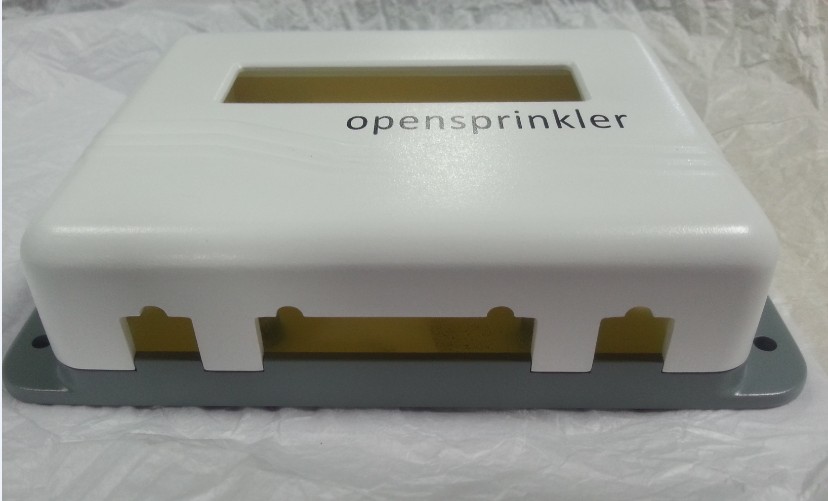
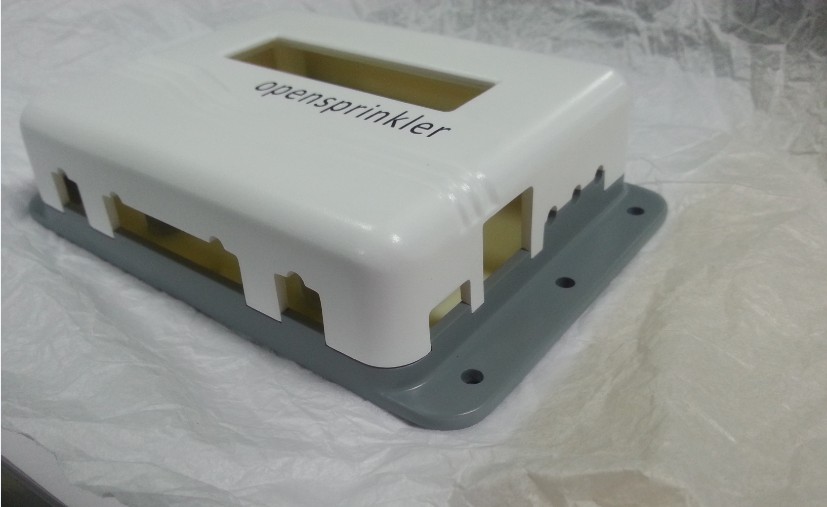
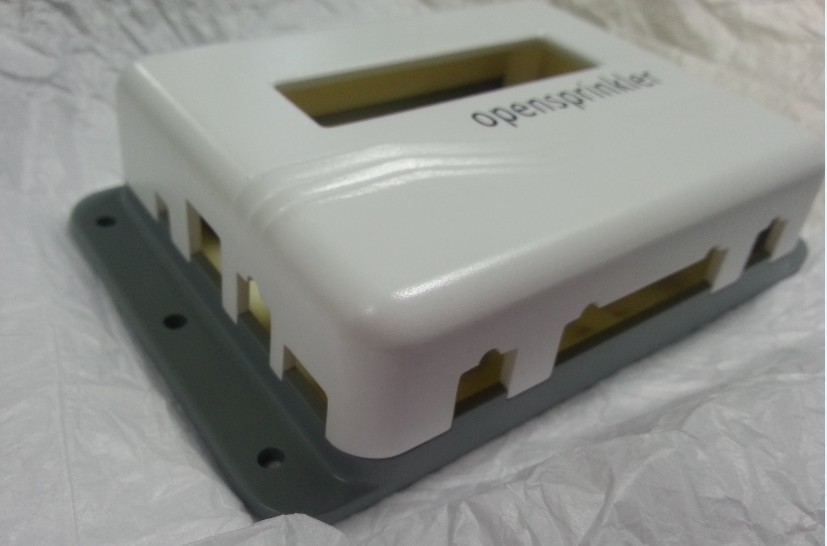
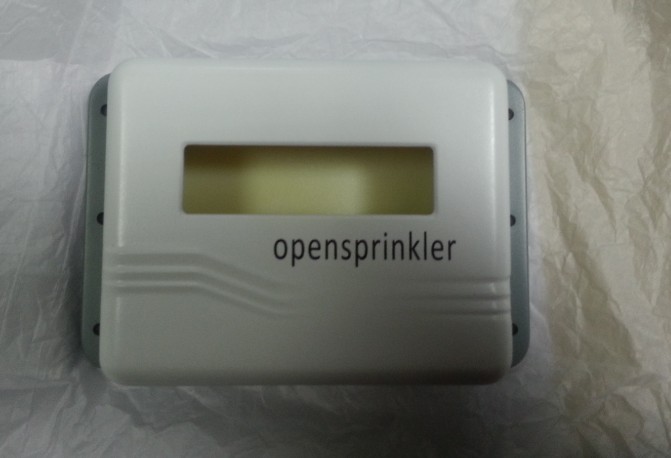
Today I received the 3D printed prototype enclosure from Seeed. It was supposed to arrive on last Friday but due to a snow (which affected nothing) DHL didn’t deliver that day. In any case, I got it today, and it is beautiful! Check out the pictures below:

A couple of quick notes:
- The new enclosure will use opaque material (instead of transparent plastic as the current enclosure). So there is now a cutout for the LCD on the top. This will give it a more professional look.
- The designer at Seeed recommended a clever design that uses a single set of 4 screws to simultaneously fix the top and bottom pieces together, and the PCB in the middle. This reduces the number of screws and provides more PCB space.
- There is now a cutout for the expansion board connector which makes it easy to plug in cables without opening the enclosure.
Overall I am very satisfied with the prototype. There is still some verification I have to do to make sure the PCB and components fit well with the enclosure. Hopefully I will place the mold order soon!
Custom OpenSprinkler Enclosure using Injection Modeling
As mentioned in a previous post, I have been working with SeeedStudios to design a custom OpenSprinkler enclosure. Thus far I have been using an off-the-shelf Serpac WM-032C clear plastic enclosure, and I have Electronic Precepts to machine the cutouts. It was a good start and really easy to design, but the cost can quickly add up as I order more from them. Over time, it’s make more and more sense to design a custom enclosure using injection molding, in order to reduce the per unit cost.
The initial design has been finalized and a 3D printed prototype is on its way to me. I am very excited because this will be the first injection-molded OpenSprinkler enclosure! It’s a pretty heavy one-time cost (the mold costs about $5,000 to make), but it’s fun and I think it’s worth the investment. I am supposed to receive the prototype today, but a snow prevented DHL from delivering today. So I have to look forward to Monday. But below I attached some pictures Seeed sent me. They are enough to enjoy for a while 🙂 More pictures will come after I receive it on Monday.
OpenSprinkler Pi Back in Stock
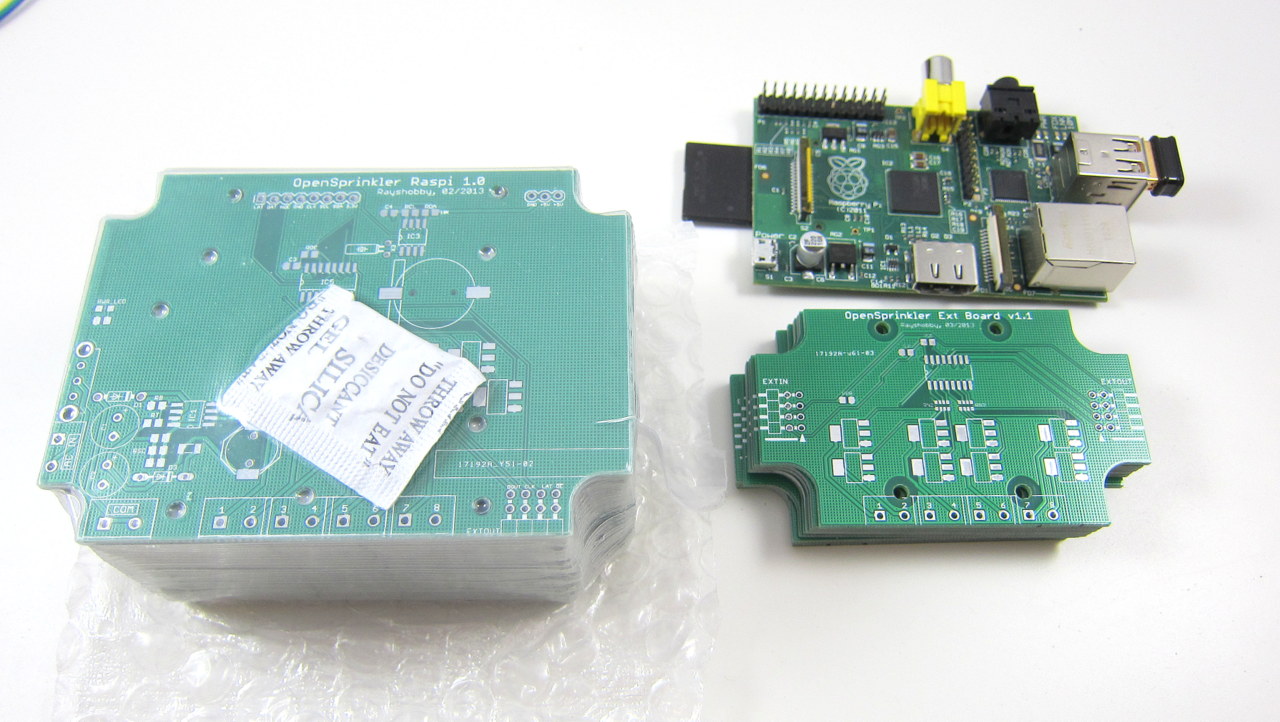
OpenSprinkler Pi (OSPi) v1.0 is back in stock and available for shipping now. The kit includes one assembled and tested OSPi board, separation pillars, terminal blocks, 8-pin and 3-pin connection cables, and optional enclosure. You need to provide your own Raspberry Pi, and 24VAC sprinkler transformer. The board controls 8 zones, and can connect to standard OpenSprinkler zone expansion board to enable additional zones. Grab it now before it goes out of stock again!
I would really like to give a big thumb-up to smart-prototyping.com. This is the first time I ordered PCBs from them (I got the link from dangerousprototypes.com), and I wasn’t sure what to expect. The order was placed on Feb 26 right after the initial batch of OSPi sold out. I selected DHL shipping (about $30) since I need it to be quick. On Feb 28 I decided to place a smaller order for the new zone expansion board prototype PCB, and I selected economy air shipping (about $4) since I don’t care how fast it comes. Then on March 5, exactly one week after placing first order, I noticed it got shipped out. I happily received the package on March 7. This is a total turn around time (from ordering to delivery) of only 9 days! What’s more surprising is that when I opened the package, I found my second order is also included. They must have figured out that since both orders are going to the same address, and both were ready upon shipping of the first order, why not put them together and use the fastest shipping. Clever! I am really impressed by their processing speed and the super-fast shipping time. Also, the PCB quality is very good, and their price is even cheaper than SeeedStudios. Highly recommended, and will definitely order from them again!