Dead-Simple Driver Installation for USBasp and USBtiny on Windows

Today I came across a surprisingly simple approach to installing USBasp and USBtiny drivers for all versions of Windows — XP, 7, 8, 8.1, whether 32-bit or 64-bit, all inclusive! As you may know, installing open-source drivers such as USBasp and USBtiny have been a great pain on some of the recent Windows OS, due to the enforcement of signed drivers. The typical solution involves rebooting Windows into a mode that disables driver signature enforcement. Even after you’ve done it once, if you boot into the normal mode next time, it may fail to recognize the driver again (reporting it’s not digitally signed). A huge source of frustration.

Anyways, while searching for ‘fully signed USBasp driver’, I came across this tool called Zadig, which can be used to install libusb drivers on all versions of Windows, and it’s digitally signed. Since USBasp and USBtiny are both based on libusb, could it be the right solution? To my great surprise it worked really well — I was able to install both drivers on Windows XP, 7 (32-bit and 64-bit), 8, and 8.1 instantly, without messing with driver signature enforcement at all. I was mostly surprised such a great solution wasn’t documented more widely online.

Instructions
  • Go to http://zadig.akeo.ie/ and download the software (note that Windows XP has a separate link).
  • Plug in your USBasp or USBtiny device. In case your microcontroller uses a USBasp or USBtiny bootloader, enter bootloading mode, and let Windows detect the device (it will report driver not found). If a window pops up asking to search for driver, just close it or click on Cancel.
  • At this point, run Zadig, it should detect the USBasp or USBtiny, or any libusb device that you have. Then in the selection box (see below), choose libusb-win32 (v1.2.6.0), and click on Install Driver, and wait for the installation to complete.

zadig_srceenshot
That’s it! Because the drivers are digitally signed, there is no hassle installing it in Windows 7 64-bit and Windows 8.1.

I will be updating the driver installation instructions for OpenSprinkler 2.1 and SquareWear right away, as they both use USBasp bootloader. Users have often complained that it’s frustrating to install USBasp driver for Windows 7 64-bit and Windows 8.1. Those days are now past!

Sneak Peak Preview of SquareWear 2.3

There is an upcoming MakerJam at Mount Holyoke College and I’ve been commissioned to create a new version of SquareWear, numbered 2.3. Following the suggestions I’ve received in the past, I made the first prototype of SquareWear 2.3:

IMG_0416IMG_0418

Below I list the main changes / improvements:

  • Added Hardware USB-serial Chip (CH340G) : this pretty much follows the same recent change on OpenSprinkler 2.2u. CH340G is a very inexpensive, easy-to-use USB-serial converter. It’s a low-cost replacement of the popular FTDI chip. With a hardware USB-serial chip, SquareWear can now use the same optiboot bootloader as standard Arduinos use. Also, cloud-based Arduino platform, like CodeBender would also work well with SquareWear. Even better, CH340G is supported out of box on Windows 7 and 8, so no more messing with installing USBasp driver, ever!
  • Added Breadboard Pins (dual-purpose): people asked about the possibility of adding breadboard pins, so in this version there are 13 pins on the right edge with standard 0.1″ spacing. These pins are also neatly laid out to serve a second purpose: they match some of the common I2C sensors (particularly MPU6050 6-axis accelerometer) and bluetooth transceiver. This way you can easily plug in sensors and bluetooth transceiver as optional add-ons! The picture on the right above shows how the board looks like with an MPU6050 and bluetooth transceiver plugged in. With this setup, you can easily make a project that involves motion sensor, and even transmit the signal wirelessly to a nearby computer!
  • Upgraded the 3.3V LDO to a bigger chip (SOT-89 packaging) that can provide higher current.
  • Added AT24C128 (16KB) EEPROM: this follows SquareWear Mini, where the added EEPROM can be useful for storing logging data and animation frames.
  • Removed Build-in Rechargeable Coin Cell: I was quite reluctant to make this change, because the built-in rechargeable coin has been one of the main selling points of the original SquareWear. But to make space for the added USB-serial chip, and also to add the breadboard pins, the built-in battery has to go. On the plus side, this makes the design focus on using external LiPo battery, which has higher capacity and the charging current is also suitable increased.

I will look forward to the MakerJam to receive some feedback / comments on the new design.

Announcing OpenSprinkler Firmware 2.1.0 (Major Upgrade)

I am excited to announce that OpenSprinkler Firmware 2.1.0 is officially release. This is a major upgrade that includes a number of new features, including:

  • Automatic Weather-based Water Time Adjustment using real-time weather data obtained from Wunderground (thanks to Rich Zimmerman who introduced the method, the adjustment method is named after him).
  • Improved Program Settings including per-station water time, flexible start times, custom name, per-program weather adjustment control, and up to 14 different programs.
  • Automatic Timezone and DST Detection based on your location. No need to select time zone and mess with DST any more — once you set your location, the firmware can automatically determine your time zone and DST.
  • Improved Station Attributes and Scheduler including station ‘disable’ attribute, ‘activate relay’ attribute, test station feature (replacing the previous manual mode), automatic serialization of overlapping schedules, and the ability to manually start a program on the controller using buttons.
  • Numerous UI Improvements (thanks to Samer’s hard work) including unified mobile interface, export / import configurations, improved visualization of logging data, and the number of supported languages has expanded to 17 (thanks to all who contributed)!

This is a pretty major milestone as it not only addresses the previous limitations but also introduced critical new features including weather-based control. Furthermore, consider all these are implemented on a small microcontroller with only 64KB flash memory and 4KB RAM 🙂 These significant changes are worth making a new video for. So here is the video tutorial for firmware 2.1.0 (it’s a bit long, but gives you a comprehensive overview of the main features);
http://youtu.be/iUrnf4nIuY4?list=UUl5dnj8oj_9dg6KIbudYmOw


Documentation

With this firmware I’ve also written a more detailed user manual, and API documentation. These are available on the Support page of our new website www.opensprinkler.com. In addition, there are a total of 4 tutorial videos that walk you through the hardware installation, WiFi connection, firmware features, and upgrading firmware. Be sure to check them out first.


Upgrade to Firmware 2.1.0

All OpenSprinkler 2.x devices (including 2.0, 2.1, and 2.2) are eligible to upgrade to firmware 2.1.0. Please check the ‘Firmware Update’ instructions on the support page to download and run the firmware updater. OpenSprinkler 2.0 and 2.2 are the easiest as drivers are pretty straightforward to install, and there is no bootloading procedure; OpenSprinkler 2.1 is tricky because the driver installation is more involved, and there is a bootloading procedure you need to follow. In any case, the firmware upgrade tutorial video gives you a quick walk-through of all the steps.

To use the weather feature, you need to apply for a Wunderground API key. Again, instructions can be found on the support page.

Firmware 2.1.0 has gone through internal alpha testing and external beta testing, so it should be pretty stable. For issues and suggestions, please use the forum, or the support page to submit support tickets.


Implementation

When I say ‘all these are implemented on a small microcontroller with only 64KB flash memory and 4KB RAM’, it’s not entirely true — the weather feature and timezone / DST detection are actually implemented using Python scripts hosted at www.opensprinkler.com. Why? Because these require fairly heavy processing power that’s simply beyond the capability of a small microcontroller. So they are implemented by using Python scripts that serve as the ‘middle man’ — retrieving data from weather websites, perform the necessary parsing and computation, and produce the final results to send back to OpenSprinkler. This way the heavy computation is done in the cloud, and OpenSprinkler only needs to poll the server once in a while to update the results. If you are interested in customizing the scripts, you can download the Python scripts from OpenSprinkler Github repository, modify them and host them on your own server. But for most people the default provided script should work pretty well.


Upcoming Features

As this firmware has been rolled out, we are getting excited to decide on the new features for the next round. Some planned features include:

  • Additional station attributes including soil type, slope type, serial group.
  • Support to store programs and station settings onto the microSD card (effectively allowing unlimited programs).
  • Adding firmware support to interface with remote power sockets, so you can use OpenSprinkler to control power line devices like heaters, fan, Christmas lights etc.
  • Support to use sunset and sunrise times for program start times (the sunset and sunrise times are already being detected using the timezone / DST script).
  • Support for flow sensor to monitor water consumption.
  • Cloud support: no more messing with port forwarding.

Suggestions and comments are welcome. Please post them below, or on the forum. Thanks!

os21s


Sneakpeak Preview of OpenSprinkler DIY kit v2.2u

We are getting ready to release the next minor revision of OpenSprinkler DIY kit, numbered 2.2u. This revision is largely the same with the current 2.1u, with three main differences:

  1. MCU clock speed is increased to 16MHz (from 12MHz previous), by using a 16MHz crystal.
  2. Built-in USB-Serial chip is added, by using CH340G, which is a common chip in low-cost USB-serial converters.
  3. With the hardware serial chip, the bootloader is also changed to use Arduino Optiboot, at 115200 bps baud rate and a bootloader size of only 512 bytes.

IMG_0249IMG_0248

The first change above is to increase the processing speed and hopefully make the controller faster at handling complex algorithms and transferring data with the Ethernet controller. The second change above is mainly to solve the issue that it has been increasingly painful to install USBasp driver on Windows 8+. To understand the background, all of these have to do with firmware upgrade — how to reflash the microcontroller with new firmwares. Back in OpenSprinkler 2.0, I used to have a separate ATtiny45 chip on board to function as a USBtinyISP programmer, which can reflash the main MCU (ATmega644). This is not an ideal design because it involves an extra chip that we have to program; also USBtinyISP is not particularly fast. So when I designed OpenSprinkler 2.1, I made the conscious decision to get rid of ATtiny45. Instead, I decided to implement a USBasp bootloader for ATmega644, which can present the MCU itself as a USBasp programmer when a button is pressed on start-up. This is quite appealing because no extra chip is required, and the programming speed is considerably faster. The only caveat is that to use USBasp in Windows, you need to install the open-source USBasp driver. This was not the most pleasant thing to do, but wasn’t a big deal as the driver was fairly easy to install.

That is until when Windows 8 came out, with this feature called driver signature enforcement. It basically means the driver needs to be digitally signed with Microsoft, otherwise it won’t allow you to install the driver. Let’s be honest, for open-source developers, who wants to pay the big bucks to get the driver signed? So suddenly this has created an even bigger barrier for average users. The only way around the issue is to boot Windows 8 into a mode that disables driver signature enforcement. This step turns out to be unnecessarily complicated. I’ve often received comments about how it’s painful to install USBasp driver for Windows 8. I recently made a video to demonstrate how to update OpenSprinkler firmware — in this 11-minute video, 6 minutes were spent purely on explaining how to install USBasp driver for Windows 8. That’s an evidence of how unnecessarily complicated it is!

Anyways, I set out to find a better solution, and was glad that I discovered the CH340 chip. It’s basically a USB-serial chip that is often found in low-cost USB-serial cables / converters. It’s really inexpensive (less than 30 cents) and requires very few peripheral elements (just a crystal and filter caps). With this chip, you can now use the standard serial monitor to debug your program, and the bootloader can also now use the standard Arduino bootloader.

ch340g_closeup

What I like the most about this chip though, is that it does not require driver for Windows 7, 8 and above. What? Is that even possible? Yup, I’ve verified it — Windows 7, 8 and 8.1 all recognized it right away. The fact that it doesn’t require driver just makes it a whole lot easier to upgrade firmware. Windows XP and Mac OS still require driver for it, though, but that’s light years better than installing driver for Windows 8.

You may be wondering: wait a minute, what about the FT232 chip, which has been available on the standard Arduino since the beginning? Isn’t what I am trying to do here already done? Sure, CH340 is basically a replacement for FT232 — both are USB-serial converters. But there is an economic reason to go for it: even at volume quantity like 1000, FT232 costs about $3 to $4 per chip. That compared to 30 cents for CH340? You tell me. Another nice thing about CH340 is that it comes with SOIC-16 packaging, which is very easy to solder even by hand. This makes it more appealing than other low-cost alternatives like PL2303 and CP2102.

OK, I’ve done enough advertisement. I am not in any ways associated with the company that makes this chip, I am just excited, and regret that I didn’t know about it earlier 🙂

First Impression on the ESP8266 Serial-to-WiFi Module


Check my new blog post on the ESP8266 Toy


Continuing from my previous blog post about Hi-Link HLK-RM04 module, I have finally received the ESP8266 Serial-to-WiFi module that I’ve been waiting for. As I said previously, with the popularity of IoT devices, there is an increasing demand for low-cost and easy-to-use WiFi modules. ESP8266 is a new player in this field: it’s tiny (25mm x 15mm), with simple pin connections (standard 2×4 pin headers), and best of all, it’s extremely cheap, less than US$3 from Taobao.com!

IMG_3188IMG_3189IMG_3190

What is Serial-to-WiFi? Simply put, it means using serial TX/RX to send and receive Ethernet buffers, and similarly, using serial commands to query and change configurations of the WiFi module. This is quite convenient as it only requires two wires (TX/RX) to communicate between a microcontroller and WiFi, but more importantly, it offloads WiFi-related tasks to the module, allowing the microcontroller code to be very light-weighted.

There are already a lot of excitements and resources you can find online about ESP8266. I’ve included a few links below:

These are great resources to reference if you need help working with ESP8266. Below I document my own experience. I’ve also bought a few extra and put them available on the Rayshobby Shop for anyone who is interested in buying the module and don’t want to wait for the long shipping time from China 🙂


Check my new blog post on the ESP8266 Toy


Pin Connections. ESP8266 is sold in several different versions. The one I received is the version with 2×4 male pin headers, and PCB antenna. In terms of the form factor, it looks a lot like the nRF24L01 2.4G RF transceiver. Here is a diagram of the pins:
ESP8266_pinout
Connect the top two pins (UTXD, GND) and bottom two pins (VCC, URXD) to the RXD, GND, VCC, TXD pins of a microcontroller. Note that VCC must be no more than 3.6V. The middle four pins are should be pulled up to VCC for normal operation. However, if you need to upgrade the firmware of the module, you need to pull the GPIO0 pin to ground — that way upon booting ESP8266 will wait for a new firmware to be uploaded through serial. This is how you can upgrade the firmware in the future.

A few quick notes for connection:

  • The typical operating voltage is 3.3V (acceptable range is 1.7V to 3.6V). As the module can draw up to 200 to 300mA peak power, make sure the power supply can deliver at least 300mA. For example, the 3.3V line from a USB-serial cable would be barely sufficient, in that case it’s better to use a LDO to derive 3.3V from the 5V line.
  • When using the module with a 5V microcontroller, such as a standard Arduino, make sure to use a level shifter on the URXD pin — a simple resistor-zener level shifter is sufficient. Again, this is to prevent over-voltage.

A schematic will make it clear. See below. In my case, I soldered the components and a matching female 2×4 pin header to a perf-board. This way I can easily plug in and unplug ESP8266. Again, if you are using a 3.3V microcontroller, you can do away with the LDO and zener diode.

esp8266_connIMG_3194

Experiments using a USB-Serial Cable. Before connecting to a microcontroller, it’s a good idea to use a USB-Serial cable (such as the inexpensive PL2303 USB-serial converter) to check out the basic functions of the module. Connect the PL2303 cable with ESP8266 according to the schematic above. Then open a serial monitor (such as gtkterms in Linux and putty in Windows) with 11520 baud rate (my ESP8266 seems to be set to 115200 bard rate; earlier versions use 57600). Then you can use a list of AT commands to talk to ESP8266. The AT commands are pretty well documented on this page. Below are some example input (shown in bold font) and output that show how to reset the module, list available WiFi networks, check the WiFi network it’s connected to, list IP address, and firmware version etc.


AT
OK
AT+RST
OK
ets Jan 8 2013,rst cause:4, boot mode:(3,6)
wdt reset
... ...
chksum 0x46
csum 0x46
ready
AT+CWLAP
+CWLAP:(0,"",0)
+CWLAP:(3,"freefly",-49)
OK
AT+CWJAP?
+CWJAP:"freefly"
OK
AT+CIFSR
192.168.1.130
AT+GMR
00150900
OK

A Simple Demo using Arduino.
Next, I connected ESP8266 to an Arduino. Because Arduino is already using the TX/RX pins for bootloader, make sure to unplug ESP8266 while flashing the Arduino, otherwise you may not be able to upload a sketch successfully. Also, you can’t use TX/RX for printing debugging information, since ESP8266 will be using them to communicate with Arduino. Instead, you can use another pair of pins (e.g. D7 and D8) as software serial pins, and use a PL2303 serial cable to monitor the output. This will help print debugging information.

I’ve also experimented with using software serial to communicate with ESP8266, but that has failed — ESP8266 requires 115200 baud rate, and that’s a little beyond the capability of software serial. So you have to stick with the hardware TX/RX pins.

(Update: the code has been revised on Dec 14, 2014 to improve robustness, particularly for some of the latest ESP8266 firmwares. Right now there is still an issue that if the browser is closed before the transfer is completed, it may leave ESP8266 in the notorious ‘busy s’ mode, the only solution to which is to do a hard reset. If using the module in real products, make sure you have a way to use a microcontroller pin to reset the power of the module, thus providing a way to hard reset the module. It looks like future firmwares may be able to address this in software.)

The demo program first configures ESP8266 to log on to your WiFi network (SSID and password are given as macro defines at the beginning), then it sets ESP8266 as HTTP server with port number 8080, and it listens to incoming request. If you open a browser and type in http://x.x.x.x:8080 where x.x.x.x is the module’s IP address (printed to soft serial pins), you will see the output which is a list of analog pin values, and the page refreshes every 5 seconds. So this is a basic Hello World example that shows how ESP8266 can be configured as an IoT server, responding to incoming requests.

IMG_3193

Challenges. While my initial experiments with ESP8266 have been quite successful, I’ve also encountered minor issues that took me a while to figure out. For example, while the AT commands are well documented, they don’t seem extremely consistent — some commands allow question marks at the end, some don’t. I also see variations of the returned values from running the AT commands: sometimes there is an extra end of line character, sometimes there is none. These basically require a robust software library to handle all possible cases.

Overall I would say ESP8266 is a very promising WiFi module for IoT, particularly open-source IoT gadgets, because of its low cost, compact size, and the community development. It seems the manufacturer has also open source the firmware code, and thus the minor issues can probably be easily fixed through a firmware upgrade.

We have a small number of ESP8266 modules available in stock, and will continue to offer them if there are sufficient interests. Thanks!


Check my new blog post on the ESP8266 Toy


OpenSprinkler Firmware Update Program 2.0 (with Video Tutorial)

We’ve just released a new OpenSprinkler Firmware Update program, with a video tutorial to walk you through the steps of how to upgrade your firmware. Hopefully this will make it easy for users to transition to the upcoming Firmware 2.1.0, which has a number of significant new features and improvements.

The new update program is written in Qt, and does not rely on Java any more. It’s cross-platform just like before. It also supports downloading the latest firmwares from the OpenSprinkler Github repository, and auto-detect of your OpenSprinkler hardware version. If you are a Windows user (especially Windows 8 and 8.1), you will still have to go through the hassle of installing driver. The video tutorial shows you a step-by-step guide of how to install driver.

For those who are interested in modifying the OpenSprinkler firmware code, I am experimenting with CodeBender.cc, which is a cloud-based Arduino platform. It’s really convenient in that it’s essentially a web-based Arduino IDE that runs in a browser; it also make it easy for people to share their code and modifications. I think its convenience will likely lower the barrier of programming, and motivate more users to modify OpenSprinkler firmware code to add custom functionality. I’ve made requests to add OpenSprinkler to their list of supported boards. Hopefully I will hear back from them soon!

Rayshobby Products at Micro Center

We went to Boston for a concert last night and I swung by the Micro Center store at Cambridge, MA to check out the Rayshobby products that they carry in store.

IMG_0226IMG_0228

They have a pretty large ‘DIY Electronics’ section with all sorts of electronic goodies. This is what I pictured RadioShack should be.

After searching around a few times, I found the AASaver, SquareWear, and OpenSprinkler on one shelf. Very exciting! I do wish they were better organized, because as is, there are hundreds of kits and gadgets spread everywhere like baby toys at a daycare center. Seeing them in store does give me a good idea how to package the products more properly in the future.

IMG_0229IMG_0230

IMG_0232IMG_0233

So if you are interested in OpenSprinkler (DIY kit), AASaver, and SquareWear, and if you have a nearby Micro Center store, go and check them out. They also take online orders. I wonder if RadioShack could have been saved if they had taken the lead in offering a wider variety of DIY electronics products. Alas, it may be too late.

First Impression on HLK-RM04 Serial-to-WiFi Module


Check my new blog post on the ESP8266 Serial-to-WiFi module


As the Internet-of-Things (IoT) are becoming more and more popular, there is an increasing demand for low-cost and easy-to-use WiFi modules. For Raspberry Pi and BeagleBone, you can plug in a cheap USB WiFi dongle (like the popular Edimax 7811). These dongles are generally less than $10. But for microcontroller-based devices, the options are much fewer and generally more costly. For example, an Arduino WiFi shield can easily cost $40 to $50; even the more recent CC3000 module costs about $35. If you are puzzled by the big price difference: those cheap WiFi dongles require a USB host system, which is beyond the capability of Arduino. Still, it’s unsettling to realize that a WiFi module or shield would cost more than an off-the-shelf WiFi router, even though the router is significantly more powerful.

Recently I saw a post on Hack A Day alerting us about a new Serial-to-WiFi chip. I immediately ordered two of those. I honestly don’t know what I should expect from these $3 parts, but perhaps it’s a good push towards a new wave competitions on low-cost WiFi solutions. Anyways, while waiting for the shipment to arrive, it reminded me that a while back I actually bought something similar: a Hi-Link HLK-RM04 Serial-to-WiFi module. It’s about $10, so still pretty low-cost. I am glad I didn’t lose it, so I took it out of a pile of electronics and started experimenting with it.

IMG_0222IMG_0221

As you can see, the module is pretty small (about 40mm x 30mm). The picture on the right above shows the components underneath the metal shield. The chip (RT5350F) is a 360MHz MIPS core with built-in WiFi support. The module is quite powerful — at factory default settings it functions as a normal WiFi router. Now, in order to get it to talk to a microcontroller like Arduino, I need to use its Serial-to-WiFi capability. What is that? Well it means using the serial (TX/RX) interface to send and receive Ethernet buffers, and similarly using serial to send commands to the module and query or change its current status. This is quite convenient because first, it only takes two wires (TX/RX) of the microcontroller to talk to the module, second, it moves WiFI-related tasks to the module allowing the Arduino code to be very much light-weighted.


Check my new blog post on the ESP8266 Serial-to-WiFi module


Power-Up. To start the module you just need to provide +5V power. At the first use, the module boots up into a WiFi AP (access point) named Hi-Link-xxxx so you can actually log on to the WiFi network and change settings there. Here is what the homepage looks like (default IP: 192.168.16.254, default log-in: admin/admin):

hlk_rm04_1

Change Settings. For my purpose I need to set the module as a WiFi client so that it can log on to my home network, and allow the Arduino to communicate wirelessly through the module. So I changed the NetMode to WiFi Client – Serial, and put in my home network’s SSID and password. I also changed the Serial baud rate to 57600 (the default is 115200): the lower baud rate can help Arduino to communicate with it more reliably especially if I am going to use software serial. Make sure that the Local/Remote port number is set to 8080 or anything other than 80 (because 80 is reserved for the module’s homepage).

hlk_rm04_2

Receiving Data. Now after the module boots up, it appears as a device on my home network (for example, 192.168.1.147). If I type in 192.168.1.147 in a browser, I will still see the same homepage as above. However, now I can communicate with the module’s serial interface through port 8080. To see what’s going on, I used a PL2303 USB-serial converter: connect the serial converter’s +5V, GND, TXD, RXD to the WiFi module’s +5V, GND, RX, TX (note TXD->RX and RXD->TX), then I opened a serial monitor at 57600 baud rate (putty in Windows or gtkterms in Linux). Now type in http://192.168.1.147:8080 in a browser, I get the following output on the serial monitor:

GET / HTTP/1.1
Host: 192.168.1.147:8080
Connection: keep-alive
Accept: text/html,application/xhtml+xml,application/xml;q=0.9,image/webp,*/*;q=0.8
User-Agent: Mozilla/5.0 (X11; Linux x86_64) AppleWebKit/537.36 (KHTML, like Gecko) Chrome/37.0.2062.94 Safari/537.36
Accept-Encoding: gzip,deflate,sdch
Accept-Language: en-US,en;q=0.8,zh-CN;q=0.6,zh;q=0.4

Cool, this means the Ethernet buffer has been received through the serial RX pin. If I can then send something back through the serial TX pin, like acknowledgement plus HTML text, the data will be transferred back to the browser. This is basically how HTTP GET command works.

A Simple Arduino Example. To send data back through the serial TX pin, I used an Arduino to set up a simple example. To get reliable communication, I used Arduino’s hardware RX/TX (0/1) pins. The drawback of this is that when you program the Arduino you need to temporarily disconnect the WiFi module from these two pins, otherwise they will interfere with the uploading process. Here is a picture of the setup:
hlk_rm04_3

Next, I wrote an Arduino program to print out the analog values of A0 to A5. This is actually modified from the WebServer example in the Arduino Ethernet Shield library:

void setup() {
  Serial.begin(57600);
}

void loop() {
  boolean has_request = false;
  if (Serial.available()) {
    while(Serial.available()) {char c = Serial.read();}
    has_request = true;
  }
  if (has_request) {
    Serial.println("HTTP/1.1 200 OK");
    Serial.println("Content-Type: text/html");
    Serial.println("Connection: close");  // the connection will be closed after completion of the response
    Serial.println("Refresh: 5");  // refresh the page automatically every 5 sec

    String sr = "\n";
    sr += "

Basically receiving/sending Ethernet buffers is done through reading/writing into serial. Now open a browser and type in http://192.168.1.147:8080, I see the following:

analog input 0 is 521
analog input 1 is 503
analog input 2 is 498
analog input 3 is 510
analog input 4 is 525
analog input 5 is 548

Pretty cool, isn’t it! 🙂 If I have a SD card connected to Arduino, I can also serve files, such as Javascripts or logging data, from the SD card.

Blinking LEDs. By analyzing the received buffer, I can also implement various HTTP GET commands. For example, the program below sets the LED blinking speed by using http://192.168.1.147:8080/blink?f=5 where f sets the frequency.

void setup() {
  Serial.begin(57600);
  pinMode(13, OUTPUT);
}

int f = 0, pos;
void loop() {
  boolean has_request = false;
  String in = "";
  if (Serial.available()) {
    in = "";
    while (true) {  // should add time out here
      while (Serial.available() == false) {}
      in += (char)(Serial.read());
      if (in.endsWith("\r\n\r\n")) {
        has_request = true;  break;
      }
    }
  }
  if (has_request) {
    int i1 = in.indexOf("GET /blink?f="), i2;
    if (i1 != -1) {
      i2 = in.indexOf(" ", i1+13);
      f = in.substring(i1+13, i2).toInt();
    }
    Serial.println("HTTP/1.1 200 OK\nContent-Type: text/html\nConnection: close");
    String sr = "\n";
    sr += "\n";
    sr += "LED frequency: ";
    sr += f;
    sr += "Hz.";
    Serial.print("Content-Length: ");
    Serial.print(sr.length());
    Serial.print("\r\n\r\n");
    Serial.print(sr);
    has_request = false;
  }
  if (f>0) {
    static unsigned long t = millis();
    if (millis() > t + 1000/f) {
      digitalWrite(13, 1-digitalRead(13));
      t = millis();
    }
  }
}

More on Changing Settings. Instead of using the WiFi module’s homepage to configure settings, you can also change settings by sending serial commands to the module directly. This can be done by pulling the RST pin on the module low for a couple of seconds, which switches the chip in AT command mode. Then you can send (through serial) any of the listed AT commands to change parameters such as SSID and password. This is a nice way to add some automation to the configuration process. Details can be found in the module’s datasheet.

Drawbacks. The main drawback of a Serial-to-WiFi module is that the data transfer speed is quite low. I tested transferring a file stored on SD card and am only getting 5 to 7 KB/s. This means to transfer a 1MB file it will take 3 minutes. Clearly not a good solution for bulk data. Another drawback is that if you need to restart the WiFi module it generally takes 35 to 50 seconds to boot up, that can be an issue for the impatient. Fortunately you likely don’t need to reboot the WiFi module frequently.

Overall the HLK-RM04 Serial-to-WiFi module is a reasonable and low-cost solution for adding WiFi to Arduino and similar microcontroller boards. At the price of $10, there is no much more you can ask for 🙂

Understanding 24VAC Sprinkler Valves

Note: check out our OpenSprinkler DC-powered version, which uses an innovative circuit design that drives sprinkler solenoids using DC-only voltage.

I often get questions about sprinkler valves, so in this post I will explain the basic electric properties of sprinkler valves. If you are designing a sprinkler controller circuit, understanding these properties can be helpful. It’s a common mistake to assume sprinkler valves work with DC voltage. While most valves indeed CAN be powered by DC voltage (see below), they are designed to work with AC voltage in the range of 22VAC to 28VAC. That’s why if you look at a standard sprinkler transformer, the output is usually AC.

The electric part of a sprinkler valve is the solenoid — it’s a cylindrical-shaped thing screwed into the valve. At the center of the solenoid is a rod supported by a spring. The solenoid has two wires connected to its internal coil. Applying 24VAC on the two wires energizes the coil, and causes the rod to contract into the solenoid. This releases the internal water pressure thus opening the valve, allowing water to flow through the valve. Removing the voltage causes the rod to revert back to its original position. This allows the water pressure to build up internally hence stopping the flow. Because closing the valve relies on internal pressure build-up, it usually takes a few seconds to completely stop the water flow. This also means if your water pressure is too low you may not be able to completely stop the water flow.

IMG_0205IMG_0206

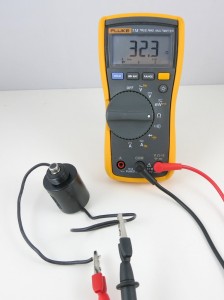
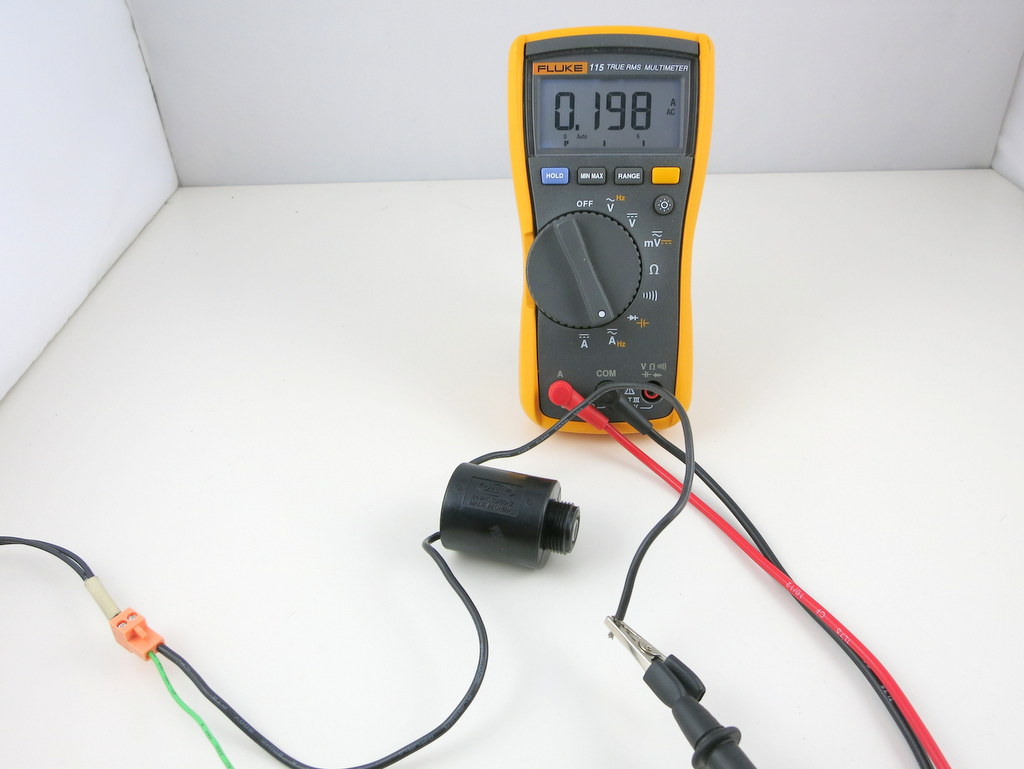
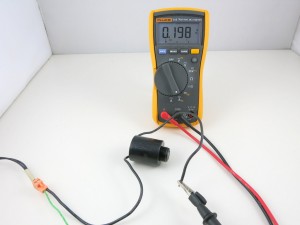
Let’s start by measuring the resistance of the sprinkler solenoid. I have two example solenoids, one made by Orbit and one made by Hunter. According to the multimeter, one measures 32.3 ohm, and the other measures 24.1 ohm. So the resistances are pretty low. If you think about it for a while, you might realize something is not quite right here: if we apply 24V on the solenoid, wouldn’t that produce a 24 V / 24.1 ohm = 1 amp current draw? That’s quite steep. In fact, my sprinkler transformer is only rated 750 mA output current, so it can’t provide enough current to drive even one solenoid?!

The catch is exactly in the fact that sprinkler solenoids are powered by AC voltage. Because the solenoid is made of a coil, it not only has coil resistance but also inductance. When operated on AC power, the inductance produces significant reactance which cannot be ignored. You can read the Wikipage to find out how reactance is calculated, but basically it has to do with the frequency of the input voltage, and the inductance of the coil. Because inductors ‘prevent’ current from changing rapidly, it behaves like a ‘resistor’ under changing current (i.e. AC). The higher the frequency, the higher the ‘resistance’ (i.e. reactance).

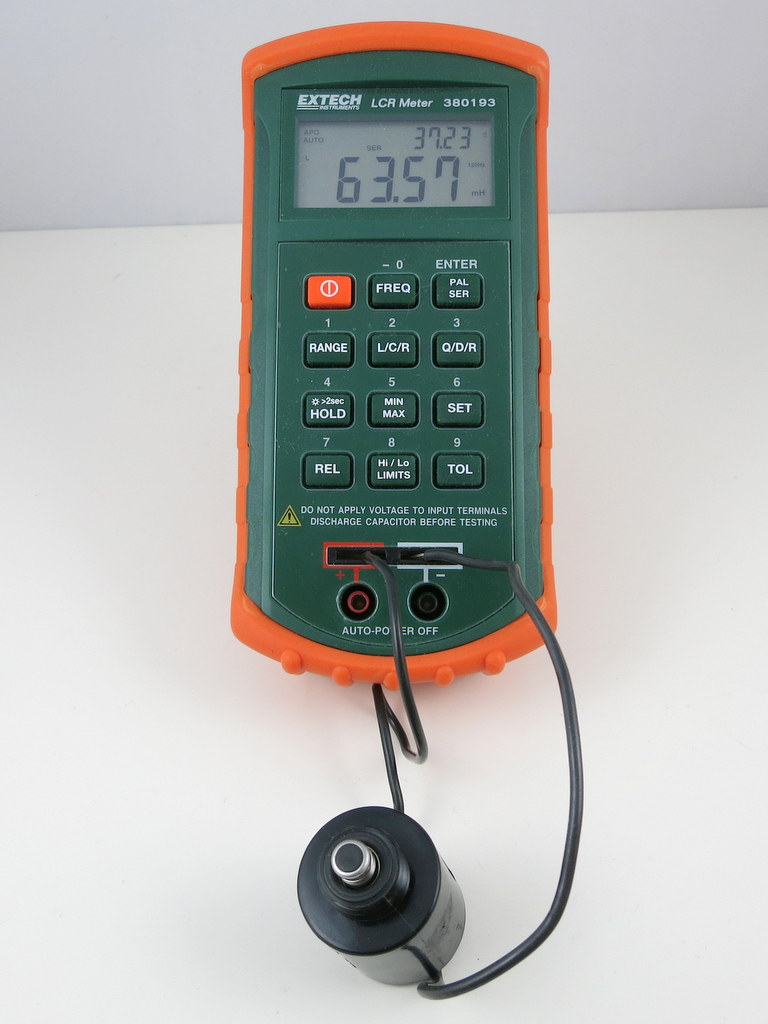
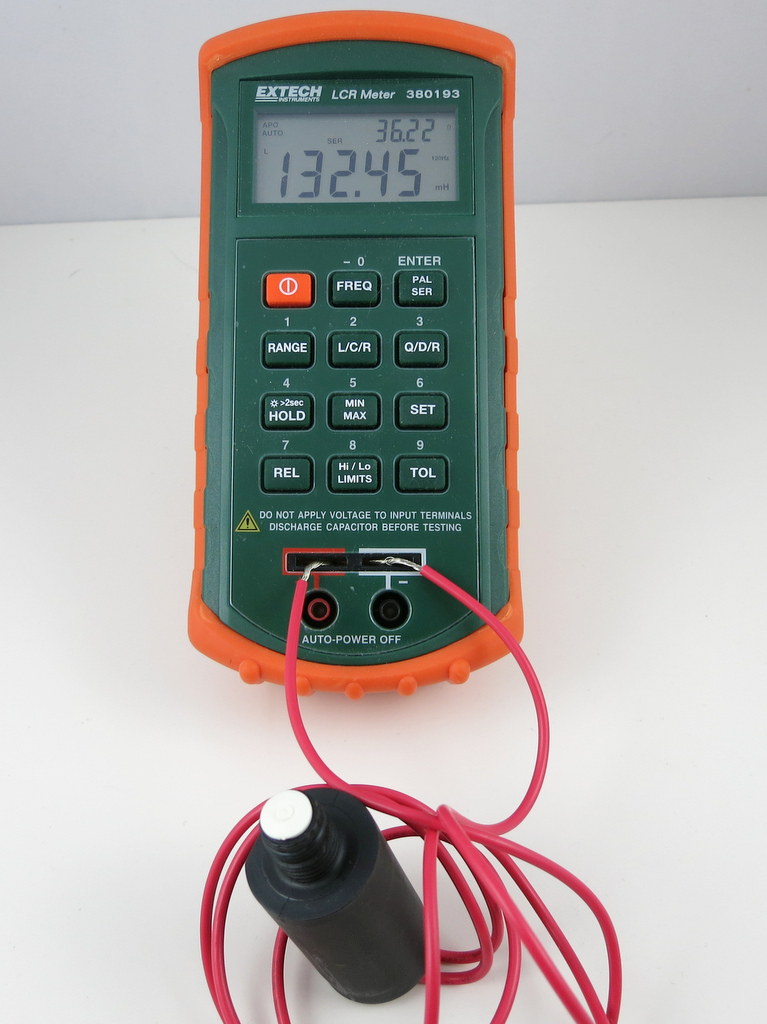
With an LCR meter, I measured the inductance of the two solenoids:
IMG_0207IMG_0209
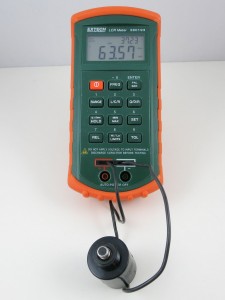
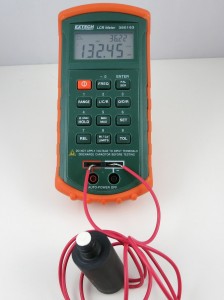
One reads 63.57 mH, the other 132.45 mH. So if we power the solenoids by 24VAC, 60Hz, which is the standard output of a sprinkler transformer, we will get a reactance of:

This, plus the resistance, gives a total impedance of:

Note that the reactance counts into the imaginary part of the impedance. Using complex numbers is just a convenient way of denoting not only the magnitude but also the phase. For example, when you apply a sinusoid voltage on the inductor, the corresponding current is also a sinusoid wave, but with a different phase. Using complex numbers, the calculation can be carried out quite easily.

Now we can calculate the operating current under 24VAC (rms). We only care about the magnitude, so the current (rms) would be:

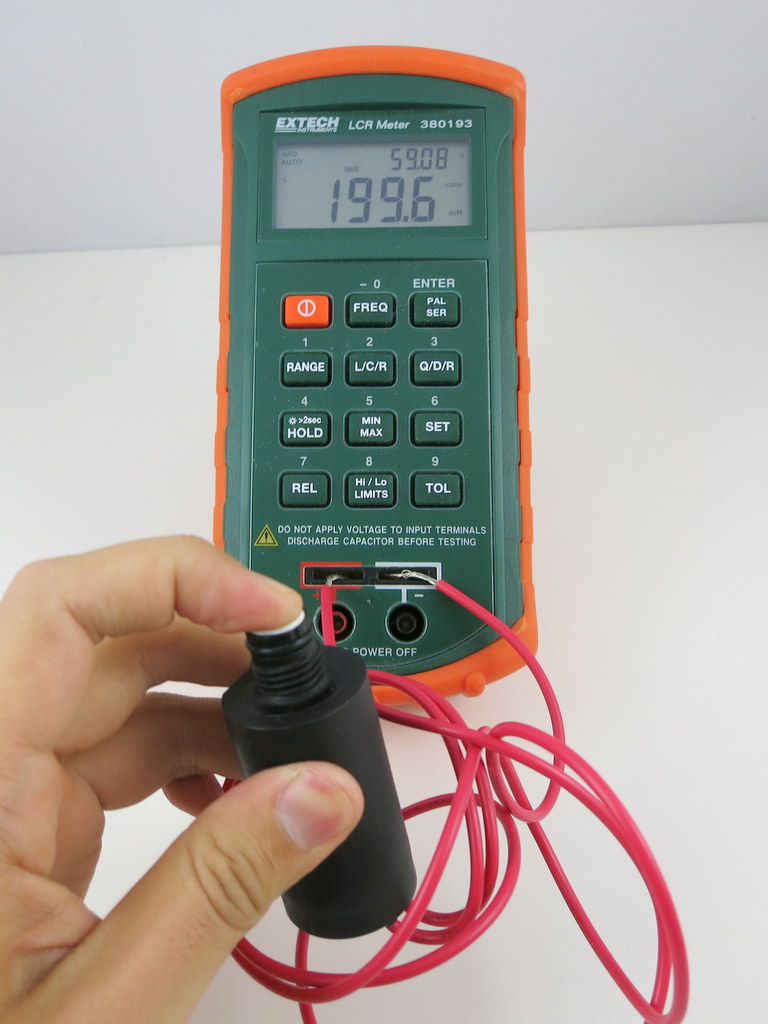
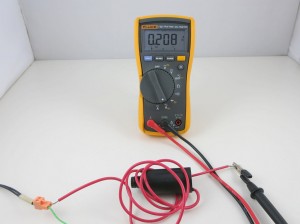
OK, so this is getting closer to the reality. But 0.6 amp current still sounds high. What is missing? Well, remember that when the solenoid is activated, the rod will be attracted into the solenoid, and that can change the inductance significantly. So let’s re-measure the inductance with the rod pushed in:

IMG_0208IMG_0210

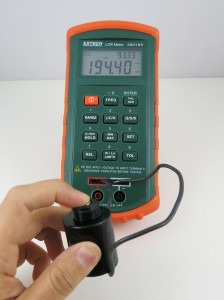
Indeed the inductance jumped from 63.57 mH and 132.45 mH previously to 194.4 mH and 199.6 mH respectively. OK, now if we redo the calculations, we will find out that the correct reactance is:

and current (rms) os:

The resulting current is about the same on the Hunter solenoid. So this roughly matches the electric specification of a typical sprinkler valve. It’s actually still a bit off: if we measure the actual AC current flowing through the solenoid:
IMG_0211IMG_0212

The readings are about 0.2 amp. I suspect the difference comes from the measurement of the inductance. On my LCR meter, which can measure inductance at two frequency levels: 120 Hz and 1 kHz, I find that the inductance is measured differently under the two frequencies. Because the actual operating frequency of the solenoid is 60 Hz, and my meter cannot measure 60 Hz, the inductance I am getting is probably somewhat off. That should explain the difference between the calculation and the actual current reading.

The 0.6 amp current we calculated above probably explains the inrush current: when the solenoid is just energized, there is an impulse current that’s typically higher than the holding current. This is because the rod is still out, and hence the reactance is lower, causing a higher current than when the rod is attracted in.

Operating Sprinkler Valves Under DC

Note: check out our OpenSprinkler DC-powered version, which uses an innovative circuit design that drives sprinkler solenoids using DC-only voltage.

From the calculations above, it’s obvious that the coil inductance is important at limiting the operating current when the valve is powered under AC. What about if we power the valve under DC? Obviously we shouldn’t use 24VDC, because that would draw too much current (0.75 to 1 amp). If you search online, you will find plenty of posts talking about powering sprinkler valves using 12VDC. This actually works well in general. Using 12VDC has advantages in that 12VDC power adapters are cheaper and much easier to find; the circuit design is simpler, and you can use the same circuit to interface with other DC devices like relays and motors. In contrast, 24VAC power circuits are more complex and you can’t use the same circuit to directly interface with DC devices.

However, you should be aware that because the sprinkler solenoid’s resistance is pretty low, the operating current under 12VDC will be relatively high, around 400 to 500 mA. This more than doubles the 200 mA operating current (rms) under 24VAC. Also, the coil will heat up more, and this potentially shortens its life. For example, under 12VDC, the Orbit valve above will dissipate 12 * 12 / 32.3 = 4.5 Watt; whereas under 24VAC, the same valve only dissipates 0.2 * 0.2 * 32.3 = 1.3 Watt (note that only the resistive portion dissipate power, inductive portion does’t).

Again, the issue is that under DC there is no reactance, so the coil’s inductance plays no effect at limiting the current. What if we reduce the voltage further to 9VDC, in order to reduce the operating current? After all, the solenoid only needs 200mA holding current to remain activated. Unfortunately that won’t work: I’ve tried powering solenoids with 9V, and I can’t get the valve to reliably energize. The problem is that 9V is not sufficient to provide the required inrush current, so the rod cannot get fully attracted in. However, if the rod is already in, 9V is sufficient to hold the solenoid activated. So if you really want to make it work with 9V, you need a circuit that can provide a high impulse voltage; then once the solenoid is activated, you can lower the voltage to reduce the current (hence power) consumption. A possible solution is to use a boot converter (very much similar to circuits for latching solenoids) to provide an impulse high voltage, but this comes at the cost of increased circuit and software complexity.

Reverse Engineer a Cheap Wireless Soil Moisture Sensor

At the Maker Faire this year I got lots of questions about soil moisture sensors, which I knew little about. So I started seriously researching the subject. I found a few different soil sensors, learned about their principles, and also learned about how to make my own. In this blog post, I will talk about a cheap wireless soil moisture sensor I found on Amazon.com for about $10, and how to use an Arduino or Raspberry Pi to decode the signal from the sensor, so you can use it directly in your own garden projects.

IMG_0183

What is this?
A soil moisture sensor (or meter) measures the water content in soil. With it, you can easily tell when the soil needs more water or when it’s over-watered. The simplest soil sensor doesn’t even need battery. For example, this Rapitest Soil Meter, which I bought a few years ago, consists of simply a probe and a volt meter panel. The way it works is by using the Galvanic cell principle — essentially how a lemon battery or potato battery works. The probe is made of two electrodes of different metals. In the left picture below, the tip (dark silver color) is made of one type of metal (likely zinc), and the rest of the probe is made of another type of metal (likely copper, steel, or aluminum). When the probe is inserted into soil, it generates a small amount of voltage (typically a few hundred milli-volts to a couple of volts). The more water in the soil, the higher the generated voltage. This meter is pretty easy to use manually; but to automate the reading you need a microcontroller to read the value.

IMG_0180IMG_0182

Resistive Soil Moisture Sensor
Another type of simple soil sensor is a resistive sensor (picture on the right above). It’s made of two exposed electrodes, and uses the fact that the more water the soil contains, the lower the resistance between the two electrodes. The resistance can be measured using a simple voltage dividier and an analog pin. While it’s very simple to construct, resistive sensors are not extremely reliable, because the exposed electrodes can degrade and get oxidized over time.

Capacitive Soil Moisture Sensor
Capativie soil sensors are also made of two electrodes, but insulated (i.e. not exposed). The two electrodes, together with the soil as a dielectric material, form a capacitor. The higher the water content, the higher the capacitance. So by measuring the capacitance, we can infer the water content in soil. There are many ways to measure capacitance, for example, by using the capacitor’s reactance to form a voltage divider, similar to the resistor counterpart. Another way is to create an RC oscillator where the frequency is determined by the capacitance. By counting the oscillation frequency, we can calculate the capacitance. You can also measure the capacitance by charging the capacitor and detecting the charge time. The faster it charges, the smaller the capacitance, and vice versa. The Chirp (picture below), which is an open-source capacitive soil sensor, works by sending a square wave to the RC filter, and detecting the peak voltage. The higher the capacitance, the lower the peak voltage. Capacitive sensors are not too difficult to make, and are more reliable than resistive ones, so they are quite popular.

chirp

More Complex Soil Sensors
There are other, more complex soil sensors, such as Frequency Domain Reflectometry (FDR), Time Domain Reflectometry (TDR), and neutron sensors. These are more accurate but also will cost a fortunate to make.

Wireless Soil Moisture Sensor
Because soil sensor is usually left outdoors, it’s ideal to have it transmit signals wirelessly. In addition, because soil moisture can vary from spot to spot, it’s a probably good idea to use multiple sensors distributed at different locations to get a good average reading. Wireless would make it more convenient to set up multiple sensors.

Recently I found this 433MHz wireless soil sensor from Amazon, for only $10, very cheap. It comes with a transmitter unit and a receiver display unit. The transmitter unit has a soil probe. The receiver unit has a LCD — it displays soil moisture level (10 bars) and additionally indoor / outdoor temperature. Let me open up the transmitter to see what’s inside:

IMG_0177IMG_0178IMG_0179IMG_0181

There is a soil probe, a 433MHz transmitter, a microcontroller at the center, a thermistor, and a SGM358 op-amp. Pretty straightforward. The soil probe looks quite similar to the battery-free soil meter probe that I mentioned above. So I am pretty sure this is not a resistive or capacitive probe, but rather a Galvanic probe. Again, the way it works is by outputting a variable voltage depending on the water content in soil. By checking the PCB traces, it looks like the op-amp is configured as a voltage follower, which allows the microcontroller to reliably read the voltage generated by the Galvanic probe.

Now we understand the basic principle of the sensor, let’s take a look at the RF signal from the sensor. I’ve done quite a few similar experiments before, so I will just follow the same procedure as described in this post.

Raw Waveform. To begin, I use a RF sniffing circuit to capture a raw waveform, which looks like this:

soil_waveform

Encoding. Each transmission consists of 8 repetitions. The above shows one repetition: it starts with a sync signal (9000us low); a logic 1 is a impulse (475us) high followed by a 4000us low; a logic 0 is the same impulse high followed by a 2000us low. So the above signal translates to:

11110011 01100000 11111111 00111001 1111

The signal encodes both temperature and soil humidity values. By varying temperature and soil moisture, and observing how the signals change, it’s pretty easy to figure out that the 12 bits colored blue correspond to temperature (10 times Celcius), and the 8 bits colored red corespond to the soil moisture value. The first 12 bits are device signature, which is quite typical in this type of wireless sensors; the last four bits are unclear, but likely some sort of parity checking bits for the preceding four bytes). So the above signal translates to 25.5°C and a soil moisture value of 57.

The display unit shows soil moisture level in 10 bars — 1 to 3 bars are classifed as ‘dry’, 4 to 7 bars are classified as ‘damp’, and above 7 bars are classified as ‘wet’. How does this translate to the soil moisture value? Well empirically (from the data I observed) the dry-damp boundary is around 60, and damp-wet boundary is around 100.

Arduino Program. I next wrote an Arduino program to listen to the sensor and display the soil moisture value and temperature to the serial monitor. For this you will need a 433MHz receiver, and the program below assumes the receiver’s data pin is connected to Arduino digital pin 3. Because the encoding scheme is very similar to a wireless temperature sensor that I’ve analyzed before, I took that program and made very minimal changes and it worked instantly.

IMG_0051soil_display_arduino

Raspberry Pi Program. By using the wiringPi library, the Arduino code can be easily adapted to Raspberry Pi. The following program uses wiringPi GPIO 2 (P1.13) for data pin.

IMG_0185IMG_0184

I haven’t done much tests about the transmission range. I’ve put the sensor at various locations on my lawn, and I’ve had no problem receiving signals inside the house. But my lawn is only a quarter acre in size, so it’s not a great test case.

One thing I really liked about using off-the-shelf sensors is that they are cheap and have ready-made waterproof casing. That combined with an Arduino or RPi can enable a lot of home automation projects at low cost.